How Do I Clean Dryer Vent Duct: A Practical Homeowner Guide
- Jan 4
- 14 min read
At its core, cleaning your dryer vent is a pretty straightforward job. You’ll need to disconnect the dryer, pull off the vent tube, and then use a special brush kit and a vacuum to clear out all the lint that’s built up inside the ductwork. It might sound like a hassle, but this simple task is absolutely essential for preventing house fires and making your dryer run better. The whole thing usually takes less than an hour and drastically improves your home's safety.
Why Cleaning Your Dryer Vent Is a Critical Safety Task
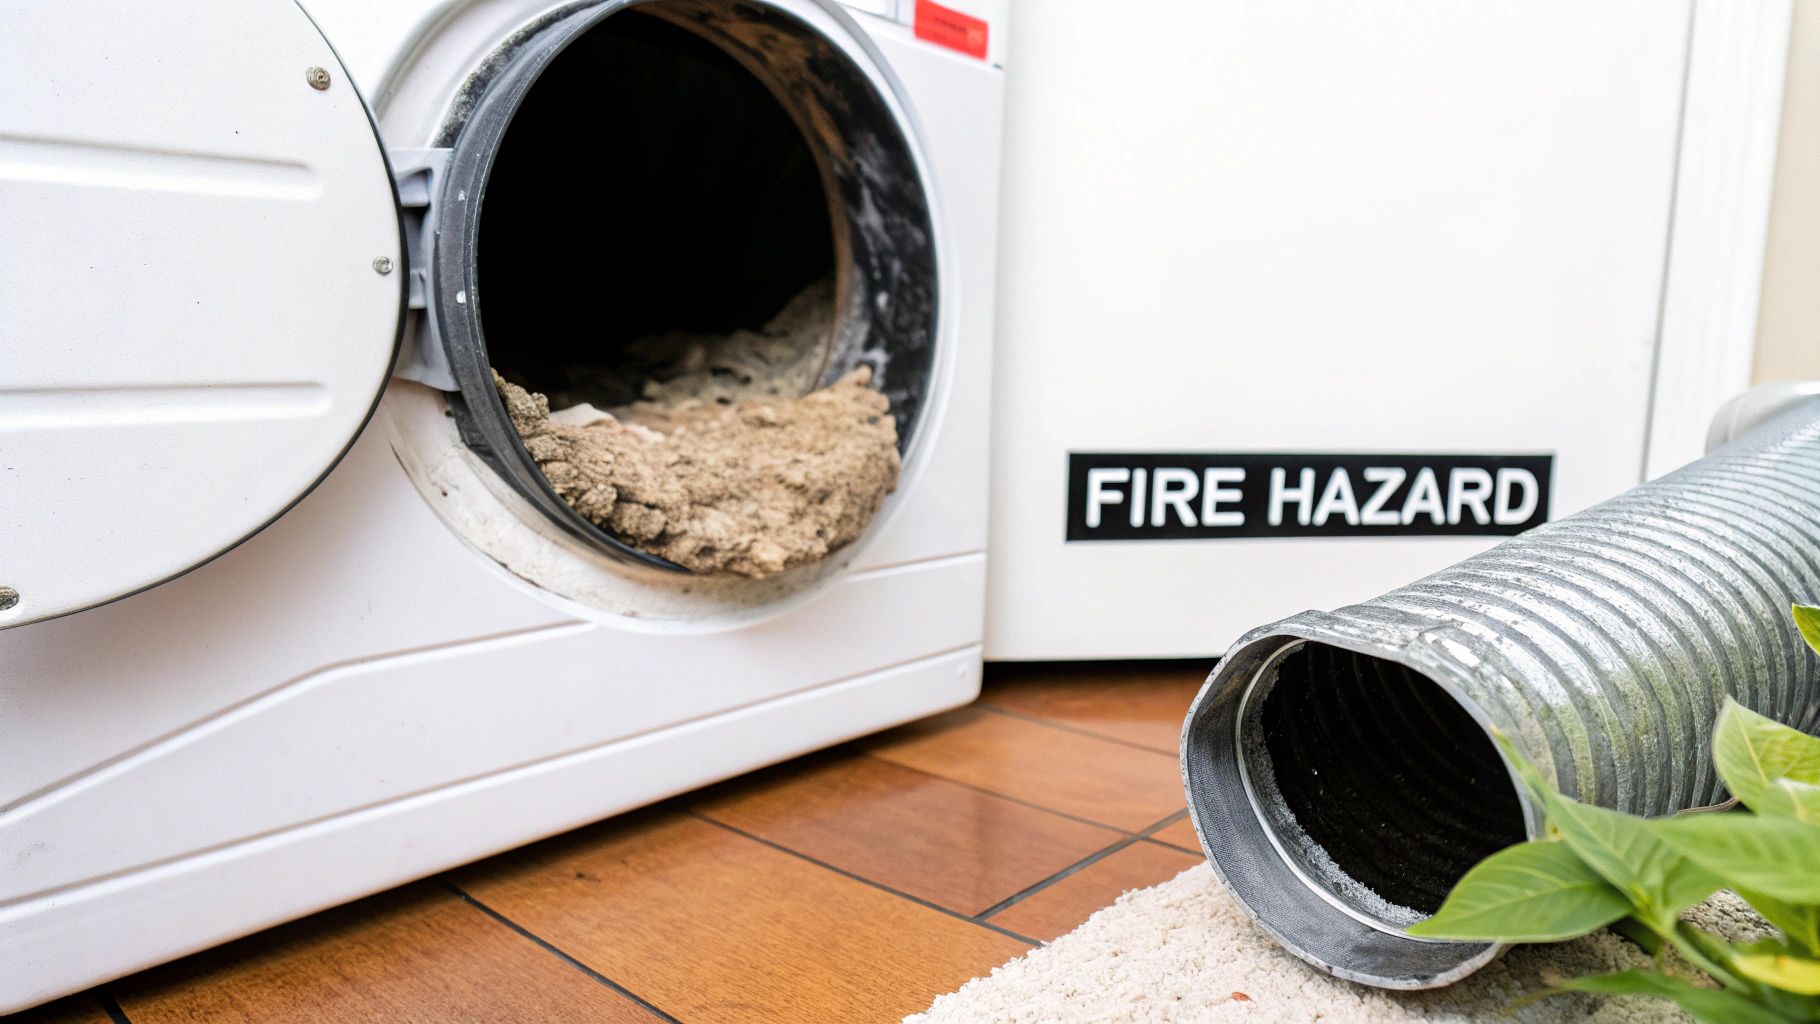
It’s so easy to forget about the dryer vent. It's tucked away behind the machine, silently doing its job. But ignoring this little piece of maintenance can snowball into some serious trouble, turning a simple chore into a major safety risk. The biggest danger here is fire, and the fuel is the super-flammable lint that gets past your dryer's filter and packs into the ductwork.
This lint buildup is a slow-motion problem. Every time you dry a load of clothes, tiny fibers sneak past the trap and get stuck in the vent, gradually choking off the airflow. This blockage makes your dryer work much harder and run hotter, creating the perfect storm for a fire to ignite.
Understanding the Risks and Rewards
The numbers on dryer-related fires are pretty startling. The National Fire Protection Association (NFPA) reported a staggering 16,800 dryer-related fires in the U.S. back in 2020. These incidents caused an estimated $236 million in property damage. The number one culprit? Lint buildup, which can cut airflow by up to 75% and send dryer temperatures soaring.
The good news is that a clean vent can slash fire odds by 90% and cut drying times by 30%. That means you're not just protecting your home; you're also saving money on your energy bills.
Beyond just preventing a fire, you'll see a few other great benefits:
Better Dryer Performance: When air can move freely, your dryer works the way it was designed to, drying clothes faster and using less power.
Longer Appliance Life: A dryer that doesn't have to struggle against a clog experiences less wear and tear on its motor and heating element.
Healthier Indoor Air: A blocked vent can trap moisture, creating a breeding ground for mold and mildew that can get pushed back into your laundry room.
Recognizing the Warning Signs
Knowing when to clean your dryer vent is half the battle. Thankfully, your dryer usually gives off some pretty clear clues that it's struggling. If your clothes are still damp after a full cycle or the top of the machine is unusually hot, you've likely got a blockage. You might even notice a musty or burning smell hanging in the air. Getting familiar with the common causes of dryer fires and how to prevent them can give you a much better handle on these risks.
The signs of a clogged dryer vent are often subtle at first, but they become more obvious as the blockage worsens. Here's a quick breakdown of what to look out for.
Warning Signs Your Dryer Vent Needs Immediate Attention
Warning Sign | What It Means | Associated Risk |
|---|---|---|
Clothes take longer to dry | Airflow is restricted, trapping moist air in the drum. | Inefficiency, increased energy bills, wear on the appliance. |
Dryer is hot to the touch | The appliance is overheating because it can't vent properly. | High fire risk, damage to internal components. |
Burning smell | Lint inside the vent or dryer casing is scorching from the heat. | Immediate fire hazard. |
Visible lint around the vent | Lint is being forced out of gaps because the main path is blocked. | Sign of a severe blockage, fire risk. |
Vent flap doesn't open | Airflow isn't strong enough to open the exterior vent cover. | Complete or near-complete blockage. |
If you notice any of these signs, especially a burning smell or an overheating unit, it's time to take action right away. Don't run the dryer again until you've cleaned the vent.
A dryer that takes more than one cycle to dry a standard load is not just inefficient; it's a cry for help. This is the most common and reliable sign that your vent is clogged and needs immediate attention.
This mindset of proactive maintenance isn't just for dryers. Embracing the principles of safe and effective cleaning for various household components is just smart homeownership. By staying on top of these simple tasks, you can head off expensive repairs and, most importantly, keep your home and family safe.
Gathering the Right Tools for Dryer Vent Cleaning
Before you even think about pulling your dryer away from the wall, let's talk about gear. Having the right tools ready to go is what separates a quick, satisfying Saturday morning project from a frustrating, lint-covered disaster.
Trying to clean out a dryer vent without the proper equipment is a bit like trying to paint a room with a toothbrush: you might make some progress, but it’s going to be slow, messy, and ultimately ineffective. You could even end up damaging the ductwork.
The absolute centerpiece of this operation is a good dryer vent cleaning kit. But not all kits are created equal. You’ll generally find two flavors on the shelf: manual brushes with flexible rods, and rotary brush systems that hook up to your power drill.
Manual Brush Kits: These are perfect for shorter, relatively straight vent runs. They’re simple, affordable, and give you a great tactile feel for any clumps or blockages you’re pushing through.
Rotary Brush Kits: If your vent is long or has a few twists and turns, a rotary kit is a total game-changer. The spinning brush, powered by your drill, is far more aggressive at breaking up stubborn, compacted lint and has a much easier time navigating corners.
The right choice really just depends on your home’s specific layout. For a simple, short duct, the manual approach is often all you need. But for anything more complex, the power of a rotary kit is well worth it.
Essential Safety and Cleanup Gear
Beyond the brush kit itself, a few other items are absolutely non-negotiable for doing this job safely and without making a huge mess. That lint isn't just fluffy stuff; it's fine particulate matter you really don't want to be breathing in. Plus, the edges of metal ducting can be surprisingly sharp.
Pro Tip: A small roll of painter's tape or foil tape can be your best friend. Use it to create a tight seal between your vacuum hose and the vent opening. This maximizes suction and prevents a lint explosion all over your laundry room.
Here’s your essential support crew:
A Powerful Vacuum: A shop vac with a hose attachment is the MVP here. It has the suction power needed to grab all the lint you're about to dislodge.
Protective Gloves: Grab a pair of sturdy work gloves. They’ll save your hands from getting scraped up on the sharp metal edges of the duct and vent connections.
Dust Mask: A simple N95 mask is a must. It will keep you from inhaling the fine lint particles that will definitely become airborne the second you start working.
Having these few things ready to go transforms the task from a potential headache into a streamlined maintenance project. If you're looking for more ways to make the job go smoothly, check out these pro tips for cleaning dryer duct work for even faster results.
A Practical Walkthrough for Cleaning Your Dryer Vent
Alright, let's roll up our sleeves and get this done. I'm going to walk you through the cleaning process from start to finish, breaking it down into manageable chunks so you can tackle it with confidence. The whole idea is to be methodical and, most importantly, safe.
Before you even think about touching a tool, safety comes first. Always disconnect your dryer from its power source. If it’s an electric dryer, simply unplug it from the wall. For a gas dryer, you'll need to shut off the gas supply valve, which is usually right on the pipe behind the unit.
This quick diagram lays out the core tools for the job: the specialized kit to do the scrubbing, a vacuum to handle the mess, and your safety gear to keep you protected.
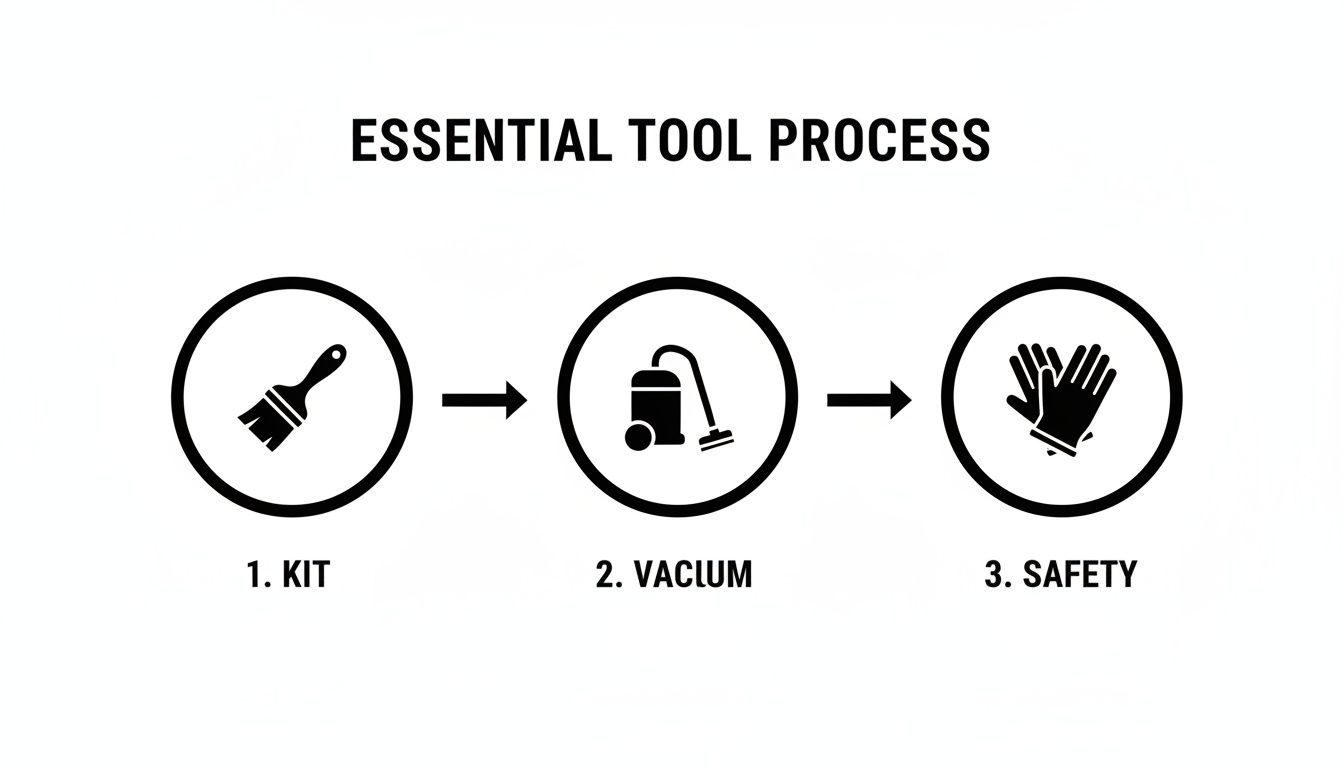
As you can see, it boils down to three simple actions: breaking the lint loose, sucking up the debris, and doing it all safely.
Detaching and Initial Cleaning
With the dryer safely powered down, gently slide the appliance away from the wall. Give yourself plenty of room to work comfortably. You'll see the flexible duct that connects the back of your dryer to the wall, and it's usually held in place with a simple clamp. Grab a screwdriver or a pair of pliers and loosen it.
Once the clamp is off, you can carefully pull the duct free from both the dryer and the wall. Don't be surprised by what you find. There's almost always a thick layer of lint caked around both openings. This is where your first round of cleaning begins.
Grab your vacuum with its hose attachment and get to work. Thoroughly clear out all the lint you can see from the dryer's exhaust port and the duct opening in the wall. Getting this initial mess out of the way first will make the deeper cleaning much more manageable.
Using the Vent Brush Kit
Now for the main event. A good dryer vent cleaning kit comes with a brush head and several flexible rods that you can screw together, letting you reach all the way through your ductwork.
Start by attaching the brush head to a single rod. Push the brush into the duct opening in the wall and start rotating it as you push it forward. If you've got a kit that works with a power drill, hook it up, set your drill to a low speed, and make sure it's spinning clockwise. Let the drill do the heavy lifting.
As the brush moves deeper, just add more rod sections. You'll feel it working against the compacted lint. Keep going until you've run the brush through the entire length of the duct, all the way to the outside vent.
Here’s a crucial pro tip: Always, always rotate the brush in a clockwise direction. It doesn’t matter if you’re using a drill or doing it by hand. If you turn it counterclockwise, the rod sections can unscrew and get stuck inside your duct. Trust me, that's a headache you do not want.
Clearing the Exterior Vent
You're not quite done yet. Head outside and find where your dryer vent exits the house. Look for a vent cap, which might have a little flap or louvers on it to keep critters and rain out.
This cap is a prime spot for lint to build up and create one last clog. Manually pull away any lint, leaves, or other gunk that's collected there. If you have a helper, get them to run the vacuum from inside while you clean the exterior cap; this helps catch any last bits of debris.
For vents that exit through the roof, the job requires a lot more caution. It's a good idea to fully understand how to clean a rooftop dryer vent safely before you even think about getting on a ladder.
Final Steps and Reassembly
With the duct interior and exterior cap clear, it's time to put it all back together. Reconnect the duct to the wall and the dryer, making sure you tighten the clamps down securely to prevent any leaks.
Carefully slide the dryer back into its spot. Be gentle here; you don't want to crush or kink the ductwork you just cleaned.
Finally, plug the dryer back in (or turn the gas supply back on). Run a quick, empty cycle on a no-heat or air-fluff setting for a few minutes. This will blow out any remaining loose lint from the system. And that's it! You've successfully cleaned your dryer vent and made your home safer and more efficient.
The Hidden Perks of a Clean Dryer Vent
Sure, preventing a fire is the number one reason to get serious about cleaning your dryer vent duct, but that’s just scratching the surface. The positive ripple effects of this one simple task can be felt everywhere from your family’s health to your monthly budget. It’s a small investment of your time that pays off in some surprisingly big ways.
Just picture a clogged vent as a major traffic jam for moist air, lint, and heat. When that pathway gets blocked, your dryer simply can't do its job properly. It’s forced to run longer and work much, much harder to dry your clothes. That extra effort doesn't just put a strain on the appliance; it sends your energy consumption through the roof with every single load.
Boosting Your Home’s Health and Efficiency
A dirty dryer vent does more than just inflate your utility bills. It can quietly chip away at your family's health by circulating allergens and other fine particles throughout your home.
Those lint-clogged vents become traps for pollen, pet dander, and even mold. This can be a real problem for anyone with allergies or asthma, especially considering 1 in 13 kids in the U.S. suffers from the condition. Plus, the numbers don't lie: uncleaned vents can increase a dryer's energy use by a staggering 30%. For a family that does a lot of laundry, that could easily add over $100 to your bills each year. You can dig into more of the data on this at Verified Market Reports.
So, the benefits really hit on two fronts: your wallet and your well-being. A clean duct lets your dryer breathe and work the way it was designed to.
Lower Energy Bills: With a clear path for air to escape, your dryer finishes its cycle much faster. This simple change can lead to a noticeable drop in your monthly utility costs because the appliance isn't running needlessly for extra minutes on every load.
Healthier Indoor Air: A blocked, damp vent is the perfect breeding ground for mold and mildew. Gross, right? By keeping the duct clear, you stop those contaminants from getting pushed back into your laundry room and circulating through your house.
Longer Appliance Lifespan: An engine that constantly overheats and strains itself is on a fast track to an early breakdown. By reducing the workload on your dryer's motor and heating element, you extend its service life, putting off a costly replacement for years.
This task is less of a chore and more of a smart investment in your home's operational health. Each cleaning session directly contributes to lower bills, better air quality, and a longer-lasting appliance.
A Smart Investment in Your Property
When you start to see dryer vent maintenance this way, it stops being a dreaded task and becomes a proactive step toward preserving your home. The financial savings alone often justify the minimal effort it takes. Just imagine your dryer running for 45 minutes instead of 75 for every single load; that saved energy adds up fast over the course of a year.
And it doesn't stop there. You’re also protecting your clothes from the excessive heat damage that happens when a dryer overheats, which keeps fabrics from fading or wearing out before their time. This kind of holistic approach to home care delivers compounding advantages.
If you want to take a closer look, you might be interested in these key dryer vent cleaning benefits for your home. By tackling this simple project, you're not just cleaning out a tube; you're actively making your home safer, more efficient, and healthier.
When to Skip the DIY and Call a Professional
Taking on a dryer vent cleaning yourself is a fantastic way to handle routine maintenance, and it works great for most standard homes. But part of being a responsible homeowner is knowing when a job is better left to the experts. Recognizing your limits isn't just about getting the job done right, it's about keeping your home and family safe.
The biggest reason to call a professional often comes down to the complexity of your ductwork. If you've got a vent run that's unusually long, say over 35 feet, a typical DIY kit just isn't going to have the reach you need. The same goes for vents with several sharp elbows or turns. These spots are notorious for creating tightly packed lint clogs that a basic brush simply can't muscle through.
Situations Demanding an Expert
There are a few clear red flags that signal a job is beyond a weekend warrior's scope. Trying to tackle these without the proper gear can lead to an incomplete cleaning at best, and damaged ductwork at worst.
It’s time to call in the pros if you run into any of these scenarios:
Pest Infestations: If you find evidence that birds, mice, or other critters have made a home in your vent, stop what you’re doing. Professionals have the tools to remove nests and debris without just compacting it deeper into the duct.
Rooftop Vents: This is a major safety issue. Cleaning a vent that terminates on the roof means working at a dangerous height. A professional crew is trained and insured for this kind of work, removing the risk of a serious fall.
Persistent Symptoms: You've given it your best shot and cleaned the vent, but your dryer is still taking forever to dry a load or gets alarmingly hot. This is a classic sign of a deeper, more stubborn blockage that requires specialized equipment to clear.
A DIY cleaning that doesn't fix the problem is a telltale sign of a more serious clog. Professionals come armed with high-powered air whips and even video inspection cameras to see and obliterate blockages that are completely invisible and unreachable with a standard kit.
DIY Cleaning vs Professional Service Decision Guide
Deciding whether to tackle the job yourself or hire it out can be tricky. This table breaks down common scenarios to help you make the right call for your home.
Situation | Recommended Action | Reasoning |
|---|---|---|
Standard, short vent run (<25 ft) with easy access. | DIY | A basic cleaning kit is perfectly effective for routine maintenance in simple, accessible systems. |
Vent is longer than 35 feet or has multiple sharp turns. | Professional | DIY kits lack the length and flexibility to navigate and clean complex ductwork thoroughly. |
Dryer symptoms persist after you've cleaned the vent. | Professional | This points to a severe clog that requires specialized tools like air whips or cameras to locate and remove. |
You suspect birds or rodents have nested in the vent. | Professional | Experts can safely remove nesting material without damaging the duct or pushing the blockage further in. |
Your dryer vent exits on the roof. | Professional | This is a significant safety risk. Professionals have the training and insurance to work at heights safely. |
Ultimately, while DIY is great for upkeep, a professional service is the best choice for complex, stubborn, or dangerous situations, ensuring the job is done completely and safely.
The Professional Advantage in Tools and Safety
The real difference between a DIY job and a professional one often boils down to the equipment. Experts bring in tools that can extract 4 times more lint than consumer-grade kits. This level of thoroughness is crucial for preventing the nearly 2,900 injuries that happen each year from dryer-related fires. When you have a complex system, their gear ensures every last bit of the hazard is removed.
Understanding the critical role of professional dryer vent cleaning for fire prevention and safety can help you make a confident decision. If the task feels too big or your dryer issues just won't go away, it may be time to consult with professional appliance repair companies, who often provide vent cleaning services. At the end of the day, investing in a professional gives you priceless peace of mind.
Common Questions About Cleaning Dryer Vents
Even with a step-by-step guide, it's normal to have a few questions pop up. Let's tackle some of the most common ones I hear from homeowners to make sure you're confident and safe when you clean out your dryer vent.
One of the biggest questions is always about timing: "How often should I really be doing this?" For an average family, cleaning the dryer vent once a year is a great rule of thumb. But that’s just a baseline. If you have a big family, pets shedding all over the place, or you're constantly washing bulky items like towels and blankets, you'll want to check it every six months. The best clue is always your dryer's performance; if clothes are taking longer to dry, it's time for a cleanout, regardless of what the calendar says.
Practical Dos and Don'ts
"Can't I just use my leaf blower?" I get this one a lot. While it sounds like a clever shortcut, it's a terrible idea. Blasting high-pressure air into the duct can easily compact the lint into a dense, solid clog. Worse, it can disconnect the ductwork hidden inside your walls, creating a massive fire hazard you won't even see. Stick with a dedicated dryer vent brush kit; it physically scrubs the lint off the duct walls instead of just ramming it further down the line.
It’s also crucial to know the difference between two parts of your dryer:
The Lint Trap: This is the screen you pull out of the dryer itself. It needs to be cleaned after every single load. No exceptions. It catches the big stuff.
The Vent Duct: This is the four-inch tube running from the back of your dryer to the outside of your house. Even with a perfectly clean lint trap, fine lint particles will always get through and build up in this duct over time.
A critical safety note: If you see a white plastic or foil accordion-style duct behind your dryer, replace it immediately. These are a known fire hazard, and most no longer meet building codes. Their ribbed design is a magnet for lint, and they crush easily, choking off airflow. Always opt for smooth-walled rigid or semi-rigid metal ducting for the best safety and efficiency.
When you want the peace of mind that comes with a professional, thorough cleaning, you need a team you can trust. The certified technicians at Purified Air Duct Cleaning have the expertise and advanced equipment to keep your home safe and your appliances running at peak performance. Schedule your professional dryer vent cleaning service today!