Cleaning Dryer Duct Work: Pro Tips for Quick Results
- Oct 23, 2025
- 10 min read
Cleaning your dryer ductwork is one of those critical home maintenance tasks that’s easy to forget but absolutely vital for preventing fire hazards and keeping your appliances running efficiently. That hidden buildup of lint is highly flammable, and clearing it out protects your home, lowers your energy bills, and helps your clothes dry faster.
Why Cleaning Your Dryer Duct Is a Must Not a Maybe

Many homeowners are diligent about cleaning the lint trap after every load, but that little screen only catches a fraction of the debris. The rest gets pushed into your dryer's ductwork, where it slowly but surely accumulates. This buildup creates a serious bottleneck, making it difficult for hot, moist air to escape.
When that airflow is restricted, your dryer is forced to run longer and work much harder to get your clothes dry. This extra strain not only wastes a surprising amount of energy, driving up your utility bills, but also puts significant stress on the dryer's heating element and motor.
The Hidden Costs of a Clogged Duct
Ignoring this simple task can have some pretty expensive consequences down the line. A dryer that’s constantly overheating is a dryer that will fail prematurely, leaving you with costly repair bills or the need for a full replacement. On top of that, the trapped moisture can create a damp environment inside your walls: a perfect breeding ground for mold and mildew.
A clogged dryer vent doesn't just impact your appliance; it impacts your wallet and your home's health. The increased energy consumption and risk of premature failure make cleaning dryer duct work a financially smart decision.
The risks are becoming more widely understood, and you can see it in the home services market. The global demand for dryer vent cleaning was valued at $2.5 billion and is projected to nearly double, which shows just how seriously homeowners are taking this issue. You can dig into this market trend on Verified Market Reports.
Ultimately, keeping your ducts clear is about more than just safety. You can explore the many dryer vent cleaning benefits in our detailed guide, from faster drying times to better indoor air quality. It's a high-impact chore that truly safeguards your family, your finances, and your home.
Gathering Your Dryer Duct Cleaning Toolkit
There’s nothing worse than getting halfway through a project only to realize you’re missing a critical tool. Trust me, I've been there. Before you start pulling your dryer away from the wall, let's make sure you have everything you need to make this job smooth, fast, and effective.
The star of the show is a specialized dryer vent cleaning kit. You'll see a bunch of options out there, from simple handheld brushes to more advanced systems that hook up to your power drill. My advice? Go for a drill-activated kit. The spinning action is far more aggressive at breaking up the stubborn, caked-on lint that a manual brush just can't handle.
Core Tools vs. Helpful Extras
Besides the brush kit, a few other items are non-negotiable. You absolutely need a vacuum cleaner with a long hose attachment to suck up all the lint you're about to dislodge. You’ll also need a basic screwdriver or nut driver to loosen the clamps holding the duct to your dryer and the wall.
To save you a last-minute trip to the hardware store, here’s a quick breakdown of what you must have versus what’s just nice to have on hand.
Essential vs. Recommended Cleaning Tools
This table quickly separates the must-haves from the helpful extras. The essentials are required to get the job done right, while the recommended items will make the process cleaner and safer.
Tool | Type | Why You Need It |
|---|---|---|
Dryer Vent Brush Kit | Essential | This is your main weapon for scrubbing the inside of the duct and breaking up lint. |
Vacuum with Hose | Essential | Crucial for clearing out all the loose lint you knock free from the duct and dryer cavity. |
Screwdriver or Nut Driver | Essential | Needed to safely disconnect and reconnect the vent clamps holding the ductwork in place. |
Dust Mask & Goggles | Recommended | Protects your lungs and eyes from inhaling the fine dust and lint particles you'll stir up. |
Heavy-Duty Tape | Recommended | Handy for patching up small tears in flexible ducts or temporarily sealing a connection. |
Getting these items ready before you start is the real secret. It turns what could be a frustrating chore into a straightforward and satisfying maintenance task.
Proper preparation is half the battle. Having these tools laid out and ready to go will make cleaning your dryer duct a breeze and get your appliance running efficiently again.
The Complete Dryer Duct Cleaning Process
With your tools laid out, it's time to get down to the business of cleaning dryer duct work. This is where the real work begins, but if you follow a logical sequence, you can sidestep common frustrations and do a thorough job from start to finish.
First things first: safety. Before you touch a single clamp or hose, make sure the dryer is completely powered down. Pull it away from the wall just enough to unplug it. If you've got a gas dryer, you also need to find and shut off the gas supply valve, which is usually on the small pipe that leads right to the appliance.
Beginning the Disconnection
Once you're sure the dryer is safely powered off, you can start detaching the ductwork. You'll find two connection points, one on the back of the dryer itself and another where the duct goes into the wall. These are held in place by simple circular clamps that a screwdriver or nut driver will loosen easily.
Slide the clamps off and gently work the duct free from both the dryer and the wall port. Be ready for a little surprise, a small mountain of lint is likely to spill out, especially from right behind the dryer. It's a good idea to have your vacuum right there with you to suck it up immediately.
This infographic breaks down the core actions of the process: disconnecting, cleaning with a brush, and vacuuming out the debris.
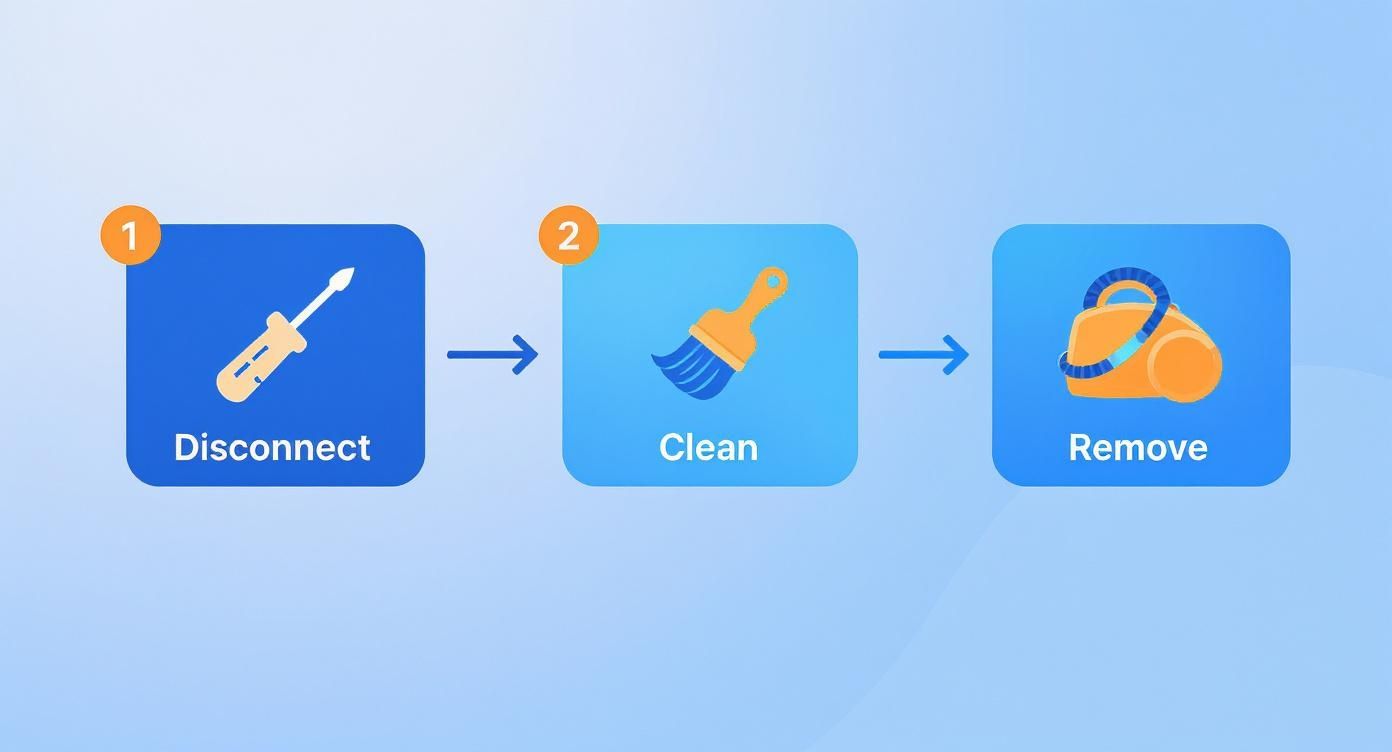
As you can see, it’s a pretty straightforward cycle of taking it apart, scrubbing it clean, and then getting rid of all the gunk you've knocked loose.
Tackling the Duct Run
Now for the main event: the duct itself. If you're working with a flexible foil or semi-rigid duct, you can often clean it right where it is or detach it completely for better access. For those of you with a drill-powered brush kit, go ahead and assemble the brush and the first flexible rod.
Feed the brush into the duct from the wall opening. Set your drill to a low speed and make sure it's rotating clockwise, then slowly push the brush deeper into the duct, adding more rod extensions as you need them. That clockwise rotation is key, going the other way can cause the rods to unscrew and get stuck inside the duct. A real headache you don't want.
As you work the brush through, maintain gentle but firm forward pressure. You'll feel it hit pockets of resistance where lint is packed tight. Just pull the brush back and forth a bit in those tough spots to really scrub the interior walls clean.
It’s a huge help if you have a partner hold a vacuum hose at the opening to catch the lint as it breaks free. If you're flying solo, no problem; just run the vacuum every so often to clear out what you've dislodged. Keep this up until the brush pops out the other side at the exterior vent hood.
Final Steps and Reconnection
You’re almost done, but don't forget the other two critical spots. Grab your vacuum's crevice tool and thoroughly clean out the hole in the back of the dryer where the duct connects. Do the same for the pipe inside the wall.
Finally, carefully reattach the duct to both the dryer and the wall. You want these connections to be snug, so tighten the clamps securely to stop any air from leaking out. For a deeper dive into different pipe types and extra safety checks, you can learn more about how to safely and effectively clean your dryer vent pipe in our more detailed guide.
All that's left is to slide the dryer back into place, plug it in, turn the gas back on, and run a quick, empty cycle to make sure everything is humming along perfectly.
Troubleshooting Common Duct Cleaning Problems
Even with the best intentions and the right tools, a dryer duct cleaning project can throw you a curveball. It's not always a straightforward job. For instance, you might pop off the exterior vent cover, ready to get started, only to find a bird’s nest staring back at you.
When you find a nest or debris from critters, always put on a pair of gloves before carefully pulling it all out. Once it's clear, give the area a thorough vacuuming and think about installing a pest-proof vent cover. It's a small upgrade that saves you from having to evict future tenants.
Sometimes, the ductwork itself is the problem. Unusually long ducts or a system with several sharp, tight bends can be a real headache for a standard brush kit.
Navigating Tricky Duct Systems
Got an extra-long duct or one with rigid, 90-degree corners? Your cleaning kit might not have the reach or the flexibility to handle it. Trying to force a brush through can get it stuck or, even worse, damage the duct itself.
Here are a few tricks I've learned for these tough situations:
Tackle it from both ends: Start cleaning from inside the laundry room and go as far as you can. Then, head outside and work your way in from the exterior vent. This two-pronged attack usually covers the entire length.
Use a leaf blower (with caution): For rigid metal ducts only, a leaf blower can be your best friend for pushing out stubborn clogs. You'll want to create a tight seal between the blower's nozzle and the duct opening inside to get maximum force.
Double-check your connections: After you've finished cleaning, make sure every connection is tight and secure. A loose connection can leak hot, lint-filled air, making a mess behind your dryer and tanking its efficiency.
Some issues are bigger than a simple clog. If you find a section of ductwork inside a wall that's been crushed, torn, or completely disconnected, that’s a major red flag. This isn't a cleaning job anymore; it's a replacement job. Damaged ducts need to be replaced to ensure proper airflow and prevent a serious fire hazard.
Knowing what to look for is half the battle. You can learn to spot the early signs of a clogged dryer vent before they turn into major headaches.
These components are part of a surprisingly large industry. The global market for dryer vents was projected to reach almost $500 million by 2025. You can dig into more details about the growing dryer vent market. If your ductwork is damaged, replacing it isn't just a repair; it's a worthwhile investment in your home's safety and efficiency.
Maintaining a Clear Dryer Duct All Year
A deep clean is a great way to hit the reset button, but the real secret to keeping your dryer safe and efficient is all about consistent upkeep. Small, proactive habits stop dangerous lint from building up in the first place, turning what could be a massive project into a few simple, manageable tasks.
The best approach is to adopt a smart maintenance schedule. Think of it as a layered defense for cleaning dryer duct work before it ever becomes a real threat.
Your Year-Round Maintenance Schedule
This simple routine is all it takes to keep lint under control with very little effort.
After Every Single Load: This one's a must. Always clean the lint screen right inside the dryer door. A clogged screen chokes off airflow from the very start of the drying cycle.
Once a Month: Take a quick stroll outside and check your exterior vent hood. Pull away any lint you see, along with any leaves or other debris that might be blocking the flaps from opening and closing properly.
Once a Year: This is when you'll perform the full deep cleaning we detailed earlier in this guide. This annual task is crucial for removing all the lint that inevitably slips past the screen over time.
An ounce of prevention is worth a pound of cure. A few minutes of maintenance each month can prevent the hazards and inefficiencies of a severely clogged duct.
It also helps to be mindful of how certain laundry products can contribute to buildup. For instance, understanding the role of scented dryer sheets is useful, as some can leave behind a waxy residue that acts like a magnet for lint.
Sticking to this schedule is the key to a safe and happy dryer. For a more detailed breakdown of timing your cleanings, check out our guide on how often to clean your dryer vent, which you can tailor to your family's laundry habits.
Your Top Dryer Duct Cleaning Questions Answered
Even with the best guide, a few questions always pop up. It’s completely normal. Let's tackle some of the most common ones I hear from homeowners so you can feel confident getting this job done right.
How Often Should I Clean My Dryer Duct?
The standard advice is to clean the entire duct system once a year, and for most homes, that's a solid benchmark. But let's be realistic: every household is different.
If you have a big family and the laundry is always running, or you've got a furry friend who sheds like it’s their job, you’ll want to bump that up to every six months. The extra lint from heavy use or pet hair builds up much faster. The best indicator? Your dryer will tell you. If clothes are still damp after a full cycle, it’s a clear sign your vent needs attention.
Can I Just Use a Leaf Blower to Clean the Vent?
I get this question a lot, and while it sounds like a clever, powerful shortcut, it’s a really bad idea. A leaf blower just blasts air through the duct. Instead of removing the lint, it often compacts it tighter, turning a simple clog into a dense, stubborn blockage.
Even worse, it completely misses the most important part of the job: scrubbing the duct walls. Caked-on lint needs the mechanical action of a brush to break it loose.
Using the wrong tool can create more problems than it solves. A dedicated dryer vent cleaning kit is designed to safely and effectively remove buildup without risking damage or a worse clog.
When Is It Time to Call a Professional?
DIY cleaning is perfect for most straight-shot, simple vent systems. But there are definitely times when calling in an expert is the smart and safe move.
You should bring in a professional if:
Your duct run is unusually long, think over 25 feet.
The ductwork has several sharp turns or a complicated path.
You simply can't access the exterior vent cap easily or safely.
Professionals have powerful vacuums and flexible, long-reach tools that are designed for these tricky situations. If you're curious about what goes into a professional service, you can learn more about the factors that influence dryer vent cleaning costs in our detailed breakdown.
If you've run into a complex issue or just want the peace of mind that comes with an expert service, Purified Air Duct Cleaning is here to help. Our certified technicians have the right equipment to ensure your dryer operates safely and at peak efficiency. Contact us today for a free quote at purifiedairductcleaning.com.