How Do You Clean Dryer Duct: A Practical Home Safety Guide
- Feb 6
- 13 min read
That fuzzy handful of lint you pull from the trap after each load? That's just the tip of the iceberg. The real trouble, a highly flammable blanket of lint, is hiding deep inside your dryer's ductwork. Properly cleaning it out means disconnecting the duct from both the dryer and the wall, using a specialized brush and vacuum to clear every inch of buildup, and then getting everything reassembled securely.
Why Cleaning Your Dryer Duct Is a Critical Safety Task
It's easy to assume the lint trap catches everything, but that's a dangerous mistake many homeowners make. Over time, lint slips past the trap and builds up in the duct, slowly choking off the airflow. This forces your dryer to work much harder and run hotter, creating the perfect storm for a fire.
Think about this for a second: Firefighters in the U.S. respond to nearly 16,800 dryer fires every single year. These fires cause an average of $35 million in property damage annually. The kicker? Over 90% of them start because of one simple, preventable problem: lint buildup. It turns a routine household chore into a genuine catastrophe waiting to happen.
The Hidden Costs of a Clogged Duct
Beyond the terrifying fire risk, a clogged vent is a silent drain on your wallet and your dryer's lifespan. With airflow restricted, your clothes will feel damp after a full cycle, often forcing you to run the dryer a second or even third time.
All those extra cycles add up, inflating your monthly energy bills. At the same time, the constant overheating puts a massive strain on the dryer's heating element and other critical parts. This leads to expensive repairs or, worse, having to replace the entire appliance years before you should have to.
Spotting the Warning Signs Early
Knowing what to look for is the key to preventing a disaster. If you notice any of the signs below, it’s time to take action. This isn't a problem that fixes itself; it only gets worse with every load of laundry.
A lot of homeowners tell us their first clue was a dryer that felt dangerously hot to the touch or a laundry room that was suddenly warm and humid. These are classic signs that your vent is blocked and can't exhaust hot, moist air properly.
Expert Tip: Don't ignore these signals. A hot dryer and a humid room mean heat and moisture are backing up into your home, which can damage not just the appliance but also your walls and floors over time.
Before you start, it’s always a good idea to avoid common cleaning mistakes that could make the problem worse. This simple maintenance task is just one piece of the puzzle for a safe and efficient home. If you're concerned about your home's overall air quality, our professional air duct cleaning services can address the entire system.
Warning Signs Your Dryer Duct Needs Cleaning
Not sure if your dryer vent is clogged? This quick-reference table covers the most common red flags. Catching these symptoms early can save you from a major headache, or worse.
Symptom | What It Means | Level of Urgency |
|---|---|---|
Clothes Take Forever to Dry | Restricted airflow prevents moisture from escaping efficiently, forcing you to run multiple cycles. | High - Wasting energy and straining the dryer. |
Dryer Is Hot to the Touch | The appliance is overheating because trapped heat has nowhere to go. This is a significant fire risk. | Critical - Stop use and clean the duct immediately. |
Burning Smell | You're likely smelling lint inside the duct or machine scorching from the high heat. | Critical - Unplug the dryer and inspect right away. |
Visible Lint Around the Vent | If you see lint building up around the outdoor vent opening, it's a sure sign the inside is clogged. | High - The blockage is preventing proper exhaust. |
Laundry Room Is Humid | The moist air from the dryer isn't being vented outside, so it's filling up your laundry room instead. | Medium - Can lead to mold and mildew growth over time. |
If you spot any of these signs, especially those in the "Critical" category, it's crucial to address the problem before running your dryer again.
Gathering the Right Tools for the Job
Before you even think about pulling your dryer away from the wall, let's talk about tools. Having everything you need laid out and ready to go is the secret to a quick, painless job versus a messy, frustrating afternoon. You don't need a professional-grade arsenal, but a few key items will make all the difference.
Trust me, diving in unprepared is a rookie mistake that often ends with the project abandoned halfway through. The heart of your setup is a good dryer vent cleaning kit, which usually comes with a brush and a set of flexible, connecting rods.
Choosing Your Cleaning Kit
Not all of these kits are built the same, and the right one for you really depends on how long your duct is and what it's made of.
Manual Brush Kits: These are great for short, relatively straight ducts. You get a brush head and a few flexible rods that screw together to give you the length you need. Simple and effective for easy jobs.
Drill-Powered Auger Kits: If your duct runs longer than 10-15 feet or has a few bends and elbows, this is your best bet. The kit hooks up to a standard power drill, letting the brush spin and chew through dense, stubborn lint clogs with ease.
We often hear from homeowners who tried tackling a 25-foot duct with a basic hand brush. The result is almost always the same: the brush either gets stuck or just can't break up the compacted lint deep inside. Spending a little extra on a drill-powered kit for those longer runs will save you a massive headache.
Essential Safety and Support Tools
Beyond the brush, you'll want a few other things on hand to get the job done right, and safely. You're about to unleash a surprising amount of dust and lint, so protecting yourself is non-negotiable.
You'll also need some basic hand tools to get the duct disconnected and reconnected properly.
Safety Gear: A quality dust mask and a pair of gloves are mandatory. You'll be amazed at how much fine particulate matter gets kicked up into the air.
Vacuum Cleaner: Your regular household vacuum with its hose attachment is your best friend here. Use it to suck up the lint as you brush it out.
Towels or Rags: It’s a good idea to have a few of these nearby to wipe up any lint that escapes the vacuum.
Getting all this stuff together before you start means you can work straight through without any interruptions. And while you're focused on improving your home's air, you might be interested in our guide on the benefits of an air scrubber in your duct system.
A Practical Guide to Cleaning Your Dryer Duct
Alright, you've got your tools ready, so let's get to it. I'm going to walk you through the whole process, breaking it down into simple, manageable actions. The best way to tackle this is to start inside your laundry room and work your way out, ensuring you get a complete, end-to-end clean.
This job is pretty straightforward, but the key is to be methodical and take your time. Rushing leads to mistakes. Let's start with the most critical step of all: prepping the dryer.
Safely Disconnecting Your Dryer
First things first: you have to completely kill the power to the dryer. For an electric model, that means unplugging that big, heavy-duty cord from the wall outlet. If you're working with a gas dryer, you'll need to turn off the gas supply using the valve on the line behind it, and then unplug its standard electrical cord.
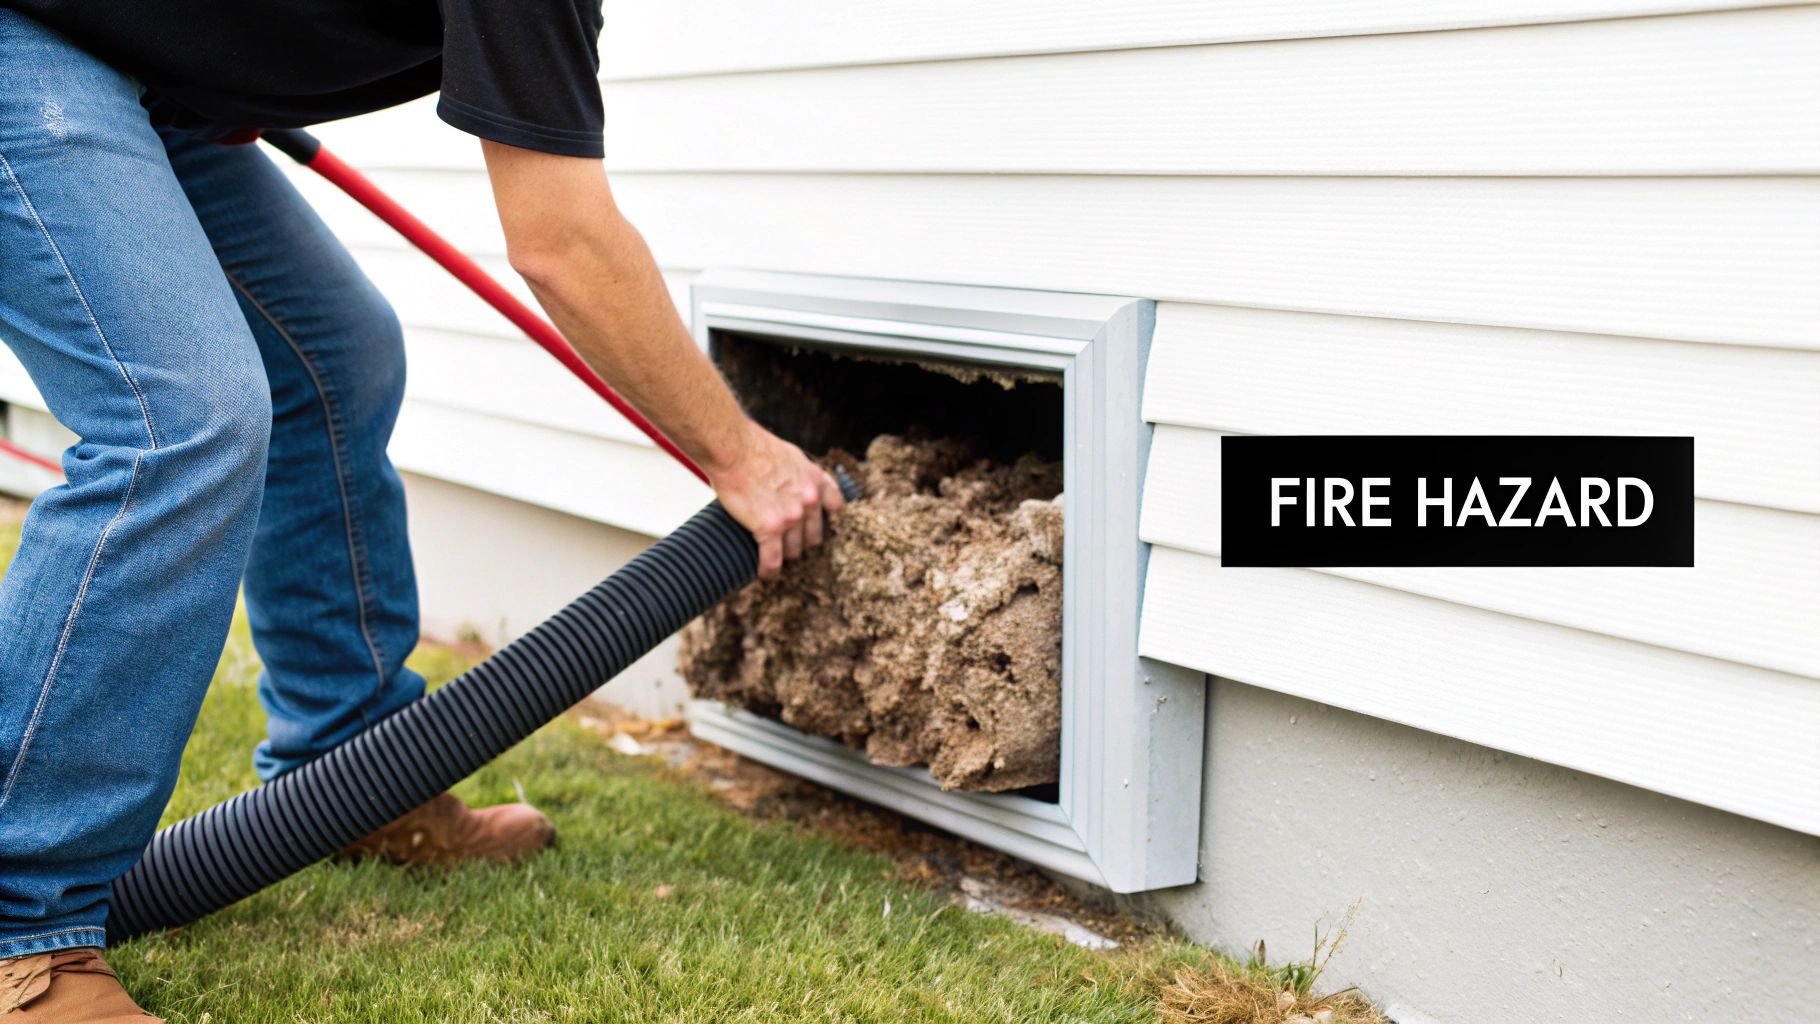
With the power off, gently slide the dryer away from the wall. You'll need enough room to comfortably get behind it. The duct is usually held on with a simple circular clamp that you can loosen with a screwdriver. Go ahead and disconnect the duct from the back of the dryer and also from the vent opening in the wall.
Cleaning the Duct from Inside
Once the duct is off, you'll probably get a good, hard look at just how much lint has been building up. Your vacuum is the first tool to grab here. Use its hose attachment to suck out all the loose gunk you can reach from both the dryer's exhaust port and the duct opening in the wall.
Now it’s time for your dryer vent cleaning kit.
Attach the brush head to one of the flexible rods.
Carefully insert the brush into the duct in the wall and start pushing it forward.
As you push, always rotate the brush in a clockwise direction. This is non-negotiable. Turning it counter-clockwise can make the rod sections unscrew, leaving the brush stuck deep inside the duct, a real headache you don't want.
Keep adding more rod sections as you push deeper into the vent, making sure to maintain that clockwise rotation the entire time.
You'll feel the brush hit some resistance where the lint is packed in tight. Just work it back and forth gently in those spots until it moves freely again.
This flowchart gives you a quick visual of the essential tools you’ll need for a safe cleaning process.
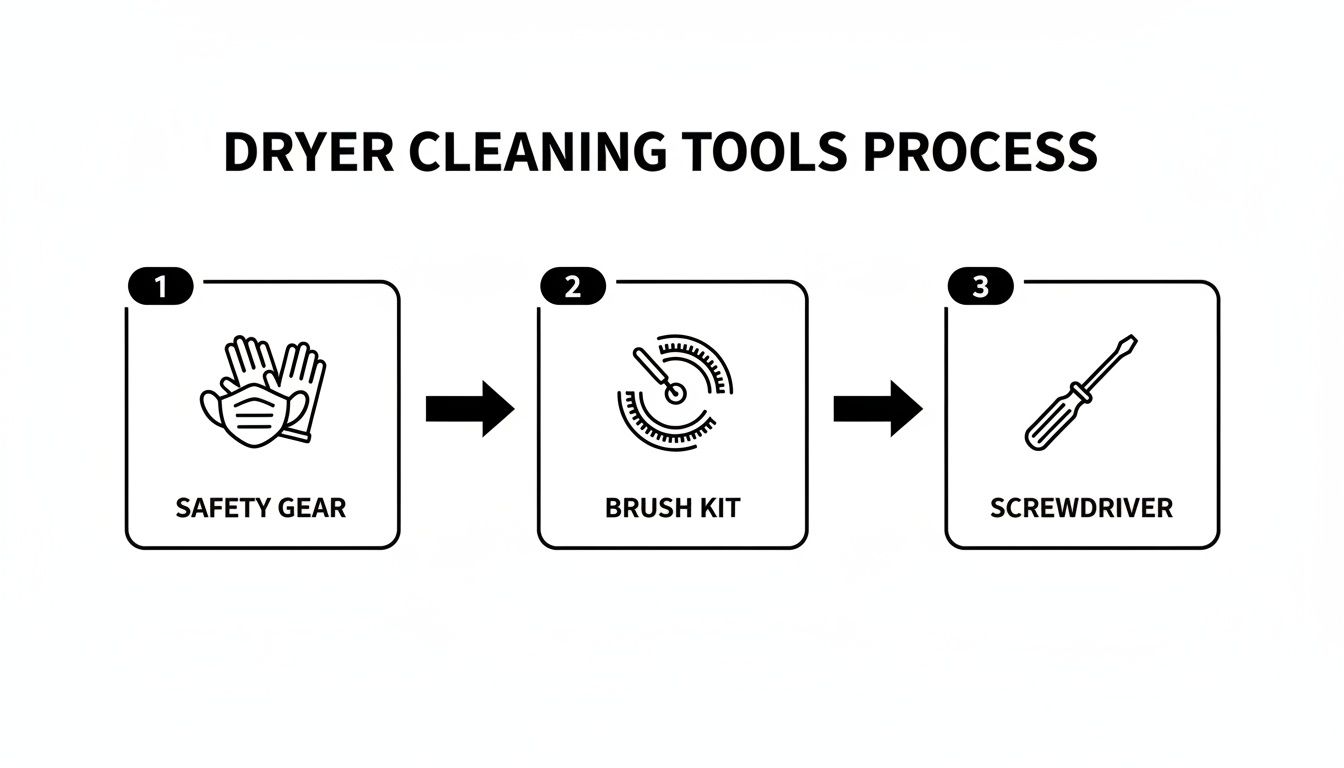
Notice how it starts with safety gear? That's because being prepared is just as important as the cleaning itself.
Tackling the Exterior Vent
So many people skip this part, but cleaning the outside vent cap is just as crucial as the duct itself. Head outside and find where your dryer vents out. The cover is usually a simple flap or has a louvered design.
Clear away any lint, leaves, or other debris you can see clogging the opening. It's not uncommon for birds or pests to build nests inside the vent, which creates a very serious blockage. Use your gloved hands or a small brush to clean everything out so the flaps can open and close freely.
Homeowner Tip: If you live in an area with a lot of critters running around, look into getting a pest-proof vent cover. They're designed to let the hot air and lint escape while keeping animals from getting in and setting up shop.
The Growing Need for Diligent Cleaning
The importance of keeping dryer vents clean is becoming more widely understood, and the industry reflects that. The global market for dryer vent cleaning services is on track to hit $3,500 million by 2035. This growth is fueled by an expected 1.2 billion new households worldwide by 2030 and a growing awareness of the fire risks.
When lint accumulates just a quarter-inch thick, it can increase fire risk by as much as 300% by trapping heat and causing the dryer to overheat dangerously. You can dig into more of this market data on wiseguyreports.com.
The state of your dryer duct is directly connected to your home's overall air system health. A clogged vent doesn't just impact your dryer; it can strain your entire HVAC system's efficiency. To learn more about taking care of other crucial parts of your system, you might find our guide on professional HVAC coil cleaning helpful.
Inspecting, Reassembling, and Testing Your Work
You’ve pulled out an impressive (and slightly horrifying) amount of lint, but don’t pack up your tools just yet. This final stage is all about making sure your system is not just clean but also safe, secure, and ready to run efficiently. Rushing through reassembly is one of the biggest mistakes people make, and it can undo all your hard work.
Before you even think about reconnecting anything, grab a flashlight and give the ductwork itself a final, thorough look. You're searching for any hidden damage you might have missed: small tears, holes, or sections that have been crushed or kinked behind the dryer over the years.
Even a tiny breach can leak hot, moist air and lint back into your home, creating a perfect storm for fire hazards or mold problems. If you find any significant damage, especially with those flexible foil ducts, the safest bet is to replace the entire section.
Securing the Connections Properly
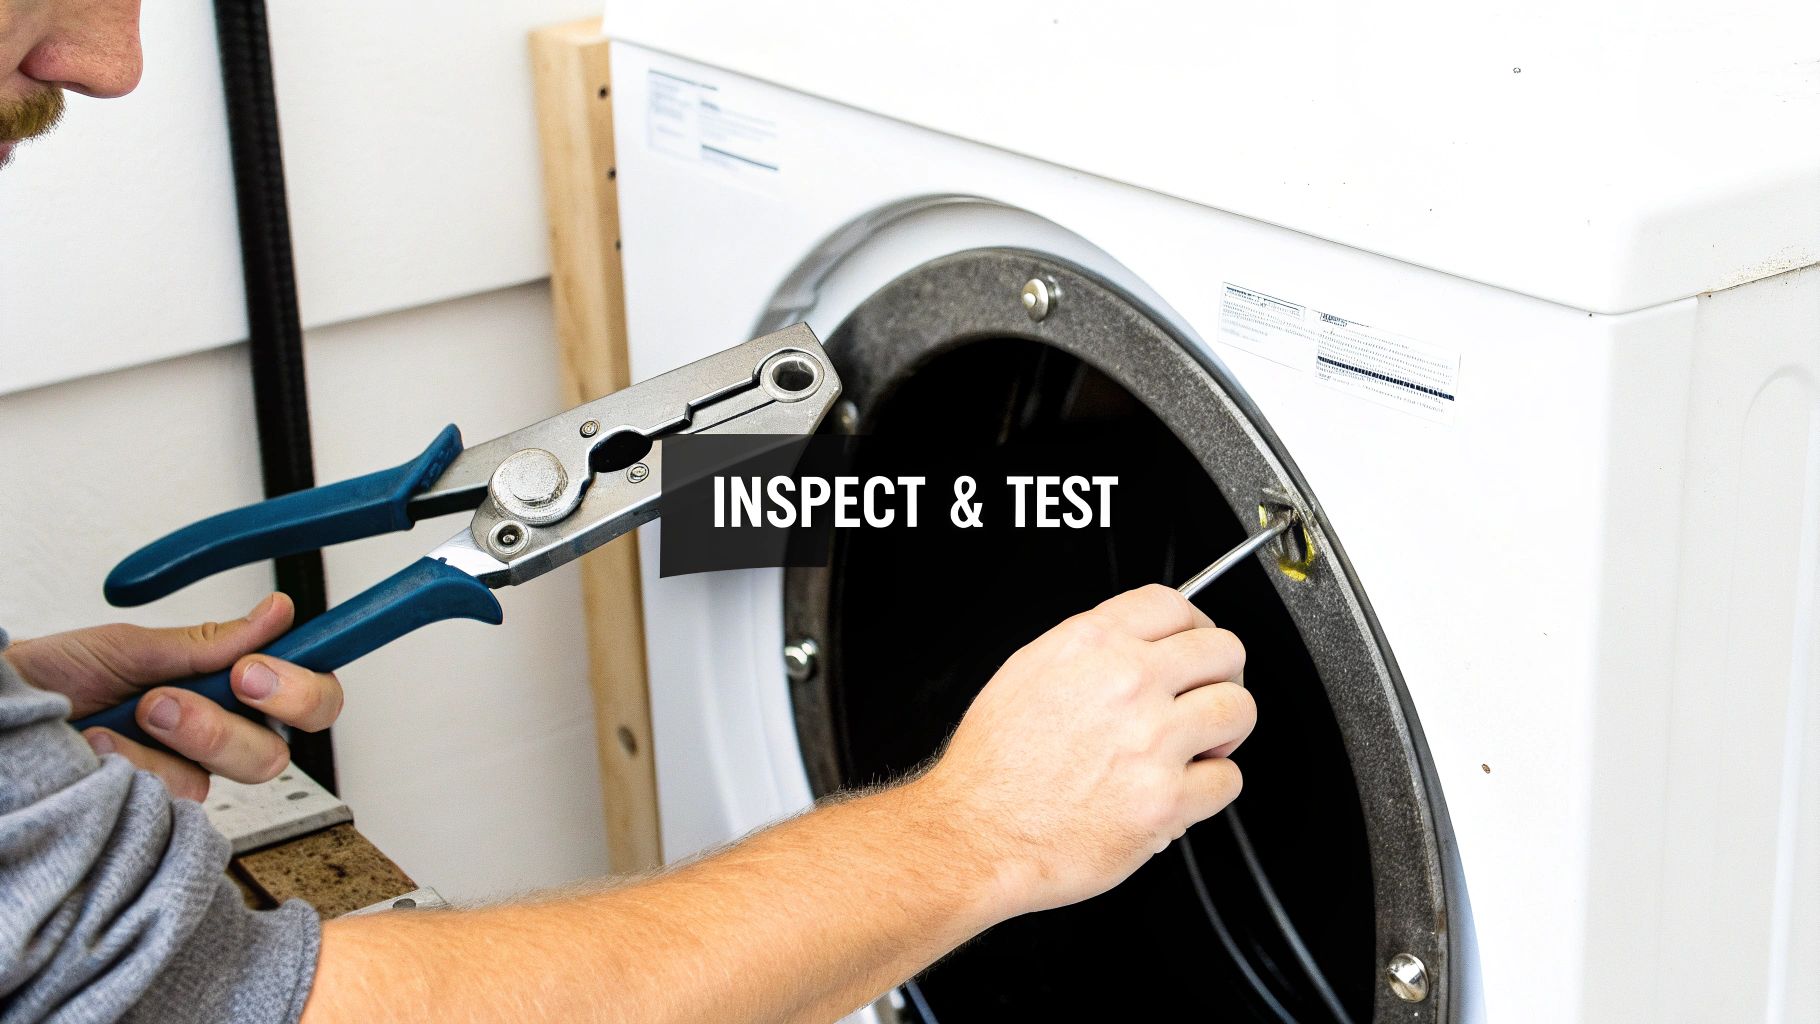
Once you've confirmed the ductwork is in good shape, it's time to reattach it. This part is absolutely critical for safety. Slide the duct back onto the dryer’s exhaust port and the wall vent, ensuring it’s seated firmly and completely.
Now, get your screwdriver and secure those connections with sturdy metal clamps. Tighten them down so the duct is held snugly in place. A good test is to give it a gentle tug; it shouldn't budge. This creates the airtight seal you need for the dryer to work properly.
Crucial Safety Note: Whatever you do, never use duct tape to reattach your dryer vent. I know, the name is misleading, but that stuff is not designed for the high heat and moisture coming from a dryer. The adhesive will fail, causing the connection to pop off and leak dangerous carbon monoxide (from gas dryers) into your home.
Running a Final Test Cycle
With everything securely reconnected, it’s time for the moment of truth. Carefully push your dryer back into position. Be mindful not to crush or kink the ductwork you just so carefully attached. Plug it in and, if you have a gas model, turn the gas supply valve back on.
Set the dryer to a short, air-only or timed-dry cycle for about 10 minutes. While it's running, you'll want to perform a few final checks to be sure the job was a success:
Feel the Airflow: Head outside to the exterior vent cap. You should feel a strong, steady stream of air pushing out. If it feels weak, there might still be a blockage or a leaky connection.
Check for Warmth: The air coming out should be warm, not scorching hot. This is a good sign that heat is venting properly instead of building up inside the dryer or the duct.
Listen for Leaks: Go back inside and stand behind the dryer. Listen for any hissing sounds and feel around the connections for any escaping air.
If you've got strong airflow outside and solid connections inside, you’ve done it! This final check gives you peace of mind, confirming your dryer can now operate safely and at peak performance. You've not only figured out "how do you clean dryer duct" but have also mastered the all-important finishing touches.
When to Call a Professional Dryer Vent Cleaner
Taking care of your dryer vent yourself is a great way to stay on top of regular maintenance. But knowing how to clean the duct is only half the battle; the other half is recognizing when a job is bigger than your tools can handle. This isn't about giving up, it's about making the smart, safe call for your home when a simple cleaning isn't enough.
Sometimes, the signs are pretty obvious. If you've snaked your cleaning brush through the line a few times and your clothes are still coming out damp, you're probably up against a serious clog. That dense, compacted lint just won't break apart with standard DIY kits. That's when you know it's time for professional backup.
Signs You Need an Expert
Beyond a stubborn clog, certain situations just scream "call a pro." Take a look at your ductwork's layout. Is it incredibly long? Does it snake through your walls with a bunch of sharp turns? These are the scenarios where a professional's equipment makes all the difference.
Extremely Long Ducts: If your vent run stretches over 35 feet, most DIY kits simply won't have the reach or the power to clean the entire length effectively.
Complex Duct Runs: Vents with multiple tight bends and elbows are notorious for creating lint traps. Professionals have specialized tools that can navigate these tricky corners without getting stuck or damaging your ducting.
Signs of an Infestation: Noticing droppings near the exterior vent or hearing scratching from inside the walls? Birds, mice, and other critters love to build nests in dryer ducts. This creates a dangerous and unsanitary blockage that really needs to be handled by an expert.
It's a shocking statistic, but clogged dryer ducts are linked to 34% of all home fires involving laundry appliances. The risk is real, and it's why the dryer vent cleaning market is projected to hit $2.5 billion by 2025. Besides the fire hazard, that lint buildup can easily double your drying time, quietly adding an extra $50-100 to your annual energy bills.
The Professional Advantage
So what's the big difference between a pro's toolkit and what you have in the garage? It really comes down to specialized equipment and deep expertise.
Certified technicians don't just use a brush. They roll up with high-powered, truck-mounted vacuum systems that generate far more suction than any shop vac. This power is what's needed to pull out the heavy, deeply embedded lint that's been accumulating for years.
They also use tools like flexible air whips that blast compressed air to dislodge caked-on debris, and they can run an inspection camera through the entire line. This lets them see exactly where the blockage is and, more importantly, confirm that the entire duct is completely clear when they're done. That’s a level of certainty you just can’t get with a simple brush kit.
For a full rundown of what our experts can handle, check out our comprehensive list of professional cleaning services. Making the call ensures the job is done right, keeping your home safe and efficient.
Got Questions? We’ve Got Answers.
Even after you've wrangled the vacuum and cleaned out all that lint, a few questions usually come to mind. We get it. Knowing the little details helps you create a smart maintenance routine and, most importantly, keeps your home safe. We’ve pulled together the most common questions we hear from homeowners just like you.
One of the first things people ask is, "How often do I really need to do this?" There’s no single answer for every home, but our professional rule of thumb is a thorough cleaning at least once a year. That said, your lifestyle and home setup can change that schedule fast.
You'll want to clean more often if you have:
A big family: If the laundry machine is always running, that vent is working overtime. Check and clean it every six months to be safe.
Furry family members: Pet hair is a game-changer. It tangles with lint to form stubborn, heavy clogs that can build up surprisingly quickly. A twice-a-year cleaning is a smart move.
A long or tricky vent path: Does your duct have a long journey to the outside wall or make several sharp turns? Those bends are prime real estate for lint to get stuck, meaning you'll need to clean it more frequently.
Can I Use a Leaf Blower? (And Other Common Questions)
We hear this one a lot. It seems like a fast and powerful shortcut, right? In reality, trying to clean your dryer duct with a leaf blower is a bad idea. It can blast lint into the vent's joints and elbows, packing it in so tightly that you create an even worse blockage. Worse, the force can easily damage or disconnect flimsy ductwork, and you’ll have no way of knowing if the line is truly clear from end to end.
Think of it this way: using a leaf blower is like using a firehose to dust a bookshelf. You’ll definitely move things around, but you won't get a real clean and you’ll probably break something in the process.
This brings up another critical point: the material of your ductwork matters. Those cheap, white plastic or foil accordion-style ducts you see at hardware stores are a major fire hazard. They crush easily, which chokes off airflow, and their ribbed design is a perfect trap for lint.
The only safe and efficient choice is a semi-rigid or rigid metal duct. The smooth interior lets lint and air flow through freely and they're built to last.
Getting these details right is about more than just cleaning, it's about creating a safer, more efficient system for your home. If you have more questions, head over to our detailed FAQs page.
When the DIY approach doesn't cut it, you need a team you can count on. For a professional, deep cleaning that ensures your family's safety and your dryer's top performance, contact Purified Air Duct Cleaning today. Schedule your service with us at https://www.purifiedairductcleaning.com.