How To Clean A Dryer Vent: A Complete DIY Cleaning Guide
- Aug 30, 2025
- 13 min read
Updated: Sep 1, 2025
Knowing how to clean out a dryer vent isn't just another task on your home maintenance checklist; it's a critical skill that directly impacts your family's safety and your wallet. The job itself is pretty straightforward: you disconnect the dryer, use a special brush to clean the entire length of the vent duct, and then clear out any lint or debris from the exterior vent opening.
This simple chore prevents serious fire hazards and makes your dryer run a whole lot better.
Why This Chore Is a Non-Negotiable Task
Let's be clear: this is much more than a tidying job. Regular dryer vent cleaning is an essential safety measure for any home. It’s easy for homeowners to underestimate the danger lurking inside their laundry room walls, thinking of lint as just a minor annoyance. But that fluffy stuff is highly flammable and builds up fast, turning your ductwork into a serious fire risk.
This isn't just some hypothetical problem, either. Public safety campaigns have been sounding the alarm for years. Statistics from 2021 showed nearly 2,900 dryer-related fires in the U.S. alone, leading to significant property damage and putting families at risk. These alarming numbers are why there's a growing focus on regular maintenance to stop lint buildup and keep air flowing freely.
Know the Warning Signs
Thankfully, your dryer will usually give you a heads-up when it needs help. Catching these signals early can stop a small problem from escalating into a dangerous one. When a vent is clogged, your dryer has to work much harder and longer than it should, causing unnecessary wear and tear on the machine.
Keep an eye out for these common indicators:
Clothes Take Forever to Dry: If a normal load suddenly needs two or three cycles to get dry, poor airflow from a clogged vent is almost always the reason.
The Dryer Gets Really Hot: If the outside of your dryer feels unusually hot to the touch, it's a sign that hot air is trapped and can't escape properly.
You Smell Something Burning or Musty: A distinct burning smell is a huge red flag, it means lint is getting hot enough to ignite. A musty odor suggests trapped moisture is creating a perfect environment for mold and mildew.
Lint is Piling Up Outside: Go check your outdoor vent flap. If you see lint and debris collecting around it, you can bet the pathway is clogged.
A clean vent doesn't just protect your home, it extends the life of your dryer. By letting hot, moist air escape efficiently, you take the strain off the heating element and other key parts, which can save you from having to buy a new appliance way too soon.
Ignoring these symptoms doesn't just waste your time; it hits you right in the wallet. An inefficient, clogged dryer can easily add $18 to $24 per month to your utility bill. Taking a little time to understand these key dryer vent cleaning benefits for your home can turn a weekend chore into a smart move that protects your family, saves you money, and keeps your appliances in good shape.
Gathering the Right Tools for the Job
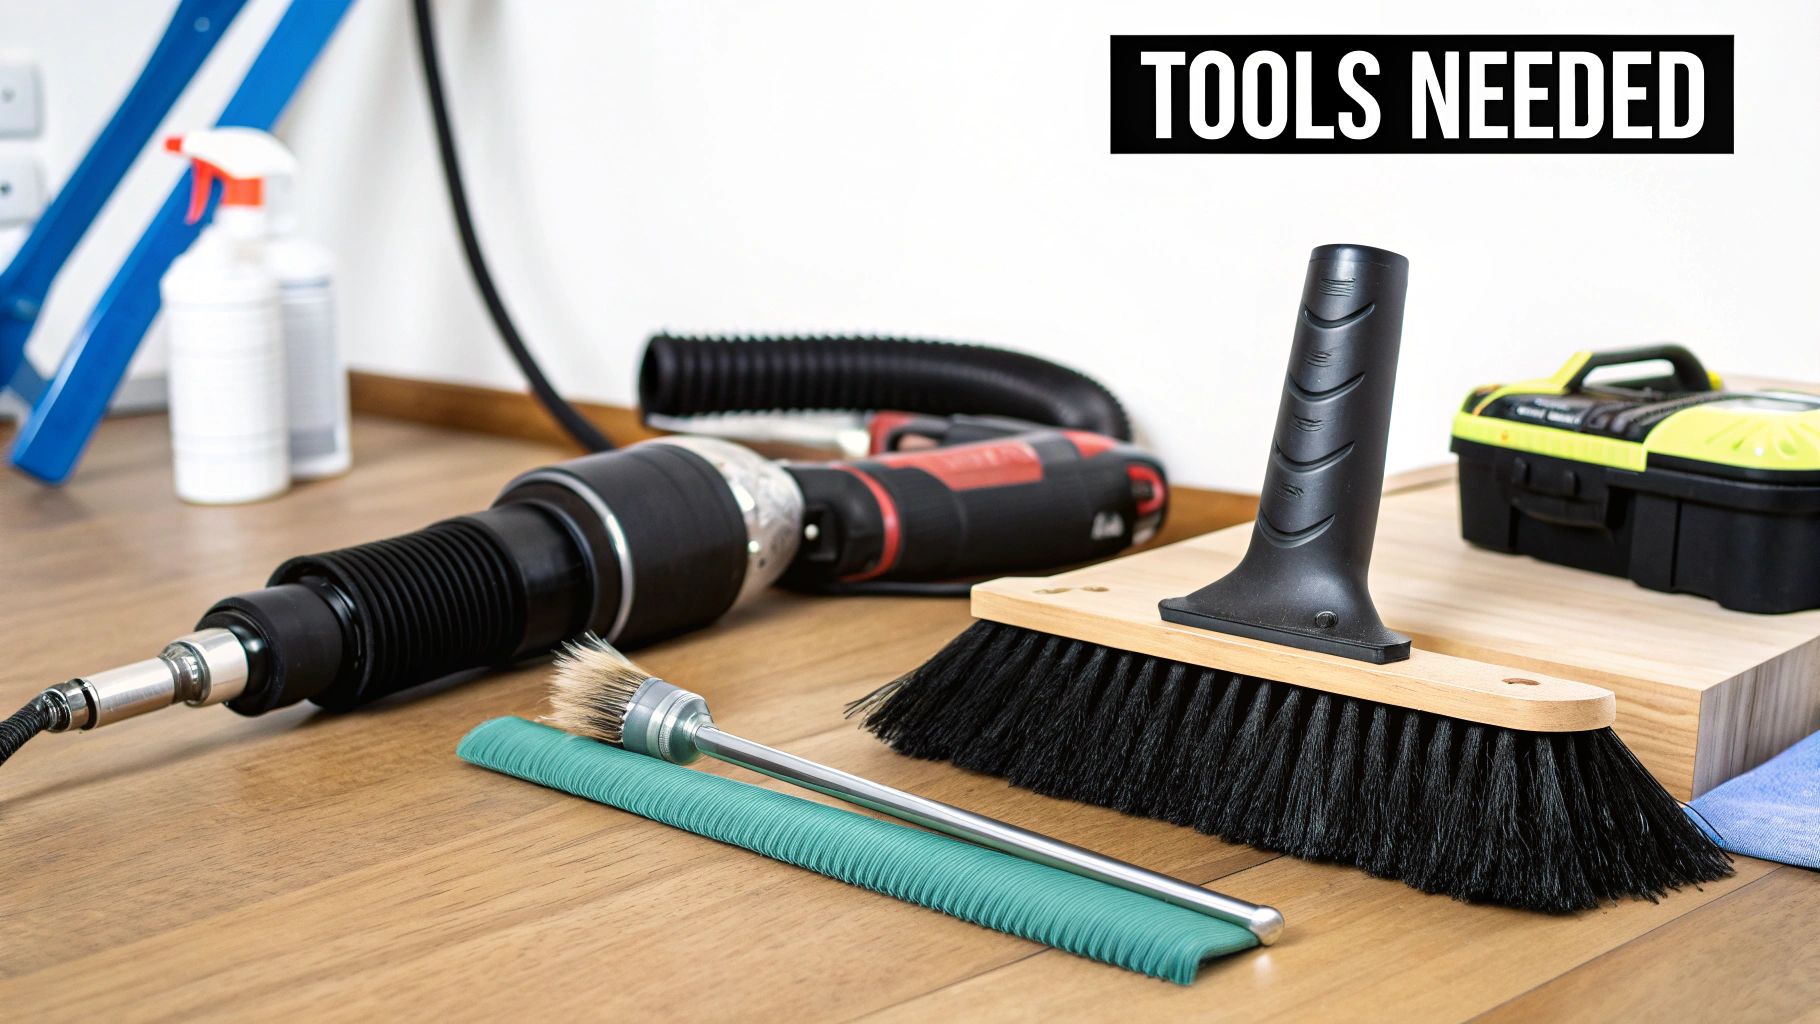
Before you even think about pulling your dryer away from the wall, let's talk tools. A few minutes of prep now will save you a world of headache later. Getting your gear together first is the secret to a smooth project and avoids those frustrating mid-job runs to the hardware store.
The good news? You don't need a professional-grade van full of equipment. A few key items will see you through.
At the top of the list is a dryer vent cleaning kit. These things are game-changers. They usually come with a specialized lint brush and a set of flexible rods you can screw together. This lets you reach way down into the ductwork, scrubbing out that caked-on lint that your vacuum could never dream of touching.
Your Essential Supply Checklist
Once you've got the cleaning kit, you just need a few other things to do this job safely and effectively. You probably have most of this stuff kicking around your garage already.
Here’s a quick rundown of what you'll want to have on hand:
Powerful Vacuum: A shop vac is ideal, but a regular household vacuum with a good hose attachment will get the job done. This is for sucking up all the lint you're about to unleash.
Screwdriver or Nut Driver: You’ll need this to loosen the clamps holding the vent hose to the dryer and the wall.
Duct Tape: Keep a roll of high-quality foil duct tape nearby (not the gray cloth stuff). It's perfect for patching up any small leaks you might find when you're putting everything back together.
Power Drill (Optional but Recommended): You can do this by hand, but attaching the brush from your kit to a drill makes the job so much faster. The spinning action scours the inside of the vent much more powerfully.
Safety First Always
Trust me on this one: cleaning a dryer vent can kick up an incredible amount of dust and lint. The last thing you want is to be breathing all that gunk in. Protecting yourself is just as important as protecting your home from a potential fire.
Always put your well-being first. A little bit of personal protective equipment (PPE) goes a long way in keeping you safe and preventing respiratory irritation from all those airborne particles.
Make sure you've got these safety items ready before you start:
Work Gloves: A decent pair of gloves will save your hands from getting nicked by any sharp metal edges on the ductwork or clamps.
Dust Mask or Respirator: This is absolutely non-negotiable. It keeps you from inhaling fine lint particles that can seriously irritate your lungs.
A final pro tip: pick the right kit for your setup. If your vent has a really long run, maybe it goes all the way up through the roof, find a kit with extra rod extensions. Got a vent with a lot of tight corners? Look for one with super-flexible rods that can navigate those bends easily. That’s how to ensure you clean out every last inch.
With your tools and safety gear ready to go, you're all set for the next step.
The Complete Process for Cleaning Your Dryer Vent
Alright, with your tools and safety gear handy, you’re ready to get to the heart of the project. This is a pretty straightforward job, but being thorough is what separates a quick fix from a job well done. We'll walk through the whole system, from the back of your dryer all the way to the vent outside your house.
Prioritizing Safety Before You Start
Before you even think about touching a tool, we need to talk about safety. This isn't just a friendly reminder; it's the most critical part of the entire process. A bit of lint is a nuisance, but an electrical shock or a gas leak is a serious hazard.
These are the three absolute must-do safety steps before you begin.
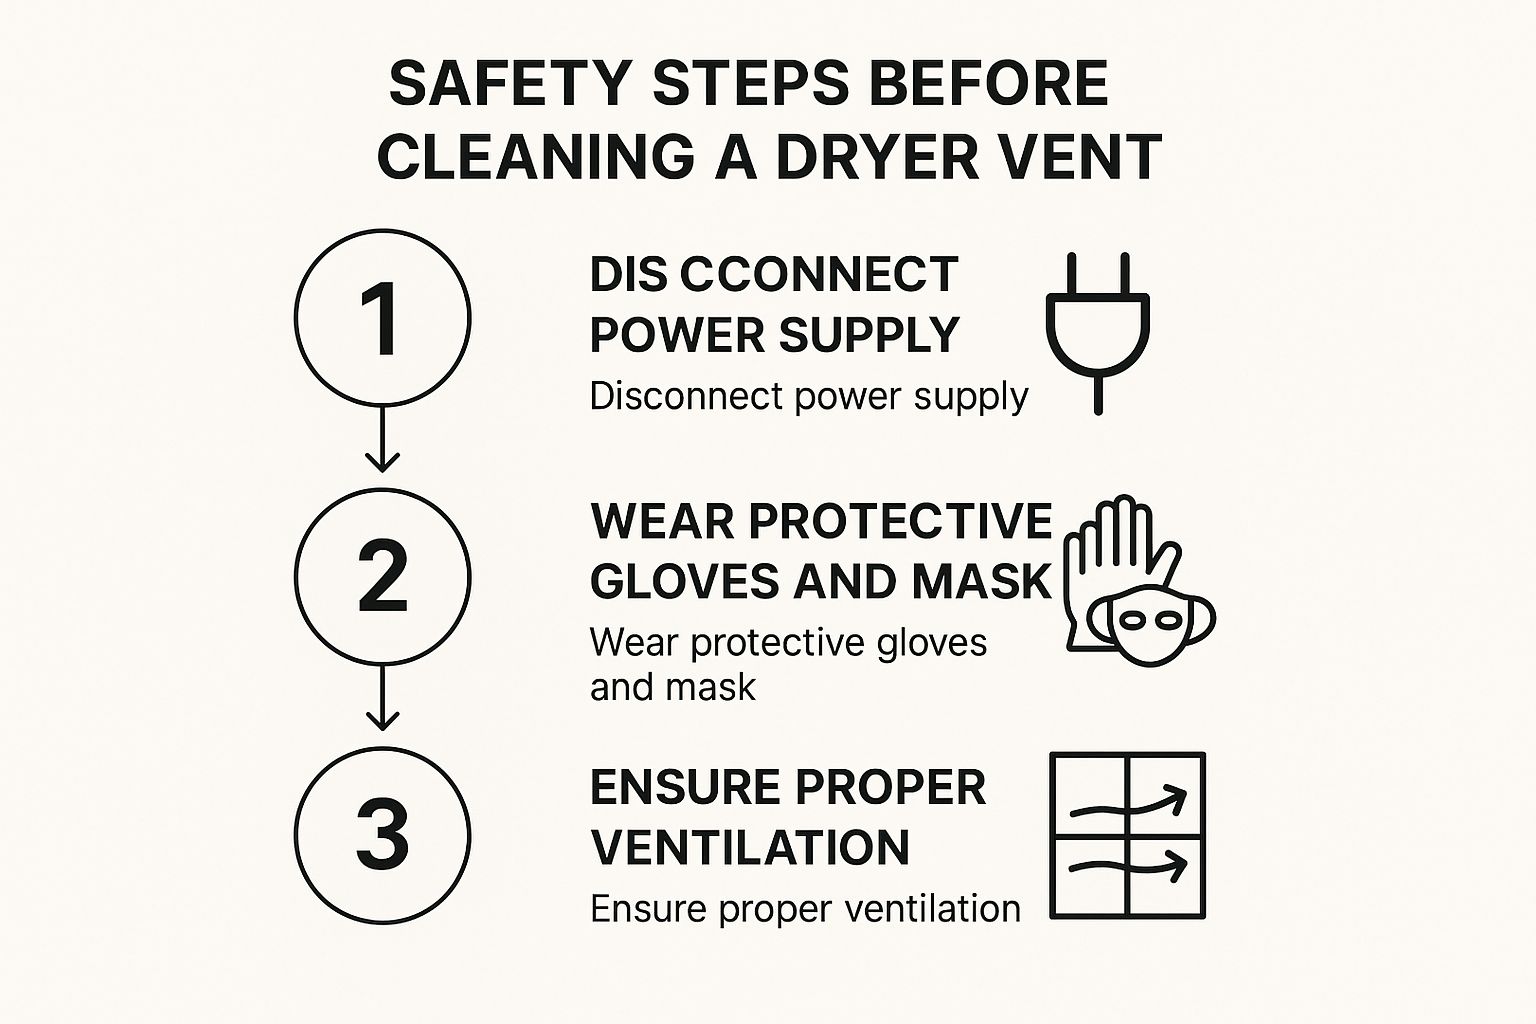
This isn’t complicated, but it's non-negotiable. Unplugging the dryer, wearing your gear, and making sure you have good airflow sets the stage for a safe and successful cleaning.
For a quick overview of the entire process, here’s a simple table breaking down the main stages.
DIY Dryer Vent Cleaning at a Glance
Stage | Key Action | Pro Tip |
|---|---|---|
Preparation | Disconnect power/gas and pull the dryer from the wall. | Have your vacuum ready to catch any initial lint fallout. |
Duct Cleaning | Use a brush kit and drill to scrub the inside of the ductwork. | Run the drill on a low, clockwise speed for the best results. |
Exterior Vent | Clear the outside vent cap of all lint and debris. | Make sure the flap or louvers move freely. |
Reassembly | Reconnect the duct, plug in the dryer, and test airflow. | Before pushing the dryer back, ensure you don’t kink the hose. |
Following these key steps in order ensures you don't miss anything important and get the job done right the first time.
Disconnecting and Accessing the Vent
Now for the hands-on part. Gently pull your dryer away from the wall; you’ll want enough room to work behind it without feeling cramped. Find the flexible duct that connects the back of your machine to the vent opening in the wall. It’s usually secured with a couple of metal clamps.
Grab your screwdriver or nut driver and loosen the clamps at both ends. Once they’re loose, you should be able to gently twist and pull the duct free. Brace yourself, because this is often where you get the first real look at just how much lint has been building up.
Pro Tip: Have your vacuum cleaner hose ready to go before you pull the duct off. A surprising amount of lint can spill out, and catching it right away saves you a cleanup headache later.
Cleaning the Ductwork Thoroughly
With the duct detached, it’s time to break out your dryer vent cleaning kit. Go ahead and assemble a few of the flexible rod sections and attach the brush head to the end.
Slide the brush into one end of the duct and start pushing it through, adding more rod sections as you go. To really get the caked-on stuff, attach the other end of the rod to your power drill. Set it to a low speed and make sure it’s rotating clockwise.
The spinning action of the brush will knock all that compacted lint loose from the inside walls of the duct. Work the brush back and forth a few times to ensure you've dislodged everything. Afterwards, use your vacuum to suck out all the debris from inside the duct, as well as from the openings on the dryer and the wall.
If you want a closer look at this part of the job, you can find more easy DIY safety tips for cleaning dryer vents that go into greater detail.
Clearing the Exterior Vent Cap
Don’t pack up yet, the job’s not done. One of the biggest culprits for a clog is right at the finish line: the exterior vent cap. Head outside and find where your dryer vents out of the house.
You'll probably see a screen or a flap covering the opening, and it's almost always caked with a thick layer of lint. Clean this area out carefully by hand, and use your vacuum’s hose attachment to get it spotless. The most important thing here is to make sure the flap can open and close freely. If it's stuck shut, hot air gets trapped and backs up the whole system.
Once that’s clear, you can head back inside to put everything back together.
Reconnect the Duct: Carefully reattach the duct to both the dryer and the wall. Tighten the clamps until they're snug; you don't need to overtighten them.
Check for Airflow: Before you shove the dryer back, plug it in and run it on an air-only cycle for a couple of minutes. Go back outside and feel for a strong, steady flow of air coming out of the vent.
Final Position: If the airflow feels good, turn off the dryer, unplug it one last time for safety, and carefully slide it back into place. Make sure you don't crush or put a sharp kink in the ductwork behind it.
Troubleshooting Common Problems and Mistakes
Even when you're armed with the right tools and a solid game plan, you can still hit a few snags. Knowing how to troubleshoot these common issues is what really separates a quick DIY clean from a professional-grade job. Every home is different, and some vent systems have quirks like extra-long runs or sharp bends that need a little more finesse.
Don't think of these as roadblocks; they're just challenges that require a slightly different approach. For instance, if you have a really long vent, you might need to clean it from both the inside and the outside to make sure you get the middle. Solving these problems is key to ensuring your dryer runs safely and efficiently.
Handling Awkward Vent Configurations
Not all dryer vents are a straight shot out of the house. The ideal setup is short and straight, but plenty of homes have vents that are long or snake around with several sharp turns. These configurations are notorious for trapping lint and making the cleaning process a real headache.
For Long Runs: If your vent travels a long way, the standard brush kit might not cut it. You'll likely need to buy extra rod extensions to reach the full length. A great pro tip is to work from both ends: start from the dryer, then go outside and work your way in. This helps ensure you clear out that tricky middle section completely.
For Sharp Bends: The flexible rods in your kit are great for gentle curves, but they can get stuck at hard 90-degree elbows. If you hit a wall and the brush just won't go any further, you'll probably have to disconnect the duct at that joint to clean it out by hand before you can continue.
One of the most critical mistakes we see is the wrong type of ducting. Those white vinyl or plastic accordion-style ducts are a massive fire hazard. They should be replaced immediately with rigid or semi-rigid metal ducting, which is smoother, traps far less lint, and won't catch fire.
Dealing with Uninvited Guests
It might sound odd, but dryer vents can be a five-star hotel for birds, rodents, and insects. They’re warm, sheltered, and seem like the perfect spot to build a nest. If you're pushing your brush through and hit a solid blockage that isn't lint, you may have just found some unwelcome tenants.
When you find a nest, it has to be removed completely. With gloved hands or pliers, pull out all the nesting material you can reach. Then, go back in with your brush and vacuum to get rid of any leftover debris. To keep this from happening again, your best bet is to install a pest-proof vent cover on the exterior opening.
This kind of proactive maintenance is becoming more common as people learn about home safety. Awareness of dryer fire risks, which cause thousands of house fires and millions in property damage each year, has grown significantly. As a result, homeowners are more focused on proper maintenance to lower energy bills and keep their families safe.
Common Mistakes That Compromise Safety
Knowing what not to do is just as important as the cleaning itself. A few simple oversights can undo all your hard work or, worse, create new dangers. One of the most frequent problems we see is failing to properly re-secure the duct connections. A loose connection lets hot, moist, lint-filled air blow directly into your wall cavity or all over your laundry room.
This isn't just messy; it creates a serious fire hazard right behind your walls. You can find more details in our guide to preventing a dryer lint fire hazard to keep your connections secure.
Always, always double-check that your clamps are tight and the duct is sealed at both ends before you push the dryer back. Finally, be careful not to crush or kink the ductwork when you move the dryer back into place. A flattened vent restricts airflow just as badly as a lint clog does.
Maintaining Your Dryer Vent for Peak Performance
Alright, you’ve put in the work and your dryer vent is finally clear. Great job. The real goal now is to keep it that way. Think of this not as a one-and-done chore, but as the start of a simple maintenance routine that will pay off in safety and efficiency for years to come.
Your best friend in this fight is your dryer’s lint screen. Seriously. Making it a habit to clean it out after every single load is the easiest and most impactful thing you can do. This simple step catches the overwhelming majority of lint before it even has a shot at getting into your ductwork.
Establishing a Simple Maintenance Schedule
Putting a recurring date on the calendar for a full clean-out takes all the guesswork out of the process. How often you do it really depends on your household, but here are some solid rules of thumb to get you started:
Annual Cleaning: For the average family, a deep clean once a year is usually enough to keep the system breathing easy and running right.
Bi-Annual Cleaning: Got a big family? Doing laundry what feels like 24/7? If your vent system is particularly long or has a few sharp turns, you’re much better off cleaning it every six months.
A regular inspection and cleaning routine does more than just prevent fires; it maintains the high efficiency of your appliance. Effective vent maintenance directly contributes to optimal dryer function; for a deeper dive into how this works, you can explore understanding dryer efficiency and performance.
Performing Quick Monthly Inspections
You don't need to break out the brushes and vacuum every month. A quick visual check is often all it takes to spot a problem before it gets serious.
Once a month, just grab a flashlight and take a quick peek behind your dryer to see if you notice any lint piling up. While you're at it, pop outside and check the exterior vent flap. Make sure it's clean and can open and close without sticking. If you see lint starting to collect on the outside vent cover again, that’s your cue it's time for another clean-out, even if it hasn't been a full year. If you're trying to figure out the perfect schedule for your home, check out these essential tips on how often you should clean the dryer vent.
This proactive mindset is becoming more common as people invest in high-efficiency dryers and want to get the most out of them. It's not just about extending the life of your dryer, it's about keeping your home safe and your energy bills from creeping up.
Answering Your Dryer Vent Questions
Even after you've got a plan, a few questions might pop up. That’s perfectly normal. Getting answers to the common stuff can give you the confidence to tackle this job and make sure your dryer vent system is genuinely safe and running at its best. Let's dig into some of the things homeowners ask us all the time.
Common Dryer Vent Inquiries
One of the first things people want to know is how often they should be cleaning their vent. For the average household, cleaning the dryer vent annually is a solid rule of thumb.
But this isn't a one-size-fits-all situation. If you have a big family and the laundry is always going, or if your home has a particularly long and winding vent path, you’ll want to be more proactive. In those cases, cleaning it out every six months is a much safer bet.
Another question we hear a lot is about using a leaf blower as a shortcut. I get the logic, but it's a really bad idea. Using a leaf blower is not recommended because it often just compacts wet, sticky lint into a dense blockage. Plus, it does nothing to actually scrub the gunk off the inside walls of the duct. The only way to do it right is with a dedicated dryer vent cleaning kit that has a spinning brush designed for the job.
Knowing when to DIY and when to call in a pro is crucial. A simple cleaning is one thing, but some situations are best left to an expert to avoid creating a bigger, more expensive problem.
So, when is it time to pick up the phone and call a professional? You should definitely bring in an expert if your vent run is unusually long, say, over 30 feet, or if it snakes through tricky spots like an attic or a tight crawlspace.
Pros have specialized equipment, like high-powered vacuums and cameras, that are built for these complicated jobs. If you want to get a better idea of what's involved in a professional service, you can learn about the average cost of dryer vent cleaning and what to expect in our detailed guide.
If you're dealing with a complex vent system or just want the peace of mind that comes from a professional-grade cleaning, the certified technicians at Purified Air Duct Cleaning are here to help. We provide comprehensive services to ensure your dryer runs safely and efficiently. Contact us today for a free quote at purifiedairductcleaning.com.