How to Clean AC Coils: A Complete DIY Guide
- Sep 14, 2025
- 12 min read
Updated: Sep 15, 2025
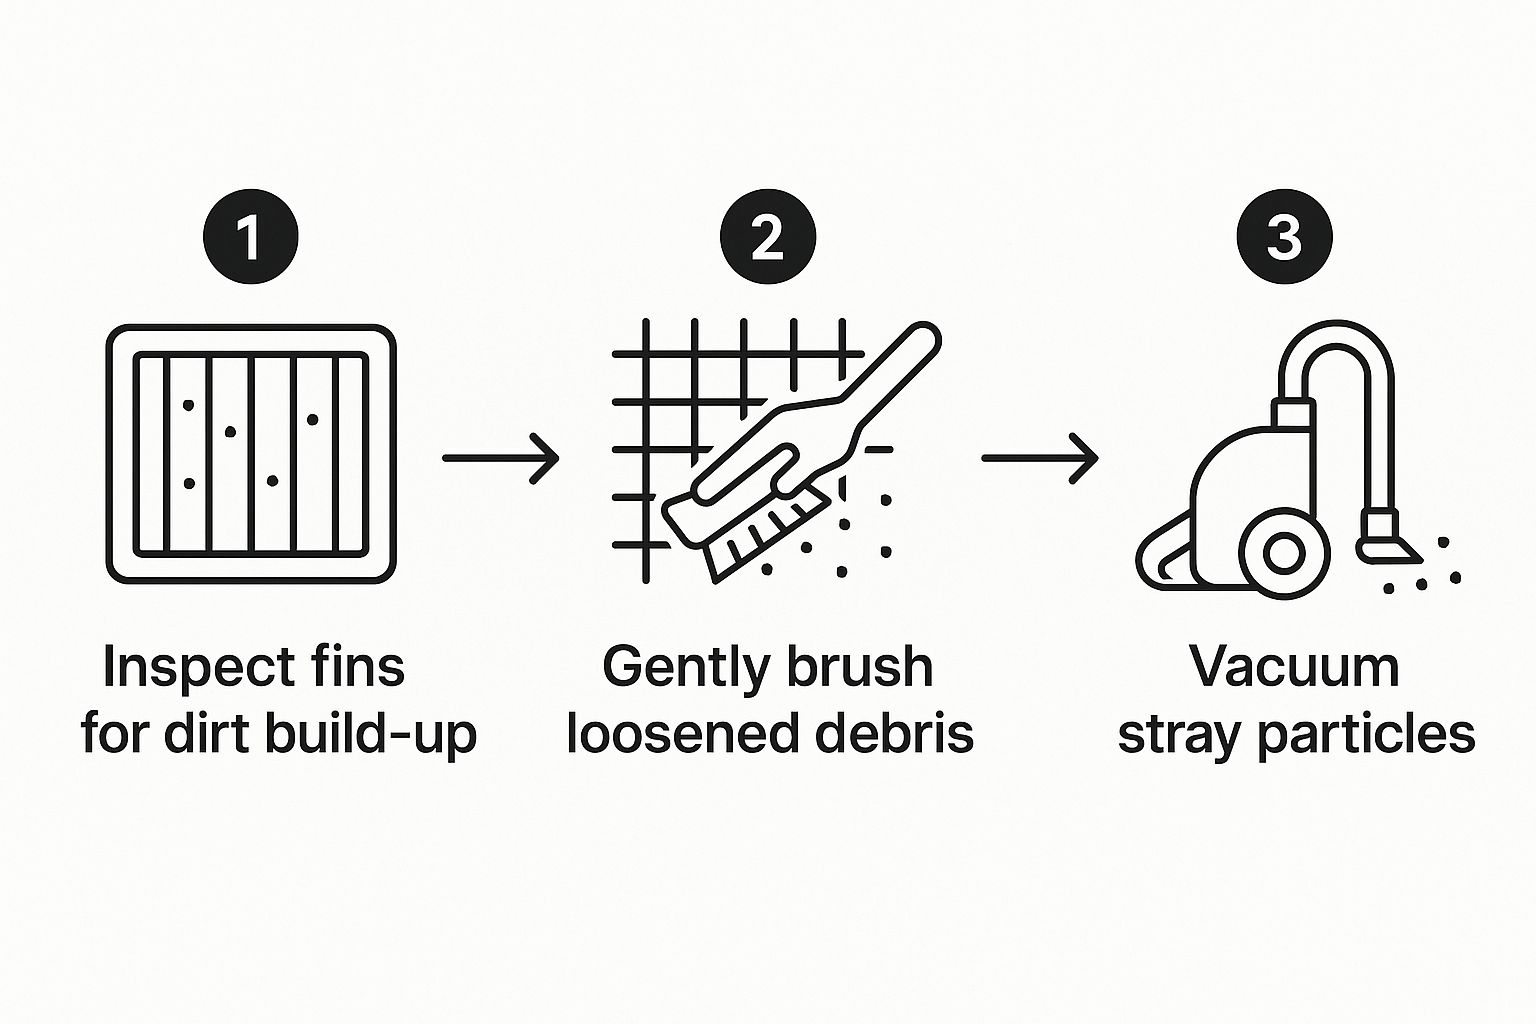
The quick and dirty on cleaning your AC coils: you'll need to shut off the power, get to the coils themselves, use a good coil cleaner, and give them a solid rinse. For the unit outside, a garden hose works wonders; just be sure to spray from the inside out. For the indoor unit, you'll want a no-rinse foaming cleaner to play it safe and avoid any water damage. A little bit of effort here goes a long way in boosting your system's performance.
Why Cleaning Your AC Coils Actually Matters
If your AC seems sluggish and your energy bill is creeping up, you might have a common culprit: dirty coils. It’s a maintenance step tons of homeowners skip, thinking a new filter every few months is all it takes. But the coils are where the magic of heat exchange happens, and when they're caked in grime, your whole system takes a hit.
Think of it like trying to breathe through a dusty mask. That's what your AC unit is doing when its coils are dirty. That buildup of dust, pollen, and general gunk acts like an insulator, making it way harder for the coils to do their job: absorbing heat from inside your home (the evaporator coil) or dumping it outside (the condenser coil). This strain forces the compressor to work harder and run longer, which can lead to expensive wear and tear. An afternoon of cleaning can easily save you a pricey repair call later.
The Real-World Impact of Clean Coils
Learning how to clean your AC coils pays off in more ways than just better cooling. The benefits directly hit your wallet, your comfort, and the lifespan of your HVAC system.
Lower Energy Bills: A clean system simply doesn't have to fight as hard, meaning it pulls less electricity. According to the U.S. Department of Energy, this one task can boost efficiency by up to 30%.
Better Indoor Air Quality: Your indoor evaporator coils are naturally damp, which is a perfect breeding ground for mold and mildew once dust settles in. Cleaning them out helps stop those allergens and other junk from circulating through your home.
Longer System Lifespan: When you reduce the strain on the compressor, one of the most expensive parts to replace, you can add years to the life of your entire HVAC system.
I remember a customer in Phoenix whose AC was running nonstop but the house was still hot. Before they called us for a big repair job, they decided to clean the outdoor condenser coils, which were packed with dirt and cottonwood fluff. The difference was immediate. The system started cooling the house down quickly and cycling off like it should, saving them hundreds on a service call. You can find more tips like this in our guide on how to improve HVAC efficiency.
It’s worth noting that the same logic applies across different types of systems. The principles of keeping coils clean for top performance are also key for making air source heat pumps work efficiently, showing just how fundamental this maintenance really is.
Your Essential Toolkit for Safe AC Coil Cleaning
Before you even think about touching those AC coils, let's talk about getting your gear in order. Jumping in without the right supplies is the difference between a job well done and a call to a repair technician that’s going to cost you. Think of this as your pre-game prep to make sure everything goes off without a hitch.
The absolute, non-negotiable first step is safety. You have to kill the power to your HVAC unit completely. That means turning it off at the thermostat and, more importantly, finding the dedicated breaker in your electrical panel and flipping it off. I can't stress this enough: it's a crucial step to avoid getting a nasty shock.
Gathering Your Cleaning Arsenal
With the power safely off, it's time to assemble your tools. You don't need a truck full of professional equipment, but a few key items will make this job much faster and more effective.
Protective Gear: At the very least, grab a pair of insulated gloves to protect your hands from sharp fins and chemicals. Safety glasses are also a must to keep cleaner and debris out of your eyes.
Basic Tools: A simple screwdriver set is all you'll need to get the access panels off. You’ll also want a soft-bristle brush; it's perfect for gently knocking off the bigger chunks of grime without mangling the delicate fins.
Fin Comb: This little tool is a lifesaver. It’s cheap and does an amazing job of straightening out any bent aluminum fins on the coils. Fixing those is key to getting your airflow back to normal.
The most critical choice you'll make here is the cleaning solution itself. The right product will melt away grime like magic, but the wrong one can actually corrode your coils. What you pick really depends on whether you're working inside or outside.
Choosing the Right AC Coil Cleaner
Picking the right cleaner from the hardware store shelf can feel overwhelming. To make it simple, I've put together a quick comparison of the most common types you'll find. This should help you grab the perfect one for your specific needs.
Choosing the Right AC Coil Cleaner
Cleaner Type | Best For | Application Method | Key Consideration |
|---|---|---|---|
Foaming Cleaner | Heavily soiled outdoor condenser coils | Spray on, let it foam and expand, then rinse off with a hose | The expanding foam action is great for getting deep into the fins. |
No-Rinse Spray | Indoor evaporator coils (where rinsing isn't an option) | Spray on and let it drip into the condensate pan | Super convenient for indoor units, as it cleans itself off with condensation. |
Heavy-Duty Solvent | Extremely greasy or neglected commercial coils | Typically requires careful application and thorough rinsing | Very powerful stuff. Honestly, this is usually best left to the pros. |
Each of these cleaners has its place. For most homeowners, a good foaming cleaner for the outside unit and a no-rinse spray for the inside one will cover all your bases.
This kind of prep work is a core part of good system care, which we talk more about in our guide to 8 essential HVAC maintenance tips for 2025. A simple garden hose is all you need for rinsing the outdoor unit; never use a pressure washer, as it will destroy the fins. For other heavy-duty cleaning jobs that do require some serious power, you might find some good info on diesel pressure cleaners and how to use them safely.
Cleaning Your Outdoor Condenser Coils
Alright, with your gear in hand, it's time to head outside and tackle the condenser unit. This is where the real magic, and the real mess, happens. Think of it as the lungs of your AC system, and right now, it's probably clogged with a year's worth of dirt, leaves, and that fluffy cottonwood stuff. This gunk acts like a thick winter coat, trapping heat and forcing your system to work way harder than it should.
Before you touch a single screw, the absolute first step is safety. Go to your breaker box and shut off the power to the AC unit. No exceptions. This is the most important part of the job and prevents any risk of electric shock.
Once you're 100% sure the power is off, you can get to work. Start by removing the screws holding the top fan assembly and the protective cage. I like to keep a small magnetic tray or a Tupperware container handy for these so they don't get lost in the grass. With the cage off, you’ll likely see a pile of leaves and twigs at the bottom. Reach in and clear out as much of that large debris as you can by hand.
Applying Cleaner and Rinsing Correctly
Now that the big stuff is gone, we can focus on the fine dirt and grime caked onto those delicate aluminum fins. This is where your AC coil cleaner proves its worth.
Spray the cleaner generously over the coils. Don't be shy; you want to get full coverage from the top all the way to the bottom. If you're using a foaming cleaner, you'll get the satisfaction of watching it expand and literally push the dirt out from between the fins. Let it sit and work its magic for 5-10 minutes, or whatever the instructions on the can recommend.
This visual gives you a good idea of the initial clearing process before you get down to the deep cleaning.
Getting rid of the surface-level grime first lets the chemical cleaner work on the really stubborn stuff packed deep inside.
After the cleaner has had time to do its job, it's rinsing time. Technique is everything here.
Grab a garden hose with a gentle spray nozzle and rinse the coils from the inside out. This is key. Spraying from the outside just drives the gunk deeper into the fins. Pushing the water from the inside flushes all that dissolved dirt and chemical residue away from the unit.
Finishing Touches for Better Airflow
Before you put everything back together, take a minute to look at the aluminum fins. It’s pretty common for them to get bent from things like hail, weed whackers, or flying debris. This is where a fin comb comes in handy. Gently slide the comb down the rows of fins to straighten them back out. It’s a small detail, but it makes a massive difference in restoring proper airflow and getting your system back to peak efficiency.
Taking these extra steps is what separates a quick rinse from a proper cleaning. It's a critical part of any good maintenance routine. To see how this fits into the bigger picture, check out our guide on the ultimate 2025 HVAC preventative maintenance checklist.
Once the fins are straight and the unit has had a chance to air dry, you can put the cage and fan assembly back on. Job done.
Tackling Your Indoor Evaporator Coils
Alright, let's move inside. Cleaning your indoor evaporator coils can feel a bit more daunting than the outdoor unit, but trust me, the process is pretty straightforward once you know what you're doing.
These coils are usually tucked away inside the air handler or right next to your furnace. This is the heart of the cooling process; it's what pulls the heat and humidity out of your air. Keeping it clean is non-negotiable for comfort and efficiency.
First thing's first: kill the power at the breaker. No exceptions. Once you're sure it's off, you'll need to find the access panel on your air handler. It's typically a metal door held on by a few screws. Pop that panel off, and you'll see the A-shaped evaporator coils inside.
Obviously, you can't just blast this with a garden hose like the outside unit. That's where a good no-rinse foaming coil cleaner comes in. These products are made specifically for this job and are a lifesaver.
The No-Rinse Cleaning Method
Before you spray anything, grab a soft brush and gently knock off any loose dust or gunk from the coil fins. Be gentle here, as those fins bend easily.
Now, spray the no-rinse cleaner evenly across the entire surface of the coils. You want to get it deep into all those fins. The foam will expand, doing the hard work for you by lifting all the built-up dirt and grime to the surface.
As the foam liquefies, it, along with all the gunk it pulled out, will simply drip down into the condensate drain pan below and flush out of the system. This clever design makes the whole process clean and safe for your home's interior.
One of the most important parts of this job is checking the condensate drain pan and line. I can't tell you how many service calls for water damage end up being a clogged AC drain. That mysterious ceiling leak in the middle of summer? It’s often not the roof, but an overflowing AC drain pan.
This quick check can save you from a massive headache down the line. A clogged drain creates a perpetually damp environment, which is a perfect breeding ground for mold and other nasties. You can learn more about how moisture causes these issues and how to avoid mold in your home and damp buildings.
To finish up, just take a peek at the drain pan. If you see standing water, you've likely got a clog in the drain line. A little bit of diluted vinegar or a special drain line tablet can help keep it clear. Once everything looks good, screw the access panel back on securely, and then you can restore the power.
Common Mistakes That Can Damage Your AC
Knowing how to clean AC coils is only half the battle. Knowing what not to do is just as important if you want to avoid a hefty repair bill. With the best intentions, a few common DIY mistakes can quickly turn a simple maintenance task into a disaster for your HVAC system.
One of the most frequent, and damaging, errors I see is someone taking a pressure washer to their unit. Those delicate aluminum fins on your condenser coils are engineered for maximum airflow, but they will bend and flatten in a heartbeat under high pressure. Even on a low setting, a pressure washer can instantly crush these fins, severely restricting airflow and crippling your AC’s ability to cool your home.
Using the Wrong Cleaning Products
Another critical mistake is grabbing any old household cleaner from under the sink. Products with bleach, harsh detergents, or other acidic chemicals were never meant for the metals in your AC unit, like copper and aluminum. Over time, these substances will cause corrosion, leading to refrigerant leaks and premature system failure.
Always use a cleaner specifically labeled for HVAC coils. They are formulated to dissolve grime without eating away at the essential components of your system. This simple choice protects your investment.
Finally, the most dangerous mistake of all is forgetting to cut the power. It seems obvious, but it’s surprisingly easy to overlook in the moment. Failing to turn off the power at the breaker box before you start working exposes you to the serious risk of electric shock and can short out the electrical components of your unit.
Making these errors can create bigger problems than just dirty coils. Interestingly, similar issues can pop up from improper techniques elsewhere in your system, which is why it's wise to understand if air duct cleaning can cause damage when done incorrectly. Always prioritize safety and use the right tools for the job.
Putting It All Back Together
Alright, with your AC coils looking brand new, you're on the home stretch. The last piece of the puzzle is reassembly and a quick performance check. Don't rush this part; taking your time here ensures all your hard work pays off safely.
Go ahead and carefully reattach any access panels or protective cages you removed. Make sure every screw goes back in and is tightened down securely. This might seem minor, but a loose panel can vibrate and create a really annoying rattling sound once the system kicks back on, not to mention cause air leaks.
Powering Up and Checking Your Work
Before you even think about flipping that breaker back on, give the unit some time to air dry, especially the outdoor condenser. You just sprayed it down with water, after all.
I usually recommend waiting at least 30 minutes to an hour. It's a good rule of thumb that prevents any potential electrical shorts from lingering moisture. Better safe than sorry.
Once everything is dry and reassembled, restore power and turn on your AC. Now for the satisfying part: seeing the results.
Feel the Airflow: Stand under a vent. The air should feel noticeably stronger and colder than it did before you started.
Listen for the Hum: A clean system is a happy system. It should run much more smoothly and quietly, without any of the straining or groaning noises you might have gotten used to.
Watch the Cycle: Let it run for a bit. The AC should hit the temperature you set on your thermostat and then cycle off, just like it's supposed to. If it was running constantly before, this is a huge win.
Think of this as your post-cleaning checklist. If you've got stronger airflow, quieter operation, and efficient cooling cycles, you've nailed it. Those are the immediate rewards for a job well done, and your system is officially ready to take on the heat.
Answering Your Top AC Coil Cleaning Questions
Even with the best guide in hand, you're bound to have a few questions when you tackle a job like cleaning your AC coils for the first time. Let's clear up some of the most common ones so you can get the job done right, without any guesswork.
How Often Should I Clean My AC Coils?
As a solid rule of thumb, plan on cleaning your AC coils annually. The perfect time to do this is in the spring, right before you start leaning on your AC for the hot summer months.
However, your local environment is the real deciding factor here. If you live in a particularly dusty area, have cottonwood trees dropping fluff all spring, or share your home with shedding pets, you’ll want to bump that up. In those cases, checking and cleaning the coils twice a year is a smart move to keep your system running efficiently.
What Kind of Cleaner is Safe to Use?
This is a big one, because using the wrong product can cause some serious, expensive damage. Stay away from common household cleaners like bleach or dish soap. Just don't do it.
These harsh chemicals can easily corrode the delicate aluminum fins and copper tubing of your coils. Worse, they often leave behind a sticky film that becomes a magnet for even more dirt and grime. Stick with a product specifically labeled as an HVAC coil cleaner, as they're formulated to be tough on dirt but safe for your system.
When Is It Time to Call a Professional?
DIY cleaning is great for regular maintenance, but there are definitely times when it's best to call in a pro. If you open up the unit and see the coils are covered in a solid block of ice, that's a red flag. An iced-over coil usually signals a deeper problem, like a refrigerant leak, that a simple cleaning won't fix.
Another scenario is access. If your indoor evaporator coils are tucked away in a ridiculously tight or awkward spot, it's safer and more effective to have a technician handle it. They have the specialized tools and experience to get to those hard-to-reach places without causing damage.
If you run into a cleaning job that's more than you bargained for or simply want the peace of mind that comes with a professional touch, Purified Air Duct Cleaning is here to help. We offer expert HVAC coil cleaning services that can restore your system's performance and efficiency. Learn more and get a free quote on our website.