How to Clean Air Ducts Yourself A Realistic Homeowner Guide
- Feb 12
- 16 min read
Yes, you can absolutely clean your air ducts yourself, but it's important to be realistic about what that actually means. For most homeowners, a DIY job is more about surface-level maintenance: vacuuming out what you can reach and washing the vent covers. It's a great habit for cutting down on dust and allergens, but it’s not a substitute for a professional deep clean.
Understanding What DIY Duct Cleaning Can Accomplish
Tackling the dust bunnies lurking in your vents can feel like a huge win, and in many ways, it is. Deciding to clean your air ducts yourself is a solid first step toward better indoor air quality. You get to control the visible grime and can often see a real difference in the amount of dust floating around your home.
Think of this project less as a deep, invasive cleanse and more as routine upkeep. It's like dusting your furniture or vacuuming the floors; you're preventing minor buildup from turning into a major headache. You can definitely get rid of the pet hair, dust, and little bits of debris that settle right at the entry points of your HVAC system.
What a Homeowner Can Realistically Handle
With your standard household tools, you'll be focusing on the parts of the ductwork you can actually see and reach. You can successfully:
Clean all your vent covers: Pull off the supply and return register covers. A good wash with soap and water will get rid of any caked-on dust and grime.
Vacuum shallow duct areas: Grab a powerful vacuum with a long hose attachment and suck out any loose debris you can reach in the first foot or two of the duct opening.
Wipe down surrounding surfaces: Don't forget to clean the walls or floor around the vents. This stops dust from getting immediately sucked right back into the system.
This level of cleaning is perfect for keeping a generally clean system in good shape and can even help airflow a little. If you're seeing signs that your ducts might need more than just a surface clean, you might want to learn about the expert tips and signs that air ducts need to be cleaned.
A key takeaway for any homeowner is that a DIY cleaning targets the "low-hanging fruit." You're removing the most visible and easily reached contaminants, which is an excellent part of a regular home maintenance schedule.
Setting Realistic Expectations for Your Project
While taking matters into your own hands is great, it’s crucial to know the limits. Without specialized equipment, you just can't do what a professional service can. Your shop vac simply won't reach deep into the winding maze of ducts running through your walls, ceilings, and floors.
Plus, a simple vacuum job won't touch more serious issues. Problems like mold, mildew, pest infestations, or heavy buildup from a recent renovation require aggressive agitation tools and high-powered, truck-mounted vacuums to truly fix. Trying to tackle mold yourself, for example, is risky business; you could end up releasing spores into your home's air.
This reality is reflected in the growing demand for professional services. The global duct cleaning market was valued at $8.2 billion and is projected to nearly double to $15.6 billion by 2033. That kind of growth shows a widespread understanding that for a true deep clean, you often need to call in the experts. You can see more about these trends on marketintelo.com.
So, what's the right choice for you? This quick comparison should help you decide whether a weekend project is enough or if it's time to call in the pros.
DIY Duct Cleaning vs Professional Service At A Glance
Factor | DIY Duct Cleaning | Professional Service |
|---|---|---|
Effectiveness | Removes surface-level dust and debris near vents. | Provides a deep, comprehensive cleaning of the entire duct system. |
Cost | Low, typically under $50 using existing tools. | Higher initial investment, ranging from a few hundred to over a thousand dollars. |
Time Commitment | A few hours to a full afternoon, depending on home size. | Typically a few hours, with no effort required from the homeowner. |
Potential Risks | Risk of damaging flexible ducts or pushing debris deeper into the system. | Minimal risk, as technicians are trained and insured. |
Ideal For | Routine maintenance in a home with no major air quality issues. | Homes with mold, pests, heavy buildup, or family members with allergies. |
Ultimately, a DIY cleaning is a fantastic maintenance step. But for the heavy-duty problems or a true system reset, nothing beats the power and precision of a professional service.
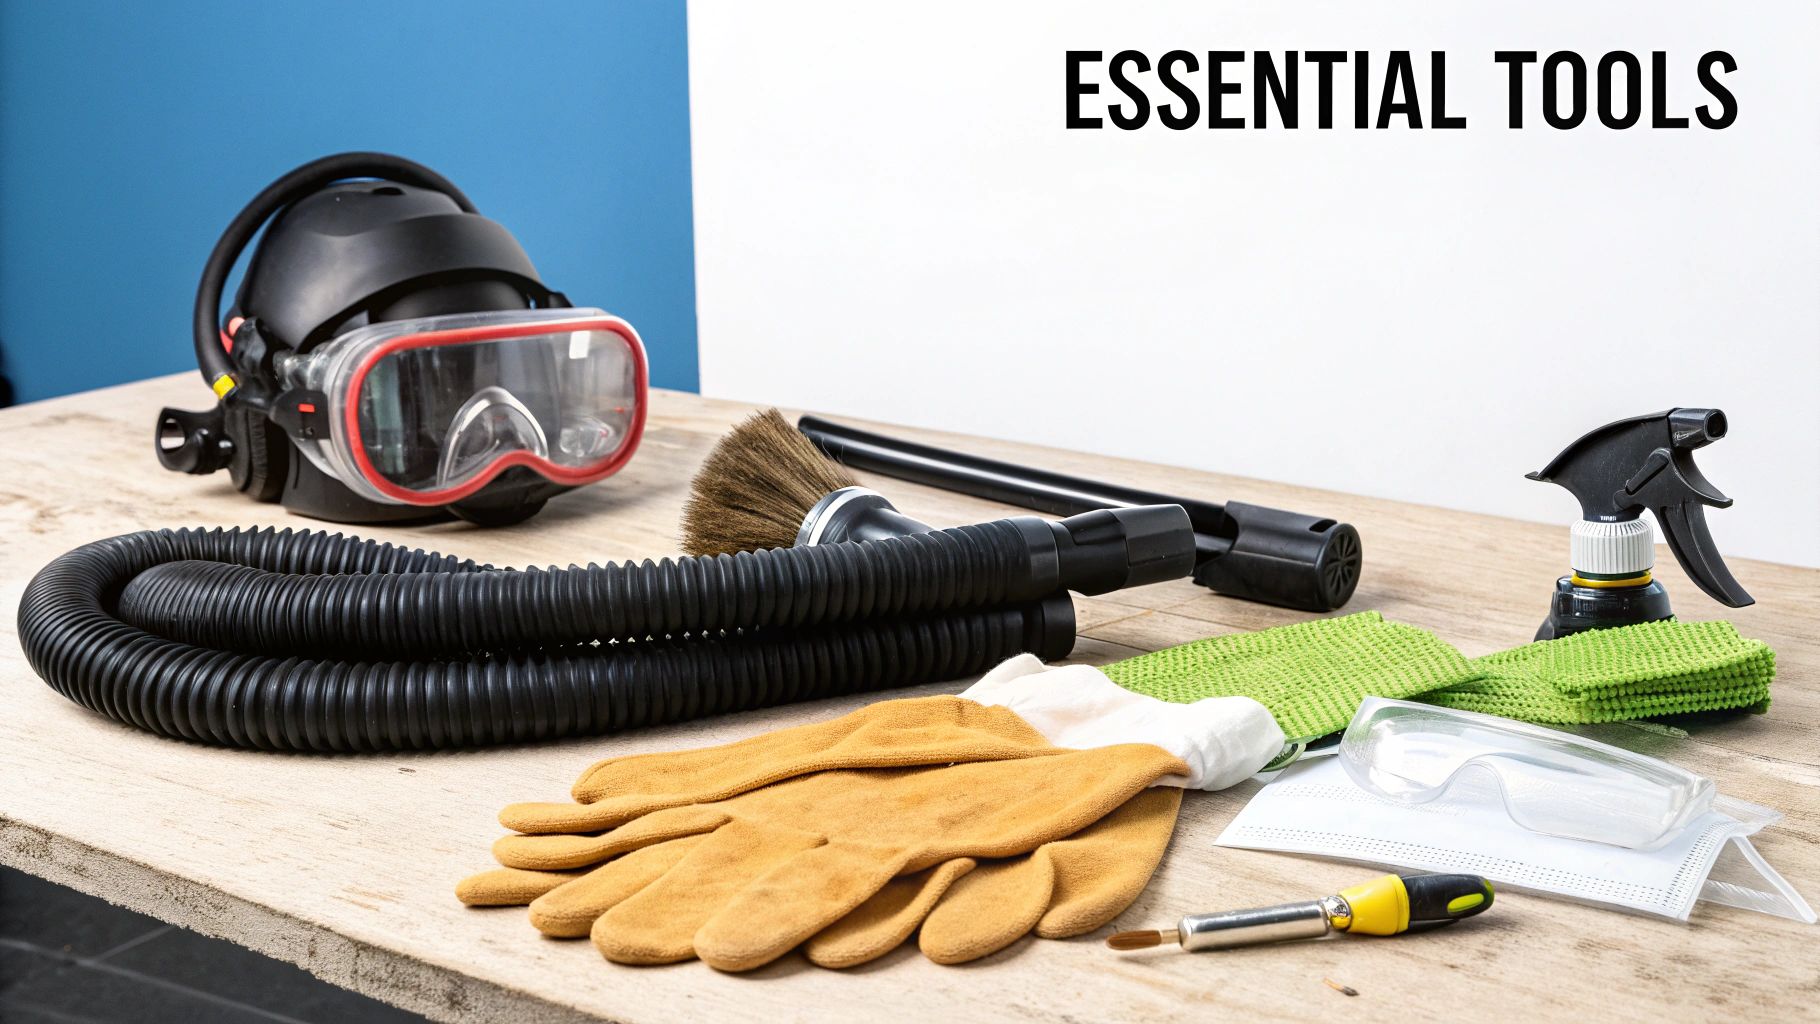
Gathering Your Tools and Safety Gear
Before you even think about unscrewing a single vent cover, let's talk about prep. Seriously, trying to clean your air ducts without the right equipment is a recipe for frustration and, frankly, a potential safety issue. Rushing in unprepared will make the job ten times harder. The good news? You probably have most of what you need tucked away in your garage or a closet already.
Think of this like a small-scale excavation project. You're about to stir up years of dust, pet dander, and who knows what else. You'll need tools to break it all loose, something powerful to suck it all up, and, most importantly, gear to protect yourself from breathing in that mess.
Your Essential Tool Checklist
Get everything together before you start. Trust me, you don’t want to be halfway through, covered in dust, and realize you need to hunt down a specific screwdriver. It's not about buying fancy, specialized gear; it's about having the right household items ready to go.
Here's a practical list of what you'll need:
A Powerful Vacuum: Your standard household vacuum just won't cut it for this. You'll need a shop vac or a canister vacuum with a long, flexible hose that can actually reach down into the duct openings.
Screwdriver or Drill: Most vent covers are held in by simple screws. Having a multi-bit screwdriver or a power drill will make taking them off a breeze.
Stiff-Bristled Brush: A brush with a long handle and stiff bristles is your best friend for breaking up the gunk caked onto the duct walls. A brand-new toilet brush or a long dryer vent brush works surprisingly well for this.
Cleaning Rags and Paper Towels: Grab some damp microfiber cloths for wiping down the vent covers and the areas around them. Paper towels are handy for blocking off other vents in the house so you don't just blow dust from one room to another.
Bucket of Warm, Soapy Water: Once the vent covers are off, you'll want to give them a good wash. A simple mix with dish soap is perfect for cutting through all that grime.
Prioritizing Your Personal Safety
Okay, this is the most critical part of your prep work. The moment you start brushing and vacuuming, you’re going to kick up dust, pollen, and other irritants that have been dormant for years. Protecting your lungs and eyes is non-negotiable.
Don't even think about skipping this essential safety gear:
N95 Dust Mask: A simple cloth mask won't do. An N95 respirator is designed to filter out the very fine particles you're about to unleash, giving your respiratory system the protection it needs.
Safety Goggles: Dust and debris can, and will, fall from ceiling vents or shoot out of floor vents. Goggles are a must to keep that junk out of your eyes.
Gloves: A decent pair of work gloves will save your hands from getting grimy and protect you from any sharp metal edges inside the ductwork.
Before you do anything else, kill the power to your HVAC system. Walk over to your home's circuit breaker and flip the switch for your furnace and air conditioner. This is the single most important safety step to ensure the system doesn't kick on while you've got your hands and tools inside.
By taking a few minutes to get properly set up, you’re paving the way for a much smoother, safer project. With your tools laid out and your safety gear on, you can tackle the cleaning with confidence.
A Practical Guide to Cleaning Your Vents and Ducts
With your tools laid out and your safety gear on, it's time to get your hands dirty. This is where you’ll see the immediate payoff for your efforts as you start clearing away the visible layers of dust and grime. The trick is to be methodical: tackle one room at a time to keep the mess contained and make sure you don't overlook a single vent.
Let's be clear: the goal here isn't the same as a deep, professional cleaning. It’s about making a significant surface-level improvement. By following these steps, you can drastically cut down on the amount of dust circulating in your home and make a real difference in your indoor air. Patience is your best friend here.
Preparing Your Workspace
Before you even think about unscrewing that first vent cover, take a few minutes to prep the room. You’re about to kick up dust and particles that have been sitting there for months, maybe even years. Without a little prep work, you’ll just end up with a fine layer of grime blanketing everything you own.
Cover any furniture, electronics, or anything else near the vents with old sheets or plastic drop cloths. This one simple step will save you a massive headache and a ton of cleaning time later. It's also a good idea to close the doors to the room you're working in to stop the dust from drifting through the rest of the house.
Removing and Washing Vent Covers
Often, the grimiest parts are the vent covers themselves, also known as registers. They act as the first line of defense against dust, pet dander, and whatever else gets sucked into your system. Start by grabbing your screwdriver or drill and carefully removing the screws holding each supply and return vent cover in place.
Take the covers to a sink or bathtub for a good cleaning. A thorough scrub with warm, soapy water and a soft brush will get most of the built-up gunk off. For the really stubborn grime stuck in those little crevices, an old toothbrush works wonders. Once they're clean, set them aside to dry completely while you move on to the ducts.
Pro Tip: Your phone is an unexpectedly great inspection tool. Turn on the flashlight and video mode, then carefully stick it into the duct opening. This quick peek can show you if there's any large debris or surprise blockages you need to deal with before you really get started.
The Cleaning Workflow
Alright, it’s time to get into the ducts. The process is pretty straightforward: loosen the debris, then immediately suck it up with your vacuum. Don't stress about reaching the entire length of the ductwork; your focus should be on the first few feet of each run, since this is where the vast majority of accessible buildup collects.
Here’s a practical workflow to follow for each and every vent:
Block Off Other Vents: Stuff some paper towels or a few rags into the other supply vents in the room. This simple step prevents the dust you're about to dislodge from blowing straight out of another opening.
Agitate the Debris: Shove your long-handled, stiff-bristled brush into the duct. Scrub the sides, top, and bottom with some real energy to break loose any caked-on dust. Work the brush back and forth and give it a good twist to hit all the surfaces.
Vacuum Immediately: With the dust now loose, it's time to capture it. Stick your shop vac hose as far into the duct as you can comfortably get it. Move it around systematically to suck up all those particles you just freed up.
Wipe the Opening: After you’re done vacuuming, take a damp cloth and give the inside edges of the duct opening a quick wipe. This catches any fine dust left behind and gives you a clean surface for reinstalling the cover.
If you’re dealing with some seriously stubborn buildup, you might need to repeat the brushing and vacuuming steps a couple of times. A system that hasn't been touched in years will naturally have more gunk. If you hit a wall and find a severely clogged air duct, our homeowner's guide offers practical solutions for more challenging situations.
Reassembly and Final Steps
Once you've cleaned the reachable part of every duct and your vent covers are bone dry, it's time to put it all back together. Carefully screw each register back into place, making sure it sits flush against the wall, ceiling, or floor.
With all the covers reinstalled, go around and pull out the rags or paper towels you used to block the vents. Now for the most important final step: head to your furnace or air handler and pop in a brand-new, clean air filter. This is non-negotiable. A fresh filter ensures that any fine dust still lingering deep in the system doesn't get immediately blown back into your freshly cleaned rooms.
Finally, you can go back to the circuit breaker and restore power to your HVAC system. Let the fan run for a few minutes to clear out any minor residual dust. You did it! You’ve completed a DIY duct cleaning that will make a noticeable contribution to a cleaner, healthier home.
When a DIY Approach Is Not Enough
Taking the weekend to clean your air ducts yourself is a great way to handle routine maintenance. A good shop vac and a brush can definitely pull out that top layer of dust and keep things fresher. But it's just as important to know when to put the tools down and call in a pro.
Some situations are just too big or too risky for a DIY job. You can't always see what's lurking deep inside your ductwork, and trying to tackle a serious problem without the right gear can backfire, spreading contaminants all through your home instead of getting rid of them.
Signs You Need to Call a Professional
If you run into any of these issues during your inspection, it’s a hard stop. These aren't just signs of dust buildup; they point to bigger problems that need an expert with specialized equipment.
A Persistent Musty Odor: Does a damp, mildewy smell hit you every time the air kicks on? That's a classic sign of moisture trapped in the system, which is prime real estate for mold and bacteria. A simple vacuum job won't fix this.
Visible Mold Growth: If you see speckled patches of black, green, or white stuff inside your vents or on any HVAC components, that’s your cue to stop immediately. Messing with mold without proper containment can blast millions of spores into your living space, creating a serious health hazard.
Evidence of Pests: Finding rodent droppings, old insect shells, or nesting materials is a major red flag. Pests don't just carry diseases; they can chew through your ductwork. A professional is needed to safely clear out the infestation and sanitize the entire system.
Excessive or Returning Dust: You just finished cleaning, and an hour later, there's already a new layer of dust on everything. Or maybe you see little puffs of dust shooting out of the vents. This means there’s a heavy, compacted buildup deep in the system that your shop vac just can't touch.
This decision tree gives you a quick visual to help you figure out the best course of action.
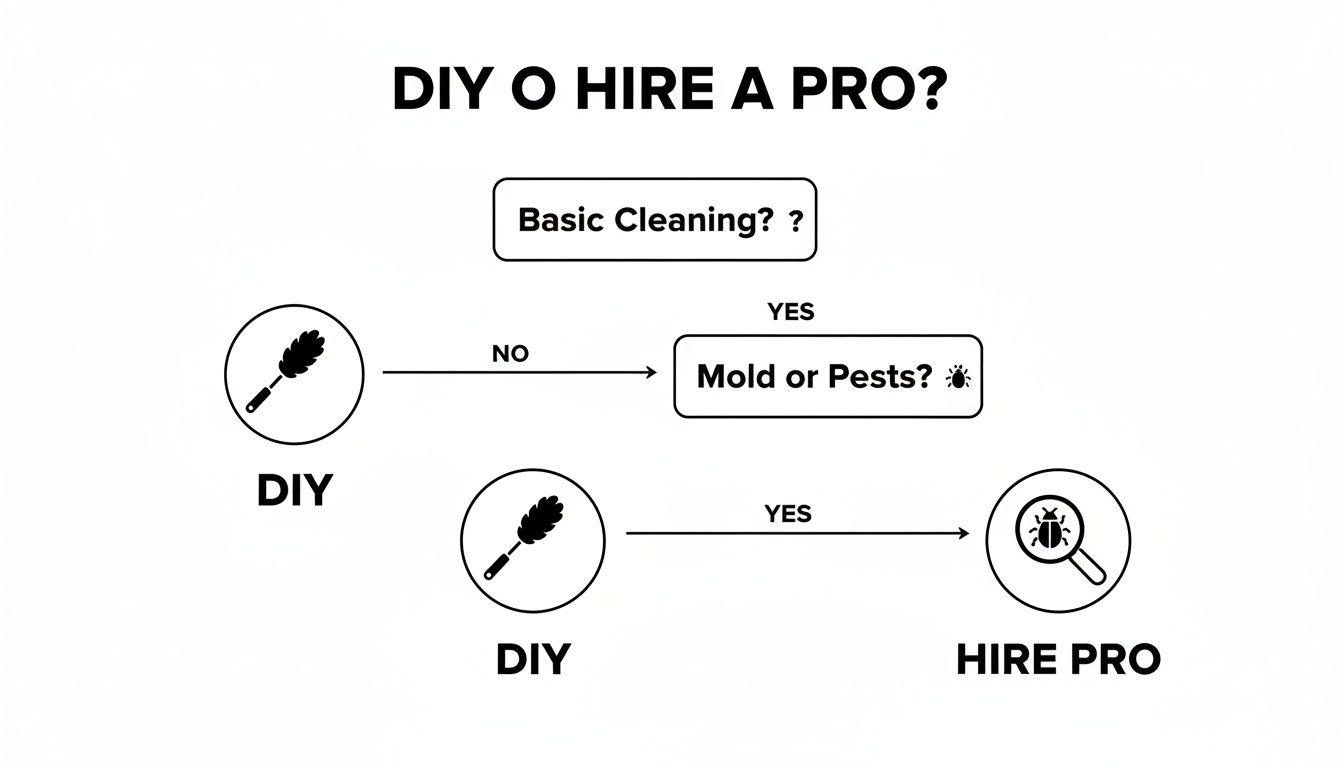
As you can see, basic dust is fair game for a DIY project. But the moment you suspect mold, pests, or anything more serious, it's time to bring in the experts.
Why Professionals Are Necessary for Certain Jobs
When you’re dealing with something like mold, pros bring in the heavy artillery. They use powerful, truck-mounted vacuums to create negative air pressure inside your duct system. This is a game-changer because it means all the nasty stuff they loosen up, like dust, mold spores, and debris, gets sucked directly out of your house and into a containment unit. Nothing gets blown back into your living areas.
They also have tools like high-powered air whips and rotating brushes that can snake through your entire duct system, scrubbing every inch clean. Your DIY setup simply can't match that level of deep cleaning and safe extraction. The HVAC cleaning services market hit $12.41 billion and is expected to climb to $18.91 billion by 2034, which just shows how many homeowners are realizing the value of getting this done right.
Calling a professional for these tough jobs isn’t giving up; it’s making a smart, proactive choice to protect your home’s air and the health of your HVAC system. It’s about getting the problem solved safely and correctly the first time.
Making the Smart Choice for Your Home
At the end of the day, deciding whether to DIY or hire a pro comes down to being honest about what you're seeing in your ducts. For routine upkeep in a home without any major issues, a DIY cleaning is a great move. But when those red flags pop up, calling a professional isn't a luxury; it's a necessity.
To get a better handle on all your options, take a look at our complete homeowner's guide to residential air duct cleaning service.
Knowing the limits of a DIY job is key to taking care of your home properly. It’s a lot like knowing when to call a professional window washing company; the task is different, but the thought process for a homeowner is pretty much the same.
Maintaining Your Home's Air Quality Long Term
Finishing a DIY duct cleaning feels great, but the work of keeping your indoor air quality high doesn't stop there. Think of it as hitting the reset button, not crossing the finish line. To make sure all that effort pays off, you need a solid long-term strategy to keep your HVAC system running clean and your air fresh for the long haul.
Once you’ve cleaned your air ducts, the goal is to shift from a one-time cleaning project to a set of proactive, ongoing habits. This approach stops dust and allergens from building up again so quickly, making your hard work last and keeping your home healthier.
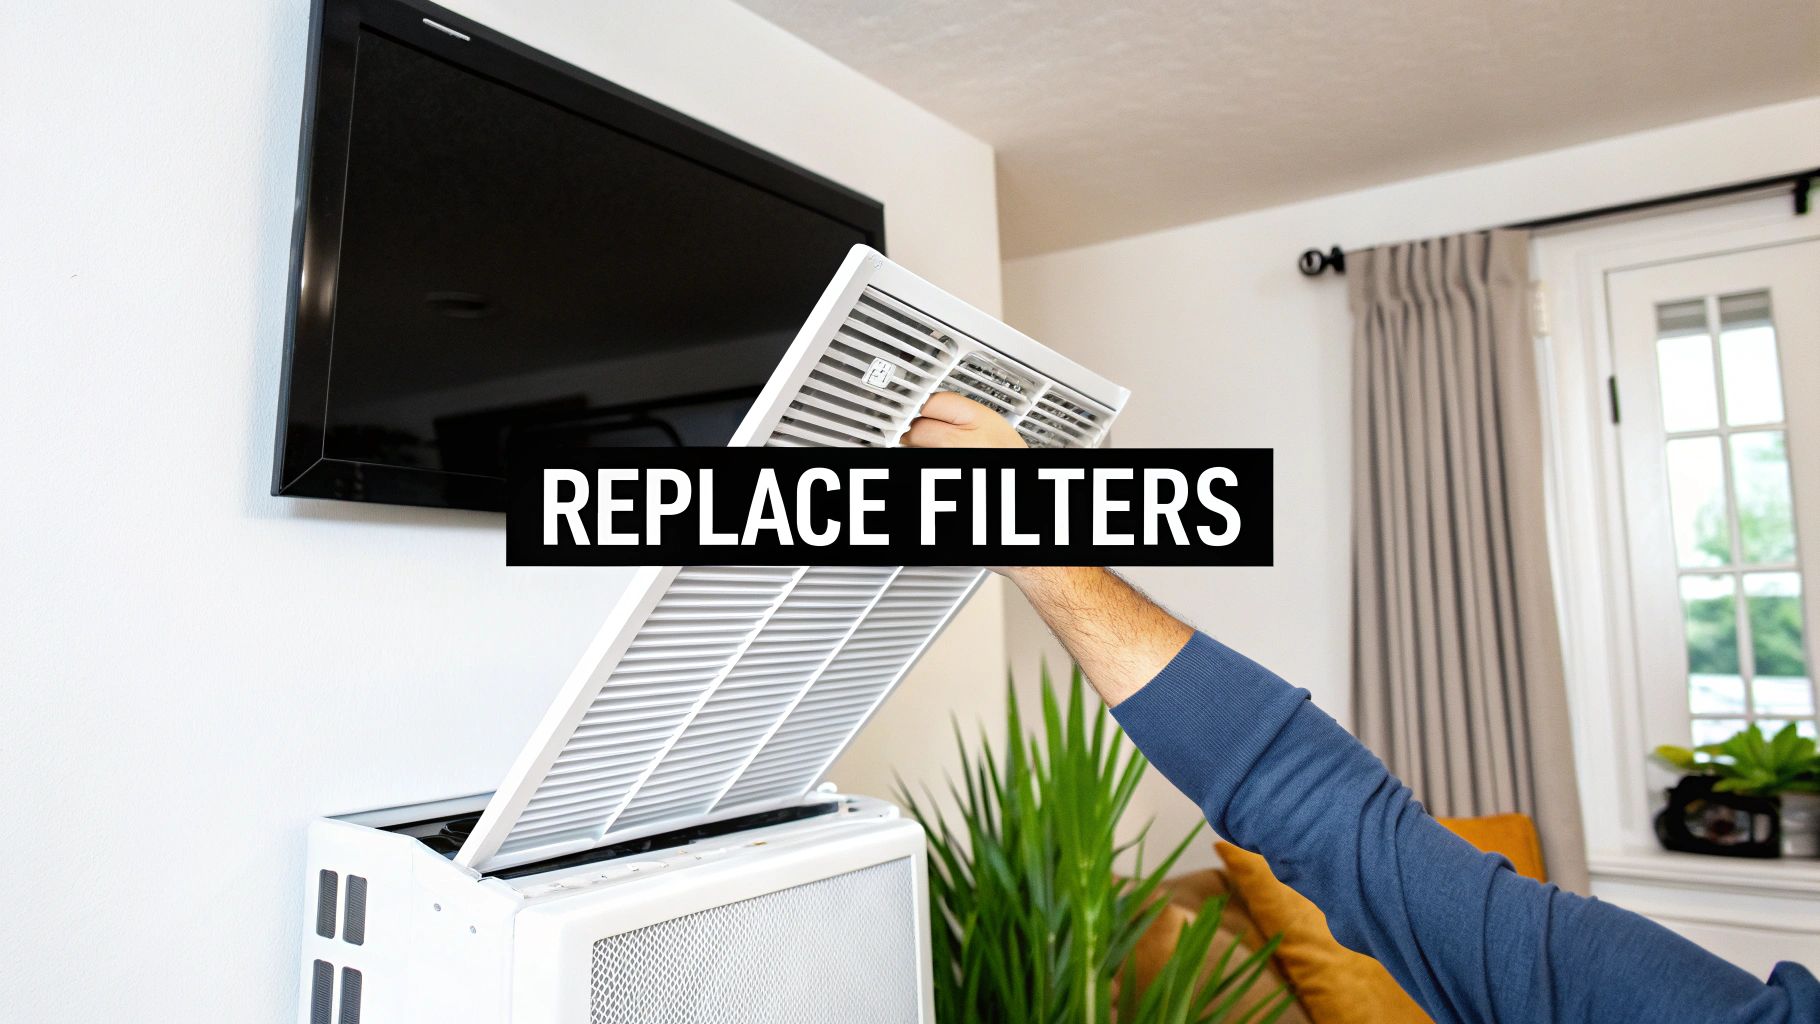
The First Line of Defense: Your HVAC Filter
The single most important piece of the puzzle for maintaining clean ducts is your HVAC system's air filter. It’s the gatekeeper, catching contaminants before they even get a chance to settle into your ductwork. Forgetting to change it is like deep cleaning your house and then leaving the front door wide open.
Change It Regularly: A dirty, clogged filter is useless. For the basic fiberglass filters, you should be swapping them out every 30 days. The thicker, pleated filters can usually go up to 90 days.
Choose a Quality Filter: Don't just grab the cheapest one on the shelf. Look for filters with a higher MERV (Minimum Efficiency Reporting Value) rating. A MERV rating between 8 and 11 is the sweet spot for residential homes; it's effective enough to trap smaller particles like pollen and pet dander without choking your system's airflow.
Staying on top of filter changes is easily the most cost-effective way to protect your HVAC system and keep your air clean. With your ducts freshly cleaned, you can also explore other methods for improving indoor air quality to take your home's health to the next level.
Beyond Filters: Whole-Home Air Purification
While filters are fantastic at trapping particles, they're a passive solution. If you want the ultimate proactive approach, it's worth looking into a whole-home air purification system. These systems don't just filter the air, they actively go after and neutralize contaminants throughout your entire house.
Modern air purifiers don't just sit back and wait for pollutants to come to them. They actively seek out and destroy airborne and surface contaminants like viruses, bacteria, mold spores, and volatile organic compounds (VOCs).
Take ActivePure® technology, for example. It was developed in partnership with NASA and works by creating and sending out powerful (but completely safe) oxidizing molecules into your living space. These molecules neutralize pathogens on contact, whether they're floating in the air or sitting on surfaces like doorknobs and countertops. It’s like having a continuous, 24/7 cleaning process for the air your family breathes. You can dive deeper into how this works in our practical guide to improving home air quality.
When you combine regular duct maintenance, diligent filter changes, and maybe even add an advanced purification technology, you're creating a powerful, layered defense system. This strategy ensures your home’s air stays consistently clean, making it a healthier and more comfortable place for everyone inside.
Your Top Questions About DIY Duct Cleaning
Even with a solid plan, it's totally normal to have a few questions before you start pulling off vent covers and sticking a vacuum hose into your ductwork. Getting some straight answers can be the difference between a confident Saturday project and a hesitant start. Let’s clear up the most common questions homeowners have.
We'll talk about how often you should really be doing this kind of light cleaning, what the actual risks are, and the big one: is the sweat equity really worth the money you save?
How Often Should I Clean My Ducts Myself?
For a surface-level cleanup like the one we've described, think about tackling it every one to two years. That’s usually plenty to keep the accessible areas of your system from getting overwhelmed with dust bunnies and debris.
Of course, life happens, and some situations might mean you need to do it more often. You may want to bump it up to an annual task if you've got:
Pets that shed like it's their job: Dander and fur love to collect right inside the vent openings.
Allergy sufferers in the house: A more frequent cleaning can help cut down on the airborne junk that triggers sneezing and sniffles.
A recent renovation: Construction dust is sneaky and gets everywhere, especially inside your HVAC system.
Think of this DIY job as part of your home’s deep-cleaning routine, not just a one-off task. For a deeper dive into the benefits, check out our article that answers, "does cleaning air ducts really make a difference?".
Are There Real Risks to My Ductwork?
Yep, there are a few things to be mindful of. While you can avoid most issues by being careful, you should know what could go wrong. The biggest risk is accidentally damaging your ductwork, especially if you have the flexible, slinky-like ducts common in many newer homes.
Those flex ducts are basically a wire coil wrapped in a thin plastic liner. If you get too aggressive with a stiff brush or a sharp tool, you can easily tear or puncture them. A rip might not seem like a big deal, but it creates a major air leak, tanking your system's efficiency and quietly jacking up your energy bills. There's also a small risk of dislodging a big clump of debris only to push it deeper, creating a much bigger blockage.
The name of the game is gentle but firm. Don't ever force a brush or hose into a spot where it doesn't want to go. If you hit a snag, it's far better to back off and reassess than to power through and cause damage that costs a lot more to fix than a professional cleaning would have.
Is the Effort Worth the Cost Savings?
This is the million-dollar question, isn't it? The answer really comes down to your goals and what you're trying to achieve.
If your aim is just some routine maintenance, like clearing out the visible gunk from vent covers and cleaning the first few feet of the duct lines, then absolutely, it’s worth the effort. For a few hours of your time, you can get a noticeable improvement in your home's general cleanliness without spending a dime.
However, if you're dealing with bigger issues like a stubborn musty smell that won't go away or persistent allergy problems, a DIY cleaning just won't cut it. The $400 to $1,000 you might pay for a professional service buys you heavy-duty equipment and the expertise to tackle problems that are buried deep within your system.
A DIY clean is a fantastic, money-saving maintenance task. A professional service is a targeted investment for solving deeper air quality problems.
If you've run into something that looks like more than just surface dust or you'd simply prefer the peace of mind that comes with a professional deep clean, Purified Air Duct Cleaning is here to help. Our certified technicians use state-of-the-art equipment to get your entire HVAC system truly spotless, boosting your home's air quality and efficiency. Contact us today for a free quote on our services.