How to Clean Dryer Vents Ducts: Easy Safety Tips
- Oct 6, 2025
- 14 min read
At its core, how to clean dryer vents and ducts is a pretty simple job: you disconnect the dryer, use a special brush kit to scrub out the ductwork, vacuum up the mess, and make sure the vent cap outside is clear. But don't let the simplicity fool you; this is hands-down one of the most critical maintenance tasks for your home's safety and your dryer's performance.

Why Cleaning Your Dryer Vent Is Not Just a Chore
It's easy to ignore your dryer vent. It's hidden behind the machine, out of sight and out of mind. But what starts as a little bit of lint can quickly spiral into a serious problem. When you understand what’s actually at stake, this task stops feeling like a chore and starts feeling like what it is: a crucial step in protecting your home and family.
Every single time you run a load of laundry, your dryer sheds tiny fibers. Most get caught by the lint trap, but plenty slip by and start building up inside the vent duct. This fuzzy buildup is incredibly flammable, basically creating a perfect tinderbox just waiting for a spark. All it takes is the trapped heat from the dryer to ignite that lint, and the results can be devastating.
The Hidden Costs of a Clogged Vent
Beyond the very real fire risk, a clogged vent is a silent drain on your wallet and a slow death for your dryer. When hot, moist air can't escape, your dryer has to run longer and work much harder to get your clothes dry. That extra runtime translates directly to a noticeable jump in your energy bills.
All that constant strain also hammers your dryer's internal parts. The heating element and blower get overworked, leading to premature breakdowns and expensive repair bills, or worse, forcing you to buy a whole new appliance.
Understanding the full scope of these risks is critical. A clogged dryer vent is more than just an inconvenience; it’s a direct threat to your home's safety, your finances, and even your health from potential moisture damage and poor air quality.
Deeper Dangers Lurking in Your Walls
The problems don't stop at fires and finances. For those with gas dryers, a blocked vent is especially dangerous because it can prevent the proper venting of combustion gases, including deadly carbon monoxide. Since this gas is odorless and colorless, a leak into your home is a genuine health emergency.
The trapped moisture is another menace. It can condense inside your walls, creating the perfect environment for mold and mildew to grow, which can lead to rot in your home’s structure. You can learn more about how to get ahead of this by checking out our guide to preventing a dryer lint fire hazard.
It's no surprise that as awareness of these dangers grows, so does the demand for professional help. According to Wise Guy Reports, forecasts show the dryer vent cleaning market could swell to $27.09 billion globally by 2032, a trend largely driven by homeowners' safety concerns and fire prevention campaigns.
Before we dive into the step-by-step process, it's important to recognize the warning signs that your vent is already clogged. This quick reference guide can help you spot the common symptoms before they become a major hazard.
Warning Signs Your Dryer Vent Is Clogged
Symptom | What It Means | Potential Risk |
|---|---|---|
Clothes take longer to dry | Hot, moist air isn't escaping efficiently, so your dryer has to run multiple cycles. | Increased energy bills, unnecessary wear and tear on the appliance. |
Dryer feels hot to the touch | The appliance is overheating because it can't vent properly. | Fire hazard, potential damage to internal components. |
Burning smell | Lint trapped in the ductwork is getting scorched by the high heat. | Immediate and serious fire risk. |
Visible lint around the vent | The blockage is so severe that lint is being forced out around the duct connections. | Sign of a significant clog that needs immediate attention. |
Vent flap doesn't open | The exterior vent flap is blocked by lint or debris, trapping air inside. | Poor airflow, moisture buildup, and potential for pests to nest. |
Spotting any of these signs is a clear signal that it's time to take action. Ignoring them not only costs you money but also puts your home at unnecessary risk.
Gathering Your Tools for the Job
There's nothing worse than getting halfway through a project only to realize you're missing a crucial piece of equipment. Taking a few minutes to gather your gear beforehand turns a potential headache into a smooth, manageable job. The good news? You probably have most of what you need already tucked away in your garage or utility closet.
First, grab some basic hand tools like a screwdriver or a nut driver; you'll need one to loosen the clamps holding the vent duct in place. Don't even think about starting without a good pair of gloves and a dust mask. That fine lint dust gets everywhere and can be a real irritant if you breathe it in.
Choosing Your Cleaning Arsenal
When it comes to the actual cleaning, your regular household vacuum and its hose attachment are a great place to start. Use it to suck up the easy-to-reach lint at both ends of the duct.
For a truly thorough clean, though, a shop vac is your best friend. Its raw suction power is miles ahead of a standard vacuum, making it far more effective at pulling out the dense, heavy clumps of lint the brushes will break loose.
The real star of the show, however, is a dryer vent cleaning kit. These kits are specifically designed for this job and typically come with a specialized brush and a set of flexible rods that you connect together to reach deep into your ductwork.
Drill-Powered Kits: These are what most people use, and for good reason. The brush head attaches to your power drill, letting you spin it through the ductwork to scrub the walls clean. It's fast and incredibly effective.
Manual Rod Systems: These kits work by hand; you push and twist the brush through the duct yourself. They get the job done but require a lot more elbow grease and might struggle with really stubborn buildup.
Here's a pro tip: Pay close attention to your duct material before buying a kit. If you have rigid metal ducts, a stiff-bristled brush is perfect. But if you have the flexible foil or vinyl kind, those stiff bristles can easily tear holes in the ducting. For flexible ducts, always choose a kit with a softer, more pliable brush.
Making the Right Equipment Choices
Picking the right tools is about more than just cleaning, it's about preventing costly damage. I've seen it happen: someone uses a brush that's too aggressive for their flimsy foil duct and ends up with a tear, blowing hot, moist, lint-filled air into their wall cavity. Not good.
Before you start, make sure you've got the right setup. If you need to fill in some gaps in your toolkit, you can find a good selection of essential cleaning tools and supplies online.
Think of this as a key piece of your home's upkeep, just like changing your HVAC filters. For more on that, check out The Ultimate 2025 HVAC Preventative Maintenance Checklist. Now that you have your tools ready, you're all set to tackle this job safely.
Your Practical Guide to Cleaning the Dryer Vent
Alright, let's get our hands dirty. You’ve got your tools, you know the risks, and now it's time to tackle that dryer vent. Follow these steps, and you’ll not only get your dryer running like new but also make your home a whole lot safer.
Initiating the Process Safely
First thing's first: safety. Before you even think about touching a tool, you need to completely disconnect your dryer from its power source. If it's an electric dryer, that means yanking the plug right out of the wall. For a gas dryer, you'll also need to shut off the gas supply. Look for a small valve on the gas line behind the dryer and turn it to the "off" position.
With the dryer powered down, gently pull it away from the wall. You'll need enough room to work comfortably behind it without feeling cramped. Take it slow to avoid scratching the floor or damaging the ductwork.
Disconnecting and Beginning the Cleanup
Once you have access, you'll see the flexible duct that connects your dryer to the wall vent. It’s usually held in place by a simple metal clamp. Grab your screwdriver or nut driver, loosen that clamp, and carefully wiggle the duct free from the back of the dryer.
Now, do the same thing where the duct connects to the wall. You’re almost certain to find a thick wad of lint crammed into both ends of the duct and the openings themselves. This is your first chance to make a real dent in the problem.
Get your vacuum with its hose attachment and suck up all that loose lint. Clear out the opening on the dryer and the vent pipe in the wall. You might be shocked at how much comes out; it's a surprisingly satisfying first step. This infographic shows the key tools that make the job go smoothly.
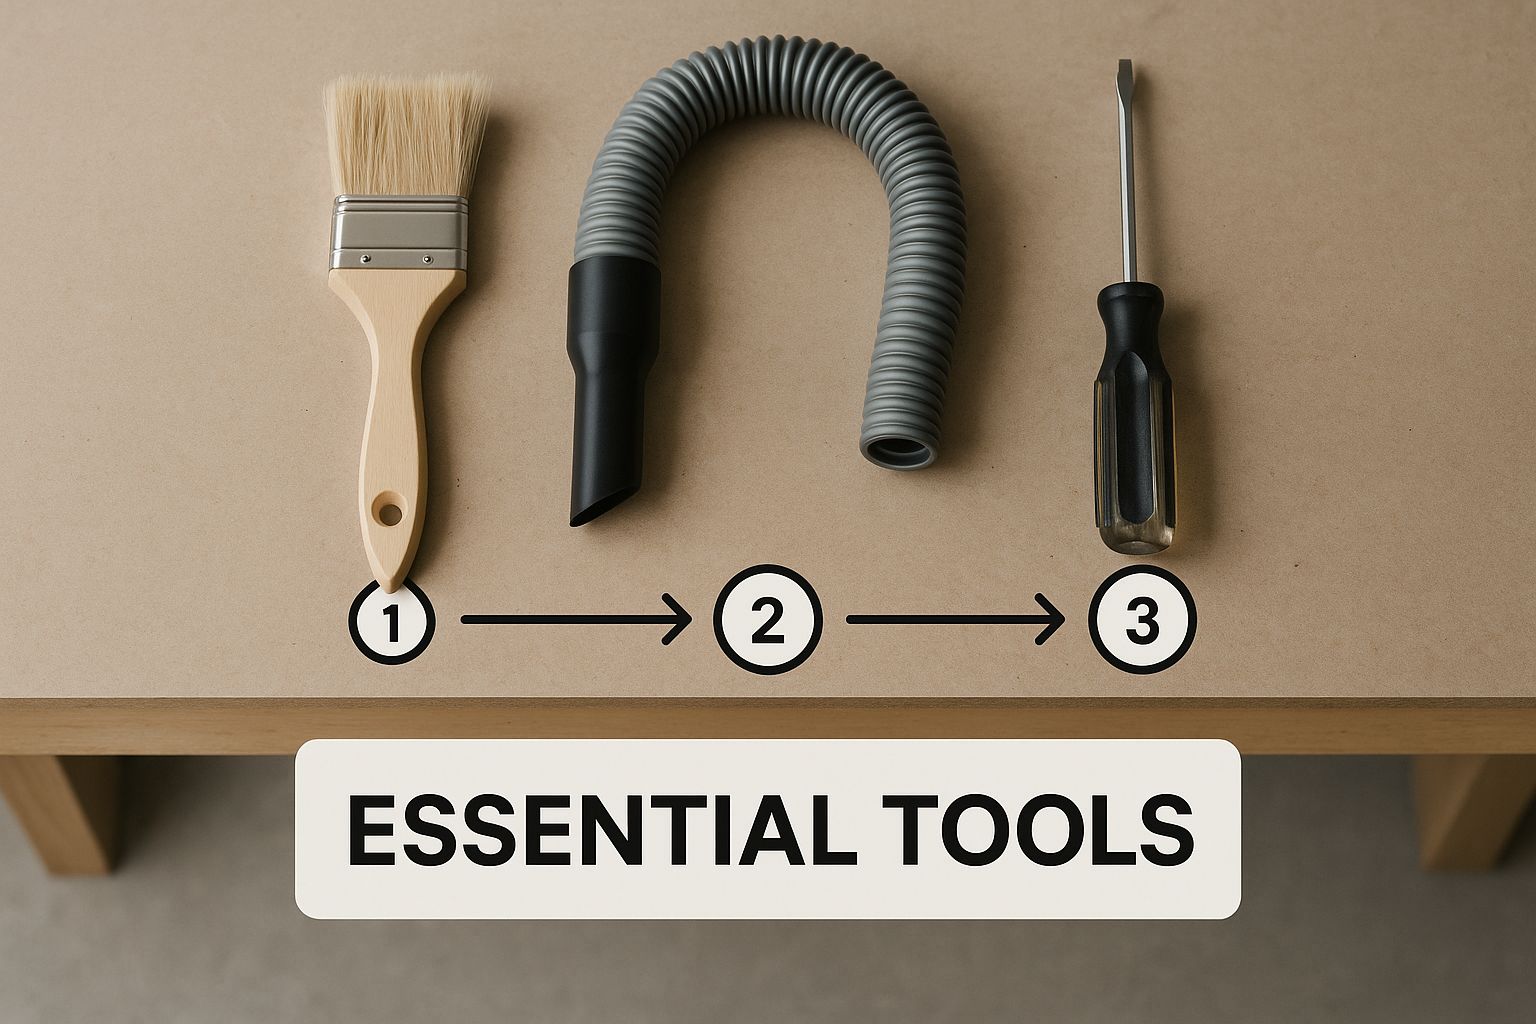
Having the right brush, vacuum, and hand tools really does make all the difference between a frustrating chore and a job well done.
Mastering the Duct Brush Kit
Time for the main event: cleaning the duct run inside the wall. This is where your dryer vent cleaning kit proves its worth. Attach the brush head to one of the flexible rods. If you have a drill-powered kit, connect the other end of the rod to your drill.
Carefully feed the brush into the vent pipe leading outside. Set your drill to a low to medium speed and, this is critical, make sure it's always spinning in a clockwise direction. If you run it counter-clockwise, the rod sections can unscrew and get stuck deep inside the vent. Trust me, that’s a headache you want to avoid.
As the brush spins, gently push it further into the duct. The bristles will scrub the inside walls, breaking loose all that caked-on lint. As you add more rod sections to reach deeper, it’s a huge help to have a partner hold a shop vac at the opening to catch the flying debris. This two-person team approach prevents your laundry room from being covered in a layer of gray fluff.
Take your time and use a steady, controlled motion. Forcing the brush too quickly, especially around sharp bends, can damage the ducting. Let the spinning brush do the work for you.
Sometimes, you might discover the lint has mixed with moisture, creating a thick, sludgy mess. This is a common problem that makes cleaning tougher. If you're wondering what causes this, our article on how to fix water in a dryer vent has some great insights.
Clearing the Exterior Vent Cap
The last stop is outside your house. Find where the dryer vent exits and take a close look at the cap or louvers. This spot is a magnet for lint, leaves, and sometimes even small birds' nests, creating a serious blockage.
Clear away any debris you can see with your hands or a small brush. Make sure the little flap or louvers can open and close without sticking. If they're jammed shut, your dryer can't breathe. A quick wipe-down ensures hot air can escape freely.
Once the entire path is clear, head back inside. Reconnect the ductwork, making sure those clamps are nice and tight to prevent air leaks. Slide the dryer back into position, plug it in (and turn the gas back on, if needed), and you're all set. Run a quick, empty cycle just to make sure everything is flowing properly. Now you can relax, knowing the job is done right.
Common Mistakes to Avoid
Knowing how to clean your dryer vents is half the battle. The other half is sidestepping the common pitfalls that can turn a simple DIY job into a major headache. I've seen plenty of well-intentioned homeowners make small errors that lead to damaged ductwork or, worse, an incomplete cleaning that leaves the fire hazard right where it was.
Let's walk through the mistakes you absolutely want to avoid.
One of the most frequent slip-ups is simply using the wrong tool for the job. Not all dryer ducts are created equal, and this is a critical detail. If you have one of those flexible foil or vinyl ducts, grabbing a stiff-bristled brush is a recipe for disaster; it'll shred that material in seconds.
Another classic mistake happens with drill-powered brush kits. You have to, and I mean always, run the drill in a clockwise direction. If you run it in reverse, the rod sections will unscrew from each other, leaving the brush head lost somewhere deep inside your ductwork. Trust me, that's not a fun situation to resolve.
Overlooking Key Areas of the Vent System
A common oversight is cleaning only part of the vent run. It's tempting to scrub the first few feet, see a bunch of lint come out, and call it a day. But lint builds up along the entire path. You need enough extension rods to reach all the way to the exterior vent outlet, no exceptions.
On that note, don't forget the final checkpoint: the outdoor vent flap. So many people do a fantastic job cleaning the duct but completely neglect the exterior cap. This exit point is often clogged with a nasty mix of lint, leaves, and sometimes even birds' nests. This creates a final blockage that makes all your hard work inside totally useless.
A partial cleaning is almost as bad as no cleaning at all. The goal is to create a completely clear pathway for hot air and lint to escape, from the back of your dryer to the outside of your home.
It's no surprise that home safety is a growing concern. The dryer vent market, valued at around $430 million in 2021, is projected to hit nearly $498 million by 2025. This growth is directly linked to updated building codes and safety standards aimed at mitigating fire risks from poorly maintained vents. You can see more details on these trends in this [dryer vents market report](https://www.cognitivemarketresearch.com/dryer-vents-market-report).
Using Improper Venting Solutions
Finally, let's talk about a dangerous mistake: improper vent termination. I've seen some creative but hazardous setups where homeowners vent their dryer directly into an attic, crawl space, or garage. This is a massive safety hazard. For a deep dive on this, read our guide on why you should avoid venting a dryer to the attic.
Dumping all that moist, lint-filled air into an enclosed space creates a perfect storm for serious problems:
Mold and Mildew: All that humidity will lead to wood rot and structural damage over time.
Fire Hazard: You're essentially creating a hidden tinderbox by letting lint accumulate in your attic or walls.
Poor Air Quality: This introduces dust, allergens, and moisture right back into the air you breathe inside your home.
Your dryer vent should always terminate directly outside your home. Period. By steering clear of these common errors, you can be confident that your cleaning efforts are actually making your home safer and your dryer more efficient.
Knowing When to Call a Professional

While the DIY approach we've covered is great for regular maintenance, there are definitely times when it’s best to leave it to the experts. Knowing when to put down the brush and pick up the phone is the key to keeping your home safe and avoiding some seriously costly mistakes. Some situations just demand the specialized tools and hands-on experience that only a professional brings to the table.
Think about the actual path your vent takes. If you’ve got a really long duct run, say, over 35 feet, a standard DIY kit probably won't have the reach or the power to clear it out properly. The same is true for vents with lots of sharp turns or a complicated route through your walls. Those bends are notorious for trapping lint in spots you just can't get to.
Red Flags That Signal a Need for an Expert
Sometimes, even after you’ve given it your best shot, you might notice signs that the problem isn't really solved. These are clear indicators that there's a deeper issue going on.
A Persistent Burning Smell: If you still smell something burning after cleaning the vent, stop using the dryer right away. Call a professional. This could mean there's a dangerous clog deep in the system or even an issue with the dryer itself.
Signs of an Animal Nest: Maybe you pulled out some twigs and nesting material but have a nagging feeling there’s more in there. Professionals can run a camera through the duct to make sure the entire blockage is gone, along with any unpleasant leftovers.
Suspected Duct Damage: If you think the duct might be torn or disconnected somewhere inside a wall, you'll need a pro to diagnose and repair it safely.
A professional service isn't just about cleaning; it's about diagnostics. They use tools like high-pressure air whips and video inspection cameras to identify and resolve issues that a DIY cleaning simply can't address.
It's no surprise that more and more homeowners are relying on expert services. The global dryer vent cleaning market was valued at $2.5 billion in 2024 and is projected to hit $4.8 billion by 2033, a trend largely driven by a growing awareness of home safety and efficiency. You can discover more insights about this expanding market on Verified Market Reports.
Bottom line: if you're not confident you can clear the entire vent line, or if any of these red flags pop up, hiring a certified technician is the smartest move you can make. Understanding the average cost of professional dryer vent cleaning can help you budget for this critical service and give you the peace of mind that the job is done right.
Answering Your Dryer Vent Questions
After walking through the cleaning process, a few lingering questions usually pop up. Think of this as the quick-reference part of the guide, designed to clear up those final bits of uncertainty before you get started. Getting these common questions answered will give you the confidence to tackle this job safely and effectively.
How Often Should I Clean My Dryer Vents?
For the average household, a deep clean once a year is a great rule of thumb.
But that's just a baseline. Your home might be different. You should probably bump that up to every six months if you're dealing with a bit more than the average laundry load. Consider a more frequent cleaning if:
You have a large family and the dryer is running almost every day.
You've got pets that shed; all that fur gets everywhere, including the vent.
Your dryer vent duct takes a long, winding path to the outside with several sharp turns.
Honestly, your dryer will give you clues when it needs attention. If your clothes are still damp after a full cycle, that’s the most obvious sign that a clog is building up and it's time to get to work.
Can I Use a Leaf Blower on My Dryer Vent?
It’s a tempting shortcut, I get it. A powerful blast of air seems like it would clear everything right out. But using a leaf blower is a really bad idea.
Instead of pushing the lint out, the intense force tends to compact it into a dense, solid plug, especially at the elbows and bends in the ductwork. You could easily create a blockage that's far worse than what you started with, one that a standard brush kit might not be able to break through.
A leaf blower just can't do the job of a proper vent brush. To really get the caked-on lint off the walls of the duct, you need the scrubbing action that only a spinning or manual brush can provide. It's best to stick with the tools actually made for the job.
What’s the Difference Between the Lint Trap and the Vent Duct?
It's easy to get these two mixed up, but knowing the difference is crucial for keeping your dryer running well. They work as a team, but they have very different jobs.
The lint trap is that mesh screen you pull out from inside your dryer's door. This is your first line of defense, and it needs to be cleaned after every single load. Its job is to catch the big stuff: the bulk of the fibers and fluff from your clothes.
The dryer vent duct, on the other hand, is the entire pipe system that runs from the back of your dryer to the exterior of your house. Its purpose is to vent all the hot, moist air outside. No matter how diligent you are about cleaning the lint trap, tiny particles always slip through and build up in this duct over time. That's why it needs its own separate, deep cleaning.
Don't let a clogged dryer vent become a risk to your home's safety and your dryer's efficiency. If the job feels like more than you want to handle, or you'd just prefer the peace of mind that comes with a professional inspection, contact Purified Air Duct Cleaning today. Our certified technicians provide expert dryer vent cleaning services to make sure your system is clear, safe, and working at its best. Visit our website to get your free quote.