How to Vent a Dryer Indoors The Right Way
- Dec 20, 2025
- 13 min read
Venting a dryer indoors with a vent kit is sometimes pitched as an easy fix, but it's a temporary solution that should only ever be considered for electric dryers. Let me be perfectly clear: you must never vent a gas dryer indoors. Doing so risks deadly carbon monoxide poisoning. Even with electric models, you're introducing serious fire and moisture problems that demand constant attention.
Why Venting a Dryer Indoors Is So Risky
Before you even think about an indoor solution, you need to understand the dangers. This isn't just about a little steam in the laundry room; we're talking about significant safety hazards and potential structural damage that make proper outdoor venting the undisputed champion of dryer installation. When you trap dryer exhaust inside your home, you're trapping a cocktail of problems right along with it.

The most pressing danger is the elevated risk of fire. Dryer lint is incredibly flammable. When it has nowhere to go, it builds up at an alarming rate inside the dryer, the vent hose, and the area around the machine.
The U.S. Fire Administration's statistics from 2008 to 2010 really put this into perspective. A failure to clean dryer vents was the leading factor in roughly 2,900 home clothes dryer fires every year. These fires caused deaths, injuries, and millions in property damage. It’s a stark reminder of why proper vent maintenance is non-negotiable.
Venting a dryer indoors essentially forces your machine to operate in a closed loop of hot, moist, lint-filled air. This not only makes the appliance work harder but also concentrates flammable materials right where they can do the most harm.
The Hidden Damage from Moisture
Beyond the immediate fire hazard, trapping all that exhaust creates a perfect storm for moisture damage. Think about it: a single load of wet clothes can release more than a gallon of water into the air as vapor. With no escape route, that humidity has to go somewhere, and it usually settles on cooler surfaces like walls, windows, and ceilings.
This constant dampness leads to a cascade of destructive issues:
Mold and Mildew Growth: The warm, humid air creates an ideal breeding ground for mold and mildew. They can thrive unseen behind drywall or inside cabinets.
Structural Damage: Over time, that persistent condensation can cause paint to peel right off the walls, wood trim to warp, and even drywall to soften and degrade.
Poor Indoor Air Quality: The exhaust isn't just water vapor. It's also pumping fine lint particles, detergent fragrances, and fabric softener chemicals directly into the air you breathe.
This combination of hazards can quickly turn a simple laundry chore into a major headache for your home and your health. Understanding what makes dryer exhaust harmful is the first step in making a safe choice for your family.
Gas Dryers and Local Codes You Cannot Ignore
When you're figuring out how to vent a dryer indoors, there is one absolute, non-negotiable rule. Let’s be direct about it: you can never vent a gas dryer indoors. This isn't just a friendly suggestion, it's a critical safety mandate that protects you and your family from deadly, odorless carbon monoxide poisoning.
Unlike electric dryers that just push out heat and moisture, gas dryers are fuel-burning appliances. The combustion that creates the heat also creates dangerous byproducts, and carbon monoxide (CO) is chief among them. Pumping that exhaust into any enclosed space, even for a short time, can have fatal consequences. This is precisely why using any kind of indoor vent kit with a gas dryer is strictly forbidden.
Understanding Building Codes
Building codes aren't just bureaucratic red tape; they are safety standards written from decades of experience with preventable accidents. The International Residential Code (IRC), which is the blueprint for most local building codes across the U.S., is crystal clear on this issue.
Under Section M1502 of the IRC, all dryer exhaust systems must terminate to the outdoors. The code explicitly forbids venting into an attic, crawlspace, or any interior room of the dwelling.
This regulation is in place to prevent the buildup of not just carbon monoxide but also highly flammable lint and excessive moisture that can lead to mold. Ignoring these rules can have some pretty severe consequences:
Voiding your homeowner's insurance: If a fire or other incident happens because of improper venting, your claim could easily be denied.
Failed home inspections: A DIY indoor vent setup will be a major red flag during a property sale or renovation inspection, forcing you into costly repairs.
Immediate health and safety risks: The threat of CO poisoning is the most serious and immediate danger, and it’s simply not worth the risk.
Getting familiar with local codes for dryer venting is just as important as understanding general UK building regulations for any other home modification. If you want to dig deeper into U.S. standards, checking out a homeowner's guide to dryer vent code requirements can give you invaluable local insights.
For anyone with a gas dryer, the only safe options are to either vent it properly to the outdoors or switch to an electric or ventless model. There's no middle ground here.
Exploring Your Indoor Venting Options
When you can't vent your electric dryer outside, you're left with a few choices. Most people immediately think of an indoor vent kit, but newer technologies offer much safer and more effective ways to handle the situation. Knowing the difference is critical for protecting your home from moisture damage, mold, and even fire hazards.
The video below gives a great overview of the problem and some of the solutions we'll be diving into.
Before you go any further, the first question you have to answer is what kind of dryer you have. This decision tree cuts right to the chase.
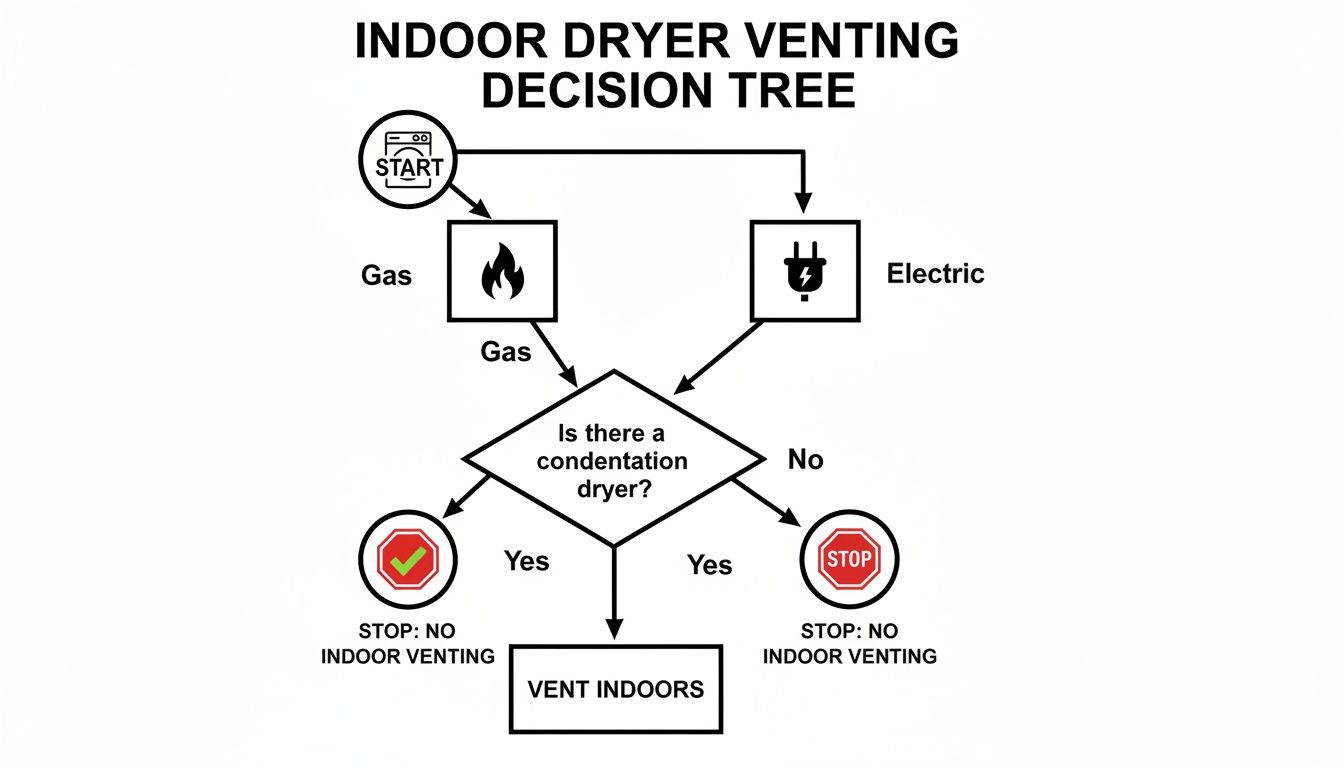
As you can see, if you have a gas dryer, the conversation stops here. Indoor venting is never, ever safe for a gas appliance. For those with electric dryers, you've got a few paths to consider.
Indoor Vent Kits: A Temporary, Risky Fix
Let’s be blunt: indoor dryer vent kits are a last resort. These simple setups usually involve a flexible hose running to a collection box, which is often filled with water to catch lint. They're cheap and easy to find, but they come with a whole host of problems.
The biggest issue is moisture. Just one load of laundry can pump over a gallon of water vapor into your room. This skyrockets the humidity, creating a perfect storm for peeling paint, warped wood, and, worst of all, mold growth. They also need constant, messy maintenance.
Think of an indoor vent kit like a bucket trying to catch the output of a fire hose. It might contain the problem for a moment, but it’s messy, inefficient, and bound to overflow if you’re not paying constant attention.
Ventless Condenser Dryers: A Smarter Solution
A much better approach is to use a ventless condenser dryer. These machines are designed for this exact situation. They work by extracting moisture from your wet clothes and collecting it as water in a removable tray or sending it down a drain hose. No hot, humid, lint-filled air gets blown into your living space.
Here’s a quick rundown compared to traditional dryers:
Upfront Cost: They do tend to cost more than standard vented models.
Drying Time: Be prepared for slightly longer drying cycles.
Installation: It doesn't get easier. Just plug it in and you're good to go.
A condenser dryer completely sidesteps the humidity and lint problems you'd get with an indoor kit, making it a far safer and more practical choice for apartments, basements, or any room without easy access to an exterior wall.
Heat Pump Dryers: The Energy-Efficient Powerhouse
If you're looking for the top-of-the-line option, it’s the heat pump dryer. This is the most advanced ventless technology out there. Instead of constantly generating new heat, it recycles hot air in a closed-loop system, making it incredibly efficient. In fact, a heat pump dryer can use up to 50% less energy than a conventional electric dryer.
While they have the highest price tag, the long-term energy savings can really add up and offset that initial cost. Just like condenser models, they collect water in a tray or send it down a drain, keeping your indoor air clean and dry.
Making the right choice depends on your budget, space, and laundry habits. Our safe and efficient venting guide dives even deeper into these options. But at the end of the day, both condenser and heat pump dryers are worlds better than any indoor vent kit.
Comparison of Indoor Dryer Venting Solutions
To help you see the options side-by-side, we've put together a quick comparison table. This should make it easier to weigh the pros and cons based on what matters most to you.
Solution Type | How It Works | Best For | Pros | Cons |
|---|---|---|---|---|
Indoor Vent Kit | A hose and container (often with water) that traps lint while releasing hot, moist air into the room. | Very temporary, emergency situations where no other option is available. | • Inexpensive• Easy to install | • Creates extreme humidity• High risk of mold/mildew• Requires constant maintenance• Fire hazard |
Condenser Dryer | Extracts moisture from clothes, condenses it into water, and collects it in a tray or drains it away. | Apartments, condos, or homes without an easy way to vent externally. | • No external vent needed• Simple installation• Contains all moisture & lint | • Higher upfront cost• Longer drying times• Tray needs regular emptying (if not drained) |
Heat Pump Dryer | Recycles hot air in a closed-loop system to dry clothes, collecting moisture in a tray or drain. | Homeowners looking for the most energy-efficient and advanced technology. | • Extremely energy efficient• No external vent• Gentle on clothes | • Highest initial cost• Can have longer drying times than vented models• More complex technology |
Ultimately, this table shows a clear progression. While an indoor kit might seem like a quick fix, investing in a dedicated ventless dryer, whether a condenser or a heat pump model, is a far safer, cleaner, and more reliable long-term solution for your home.
Installing an Indoor Dryer Vent Kit Safely
If you've landed on an indoor vent kit as the only temporary fix for your electric dryer, getting the installation right is everything. This is about more than just hooking up a hose; it’s your best shot at minimizing the built-in risks of moisture and lint from day one. Your top priority, from start to finish, has to be safety.
It helps to think of this as building a small, controlled system for a short-term problem. Every single connection needs to be airtight, and each part must be placed with care to head off leaks, spills, and potential fire hazards. The whole point is to capture as much lint and moisture as you possibly can, even though you know it's not a perfect solution.
Preparing Your Workspace and Dryer
Before you even touch the new kit, get your tools and the area ready. You'll need the kit itself (which should have a flexible duct, clamps, and a lint trap container), a screwdriver or nut driver that fits the clamps, and maybe some pliers. Check that the lint trap container is made of a decent, sturdy plastic that won't easily crack or fall over.
First things first: unplug your dryer. This isn't optional. Once it's disconnected from power, gently slide the dryer out from the wall so you have plenty of space to work behind it. If there's an old vent hose attached, use your screwdriver to loosen the clamp and pull it off the dryer's exhaust port and the wall vent.
Safety check: Before you connect anything new, grab a vacuum and clean out the dryer's exhaust port. You'd be amazed how much flammable lint gets caked in there, just waiting for a reason to ignite.
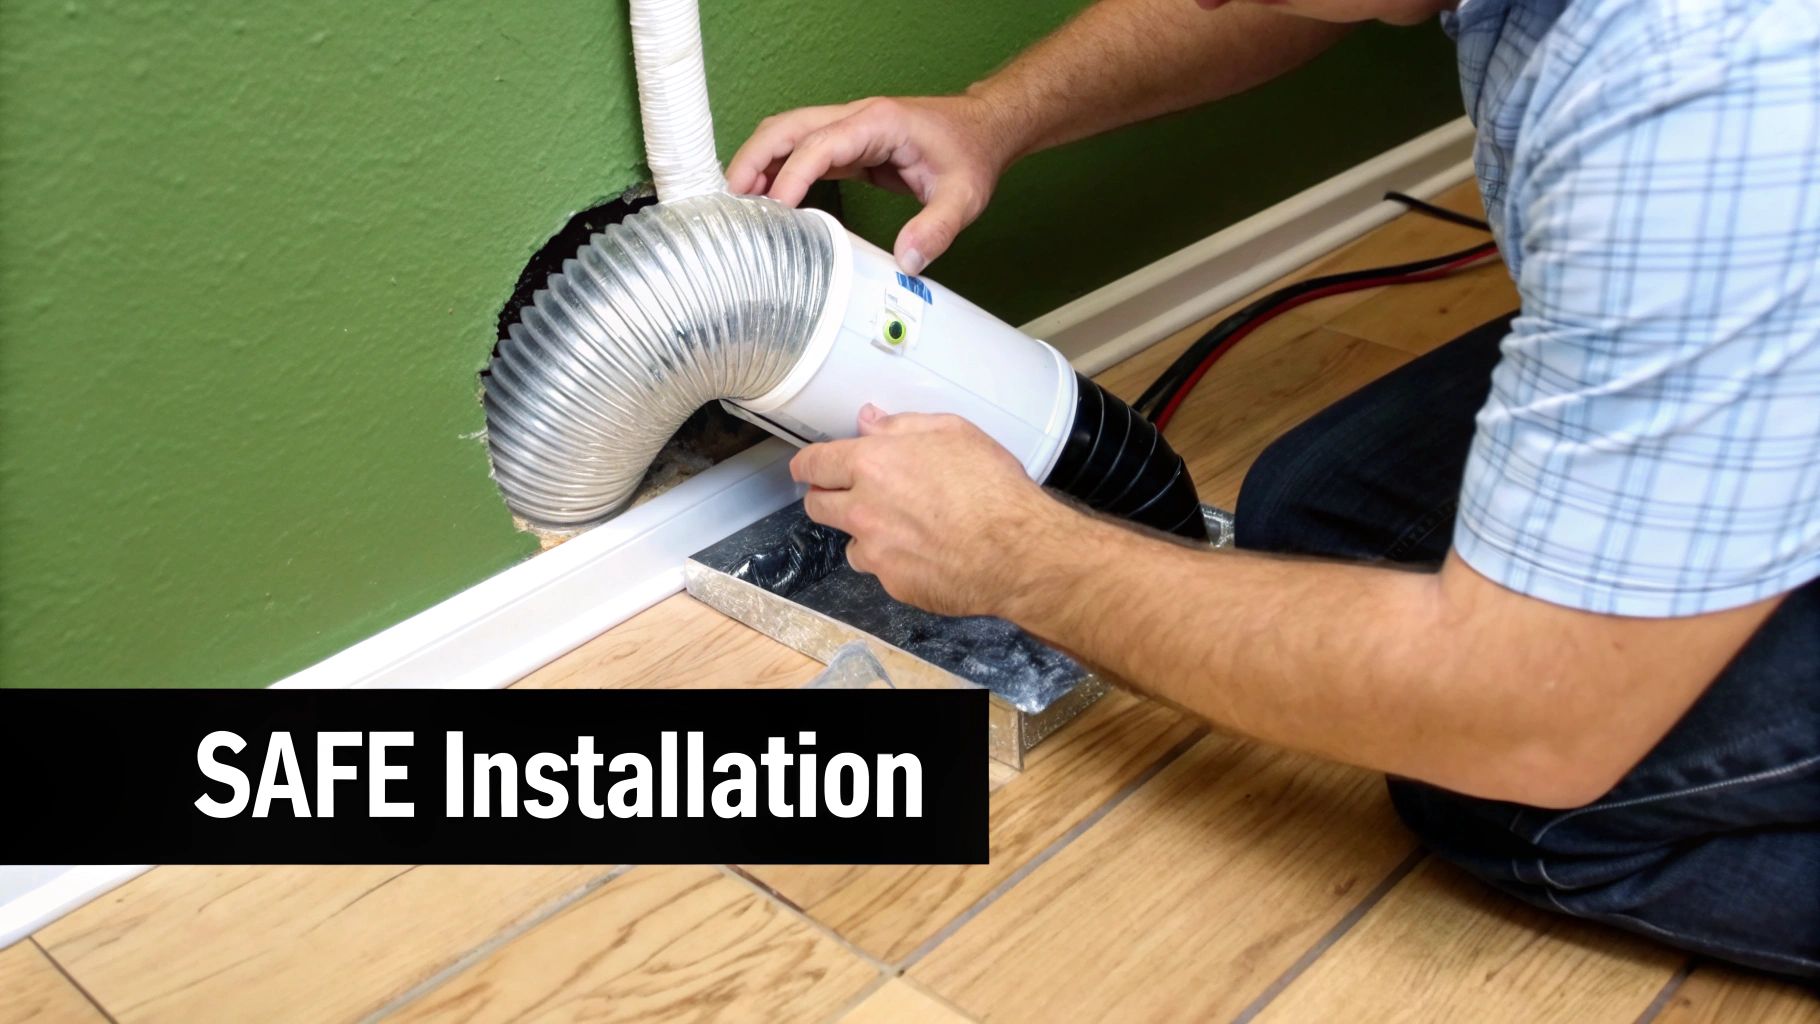
Connecting the Ducting and Lint Trap
Alright, now you're ready to install the new setup. Take one of the metal clamps and slide it over one end of the new flexible duct hose. You'll want to push this end onto your dryer's exhaust port, making sure it goes on at least one to two inches to get a really solid grip.
Position the clamp about a half-inch from the hose's edge and tighten it down until it's snug. Give the hose a light tug to make sure it's not going anywhere. A loose connection right at the dryer is a huge no-no, it'll just pump hot, damp, lint-filled air behind the machine, creating a serious fire risk you can't even see.
Now, do the same thing on the other end. Attach the hose to the port on your indoor vent kit's lint trap container and secure it tightly with the second clamp. With both ends connected, it's time to prep the container.
Fill the container with water up to the fill line marked by the manufacturer. This water is what actually traps the lint and stops it from flying around the room.
Set the container on a completely flat, stable surface where it's unlikely to get bumped or knocked over. Some people place it inside a shallow pan for extra protection against spills.
Arrange the ducting so it has as few sharp bends and kinks as possible. Straight, smooth runs allow for the best airflow. Definitely avoid crushing the hose when you push the dryer back.
Once everything is connected and in place, you can plug the dryer back in. Carefully slide it back towards the wall, but leave enough of a gap so you aren't squishing the new hose.
For a deeper dive into the basics of vent installation, our DIY guide for beginners has some extra tips. Just remember, the final and most crucial step in learning how to vent a dryer indoors is accepting the constant maintenance it demands.
The Maintenance Routine You Can't Afford to Skip
Let's be real about using an indoor vent kit: the installation is just the starting line. The real work is the constant, non-negotiable upkeep needed to keep your home safe. It’s a daily commitment you absolutely cannot ignore if you're trying to vent a dryer indoors without creating a bigger mess.
This isn't a chore you can push off until the weekend. Every part of your indoor vent setup demands regular attention to head off the very hazards you're trying to manage, from fire risks to poor air quality.
Daily and Weekly Safety Checks
Your maintenance schedule has to be strict and consistent. The safety of this temporary fix hangs entirely on your diligence, so think of these checks as a mandatory part of every single laundry cycle.
Your daily routine has to include:
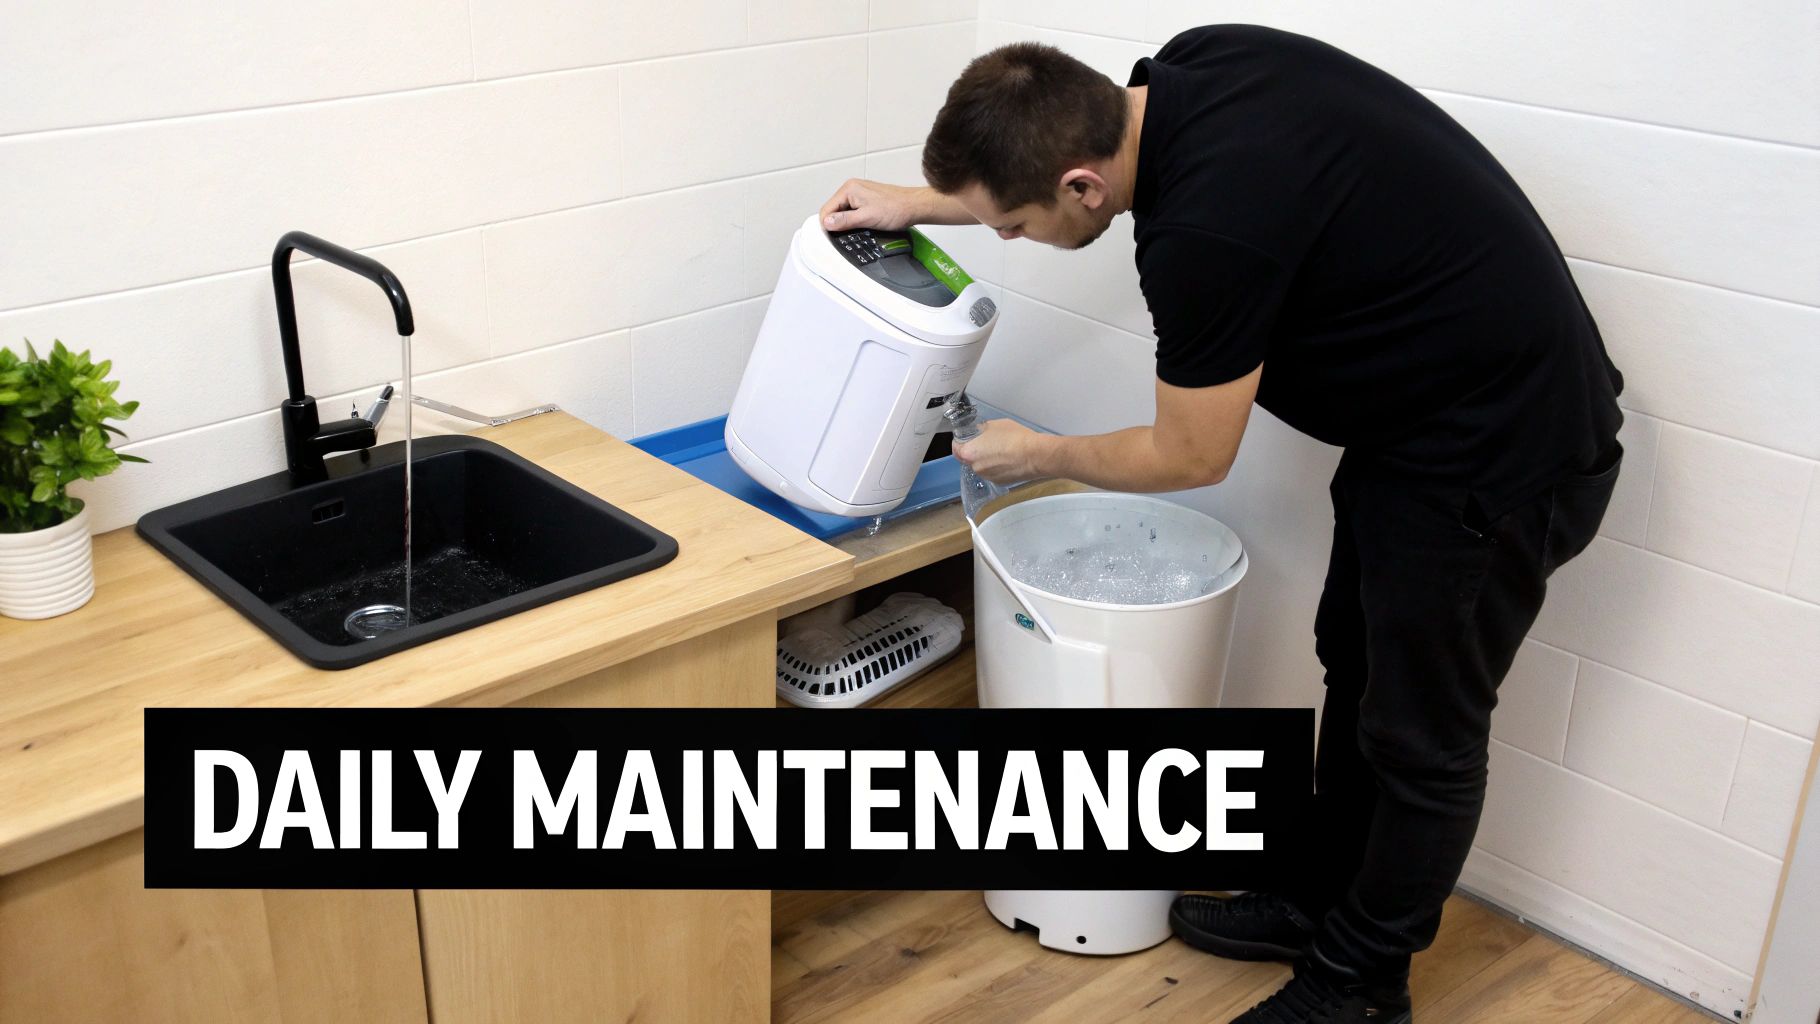
Cleaning the Lint Trap After Every Load: This is your number one defense against a fire. A clogged screen chokes off airflow, causing heat to build up, which can easily ignite that highly flammable lint.
Changing the Water Daily: The bucket of water is there to catch lint, but it gets stagnant and gross fast. Swapping it out daily, or even after each load, prevents musty smells and stops mold from getting a foothold and spreading through your home.
On top of that, you'll need to do weekly inspections to catch problems before they spiral. Take a close look at the vent hose for any cracks, tears, or blockages. Hidden lint buildup inside the duct is a major fire hazard that needs to be cleared out immediately. For a deeper dive, check out our essential tips on how often you should clean your dryer vent for safety.
Managing Moisture and Air Quality
Venting a dryer inside has a massive impact on your home's air. Just one load of laundry can pump over a gallon of water into the air, creating a steamy, humid environment that mold and mildew absolutely love. This is why running a dehumidifier while the dryer is on isn't just a good idea; it's essential for protecting your walls, furniture, and even your home's structure from moisture damage.
Beyond just water vapor, dryer exhaust releases a cocktail of chemicals directly into your breathing space. This constant exposure can be particularly harmful for individuals with respiratory issues.
The air quality problem is more serious than most people think. Research shows that dryer vent emissions are loaded with numerous volatile organic compounds (VOCs), including several classified as hazardous air pollutants. When you vent indoors, these pollutants get concentrated right where you live. To see the science behind this, you can read the full research about dryer emissions and their health impacts. To round out your knowledge, brushing up on essential property maintenance tips for homeowners is always a smart move.
Common Questions About Venting a Dryer Indoors
Even after laying out all the facts, it's totally normal to have some lingering questions. The whole idea of venting a dryer inside touches on some serious safety concerns, so it’s smart to be cautious. Let’s tackle some of the most common questions head-on to give you clear, safety-first answers.
There's a lot of bad information floating around online about this topic. Getting straight answers is the only way to protect your home and family from real hazards like fire, mold, and poor air quality.
Can I Use an Indoor Vent Kit with Any Dryer?
Let me be crystal clear: absolutely not. This is probably the most critical point to understand.
You can never, ever vent a gas dryer indoors. The exhaust from a gas dryer contains carbon monoxide, a deadly and odorless gas. Venting any gas appliance inside is a potentially fatal mistake, and it's strictly forbidden by building codes everywhere for that exact reason.
Indoor vent kits are designed only for electric dryers. Even then, most safety experts will tell you they are a temporary, last-ditch effort, not a real, long-term solution. If you don't have a way to vent outside, a modern ventless dryer is always the safer and better investment.
How Often Do I Really Need to Clean the Vent Kit?
After every single load. There's no wiggle room here.
Dryer lint is incredibly flammable; it's the leading cause of dryer fires in the United States. Letting it build up, even for a couple of cycles, is just asking for trouble.
On top of that, the water in the collection bucket has to be emptied after each load, or at least once a day. Stagnant, lint-filled water is a perfect breeding ground for mold and mildew. Before you know it, that musty smell will be circulating all over your home.
Think of the maintenance as part of the drying cycle itself. You clean the dryer's lint screen after every load, right? You have to treat the external trap and the water bucket with the same non-negotiable diligence. Skipping it defeats the whole purpose.
Is an Indoor Vent a Permanent Fix?
Not at all. An indoor vent kit should never be considered a permanent solution. Think of it as a temporary patch that creates its own set of problems, mainly by pumping moisture and fine particles into your living space.
Over time, that constant blast of humid air will cause real damage:
Structural Damage: You'll start to see paint peeling, wood warping, and even drywall softening from the relentless dampness.
Poor Air Quality: You're essentially spraying fine lint dust and whatever chemical residues are left from your detergent and fabric softener directly into the air you breathe.
Mold and Mildew: High humidity is an open invitation for mold to grow, and it often starts in places you can't see, like behind furniture or inside walls.
For a permanent, safe setup where outdoor venting isn't an option, the right choice is a ventless condenser or heat pump dryer. It's the only responsible long-term answer.
Will My Laundry Room Feel Humid If I Vent Indoors?
Yes, it will feel like a swamp. Seriously.
An average load of wet laundry releases more than a gallon of water vapor as it dries. When you vent that indoors, all that moisture gets dumped right into the room.
You'll quickly notice condensation forming on windows, walls, and any other cool surface. To fight this, running a good-quality dehumidifier at the same time isn't just a suggestion, it's absolutely essential to protect your home's structure and your indoor air quality.
If you're concerned about the fire hazards and air quality issues that come with improper dryer venting, the safest bet is a professional cleaning. The certified technicians at Purified Air Duct Cleaning have the proper tools and experience to thoroughly clean your entire dryer vent system from the inside out, making sure it runs safely and efficiently. Protect your home and family by booking a service with us today.