How to Install a Dryer Vent: DIY Guide for Beginners
- Oct 27, 2025
- 15 min read
Running a dryer vent isn't just about poking a hole in the wall and sticking a tube through it. It's a project that involves careful routing, secure connections, and proper sealing to ensure your dryer works efficiently and, more importantly, safely. Getting this right from the jump is crucial for your home's health and your appliance's performance.
Why a Proper Vent Is Not Just a Tube
Before you start drilling, let's talk about what's really at stake. A dryer vent is much more than a simple exhaust pipe; it's a critical safety feature for your home. When you install it correctly the first time, you're not just helping your dryer run better, you're actively protecting your home from some serious, hidden dangers.
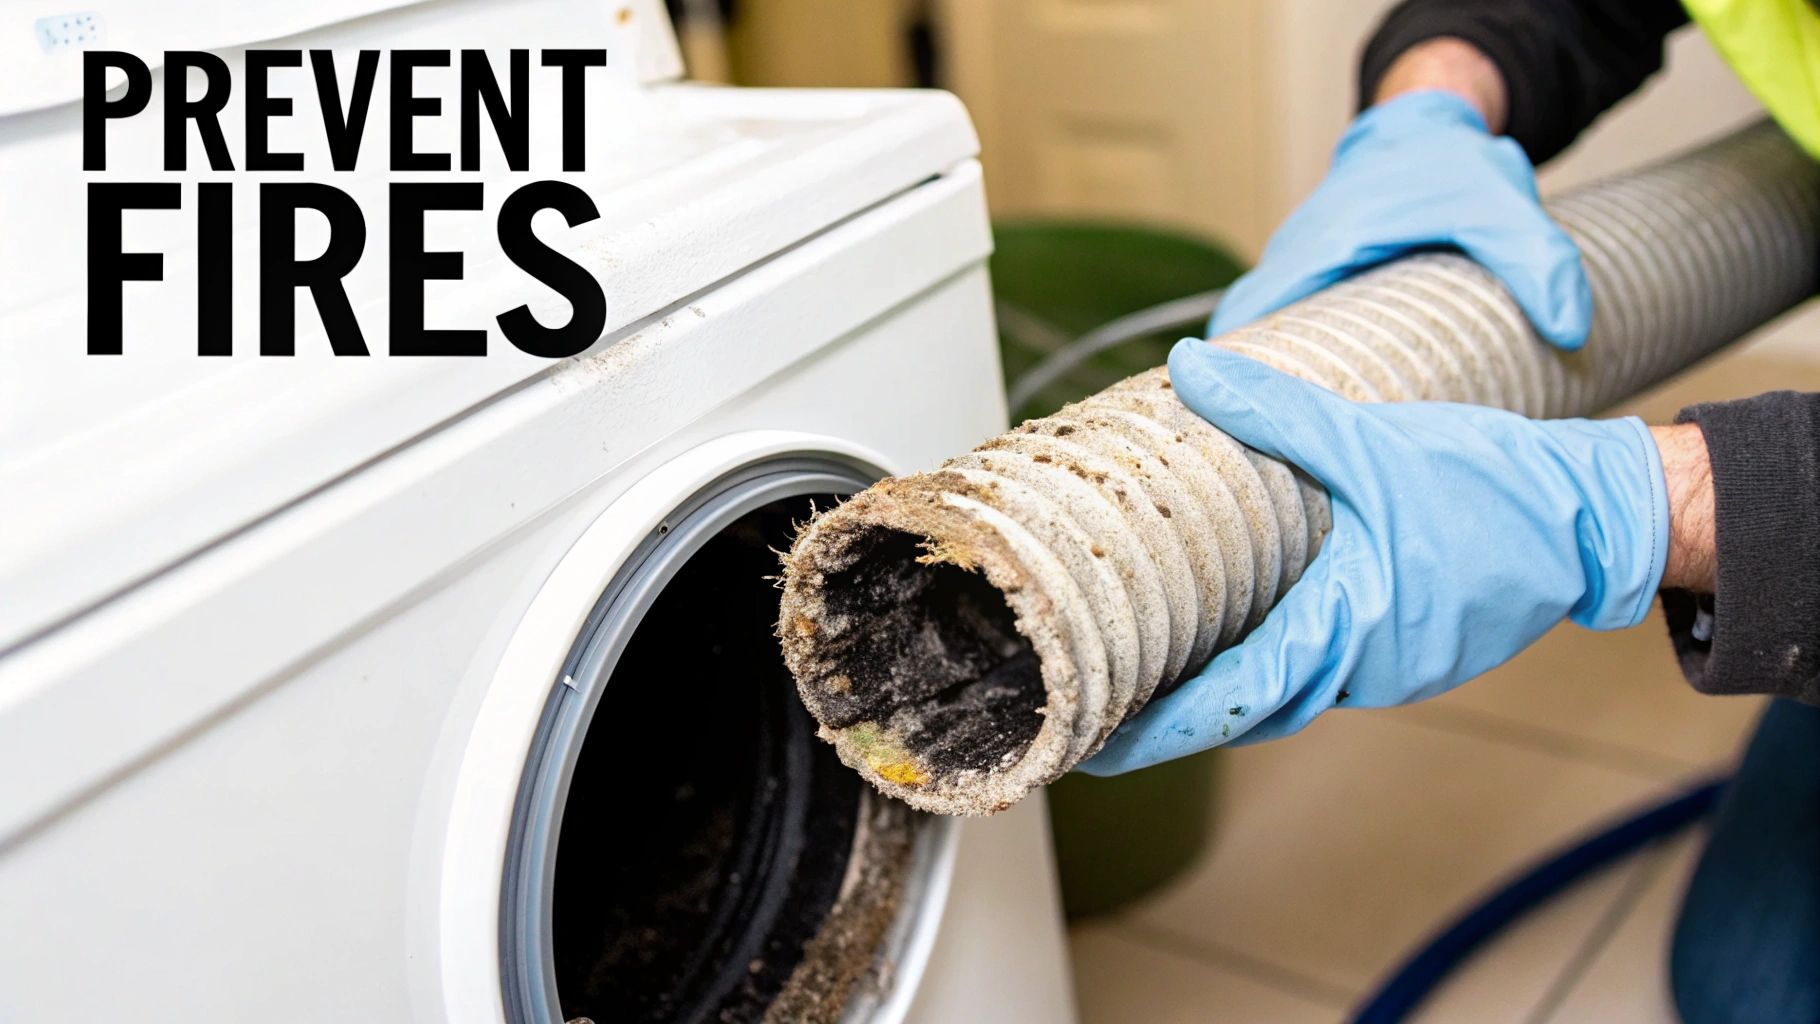
A poorly planned or shoddily installed vent is an open invitation for trouble. The biggest risk? Fire. Lint is incredibly flammable, and it loves to build up in vents with too many sharp turns or in those flimsy, plastic accordion-style ducts.
The Hidden Dangers of a Bad Installation
The risks don't stop with lint buildup. A compromised vent can introduce a host of other hazards into your living space, some of which you won't see or smell until it's too late.
Fire Hazard: Clogged vents are a leading cause of dryer fires. When the hot air can't escape, the dryer overheats, and that trapped lint can easily ignite. In fact, improperly installed dryer vents are linked to around 15,500 fires in the United States every year, causing devastating damage.
Carbon Monoxide Leaks: This is a huge concern for gas dryers. A blocked or leaky vent can force deadly carbon monoxide gas back into your home instead of safely venting it outside.
Moisture Damage: Never, ever terminate a dryer vent in an attic, crawlspace, or basement. Pumping all that warm, humid air into an enclosed space is a perfect recipe for mold and mildew growth, which can lead to structural rot and terrible indoor air quality.
Knowing the warning signs of clogged dryer vents really drives home why a proper installation is so vital. If your clothes are taking forever to dry or the top of the dryer is hot to the touch, you likely have a blockage that needs immediate attention.
Boosting Efficiency and Saving Money
Putting aside the serious safety issues for a moment, a correct installation directly benefits your wallet and your dryer's longevity. A clean, straight shot to the outside lets the dryer push out that hot, moist air with minimal effort.
This efficiency pays off in a few key ways. Your clothes dry much faster, which means your dryer isn't running as long. As a result, you'll see a real drop in your monthly gas or electric bills. This reduced workload also puts less strain on the dryer's motor and heating element, which can add years to its lifespan.
For a deeper dive, our guide on proper clothes venting breaks down even more of the specifics.
Assembling Your Dryer Vent Toolkit
Any good project starts long before you cut the first hole. Getting your gear lined up for a dryer vent installation means you won't be making that dreaded mid-project run to the hardware store. Honestly, being prepared is half the battle, and it all begins with picking the right materials.
Your number one priority has to be the ducting. You’ll see flexible foil or vinyl ducts on the shelf, but you should walk right past them. Their accordion-like ridges are notorious for trapping lint, which can lead to blockages and create a serious fire hazard over time.
Instead, you absolutely want to use rigid or semi-rigid metal ducting. This is what the pros use, and for good reason. Its smooth interior lets lint and moist air flow straight outside, which drastically cuts down on the risk of clogs.
Choosing the Right Materials
Beyond the ductwork itself, you'll need a handful of other key pieces to build a secure, weatherproof system. Each one has a specific job to do for performance and safety.
Exterior Vent Hood: This is where the vent meets the outside world. Look for a quality hood with a built-in damper that closes when the dryer is off. This is crucial for keeping pests from crawling inside. Some premium models, like the DryerJack, are specifically engineered for maximum airflow and durability, especially if your vent terminates on the roof.
Duct Elbows: For any turns in the vent path, you'll need 4-inch rigid metal elbows. Just like the straight sections, their smooth interior is key for preventing lint from building up in the corners.
Aluminum Foil Tape: This is non-negotiable for sealing the seams between duct sections. Never use standard duct tape, the heat from the dryer will bake the adhesive and cause it to fail. You also want to avoid using screws, as the tips poke into the duct and create perfect little hooks for lint to snag on.
Sticking to these specific materials isn't just a suggestion; it's a matter of safety and code compliance. In fact, many local building codes across North America and Europe mandate these materials to mitigate fire risks. The total vent length, the type of duct, and where it exits the house all play a role in airflow. Making the right choices from the start is critical. You can learn more about these installation standards and their impact on safety.
Essential Tools for the Job
Once you have your materials, it's time to gather the tools. Having these on hand will make the entire installation process go a lot smoother and safer.
Here’s a quick checklist to make sure you have everything you need before you get started. It covers the basics for a standard installation and will save you a ton of hassle.
Essential Dryer Vent Installation Checklist
Category | Item | Key Specification / Purpose |
|---|---|---|
Cutting Tools | Hole Saw (4.25-inch) | Attaches to your drill to cut a clean, perfectly sized hole through exterior walls. |
Cutting Tools | Tin Snips | For cutting straight sections of rigid metal ducting to the precise length needed. |
Power Tools | Cordless Drill | A must-have for driving screws to secure the exterior vent hood and for using the hole saw. |
Measuring Tools | Tape Measure & Pencil | For accurately mapping your vent path and marking exactly where to cut the hole. |
Safety Gear | Work Gloves & Goggles | Protects your hands from sharp metal edges and your eyes from dust and debris while cutting. |
Sealing Tools | Caulking Gun | For applying exterior-grade silicone caulk around the vent hood to create a weatherproof seal. |
With this toolkit, you’re set for a professional-grade installation. Getting it all together beforehand gives you the confidence to tackle the job efficiently, knowing you have the right tool for every step.
A quick tip from experience: buy a slightly larger hole saw, like a 4.25-inch model, instead of an exact 4-inch one. This small amount of extra space makes it much easier to slide the rigid duct through the wall without a struggle.
Mapping the Shortest and Safest Vent Path
The route your vent takes from the dryer to the outside world is the single most important decision in this entire project. A straight, short path ensures maximum airflow and efficiency. On the other hand, a long, winding route is just an invitation for clogs, fire hazards, and a dryer that dies way too soon.
Planning this blueprint correctly is the difference between a pro-level installation and a problem you'll be dealing with for years. Your goal is simple: find the most direct line out of your house.
Calculating Your Total Vent Length
Measuring the path isn't as simple as pulling out a tape measure. Building codes and dryer manufacturers are strict about what's called the equivalent length of a vent. This calculation accounts for the extra friction created by turns and elbows, which can seriously slow down airflow.
The standard rule is that a dryer vent's total equivalent length should not exceed 35 feet. Here's how that math works out:
Straight Duct: Measure the linear feet of the straight pipe you'll need.
90-Degree Elbows: For each 90-degree turn, you have to add 5 feet to your total.
45-Degree Elbows: For each 45-degree turn, add 2.5 feet.
Let's say you have a path with 15 feet of straight duct and two 90-degree elbows. The equivalent length isn't 15 feet; it's 25 feet (15 + 5 + 5). This is a classic misstep in DIY installations. Ignoring these additions can lead to a system that technically fits but performs poorly from day one.
Always aim for a total equivalent length well under the 35-foot maximum. That buffer zone ensures your dryer operates at peak efficiency and gives you peace of mind.
Finding a Clear Path Inside Walls
Before you even think about cutting, you must know what's hiding behind that drywall. Hitting a live wire, a water pipe, or a structural stud can turn a weekend project into a costly and dangerous repair job.
A quality stud finder is your best friend here. Run it across the wall where you plan to exit, marking the location of each stud with a pencil. This gives you a map of the wall's framing, allowing you to plan your exit hole safely between two studs.
After marking the studs, I always drill a small pilot hole with a long, thin bit. Once you're through the drywall, you can poke a piece of bent wire or an inspection camera in there to feel around for unexpected obstructions like pipes or electrical conduit. This small step can save you from a massive headache.
Improperly installed vents can slash a dryer's efficiency, increasing energy use and drying times by up to 30%. That's a real hit to your utility bills. A poorly planned path is a direct cause of this, which is why getting the blueprint right is so critical. You can discover more insights about the impact of professional installation on dryer performance.
This infographic breaks down the essential parts you'll need to put together a safe, effective system.
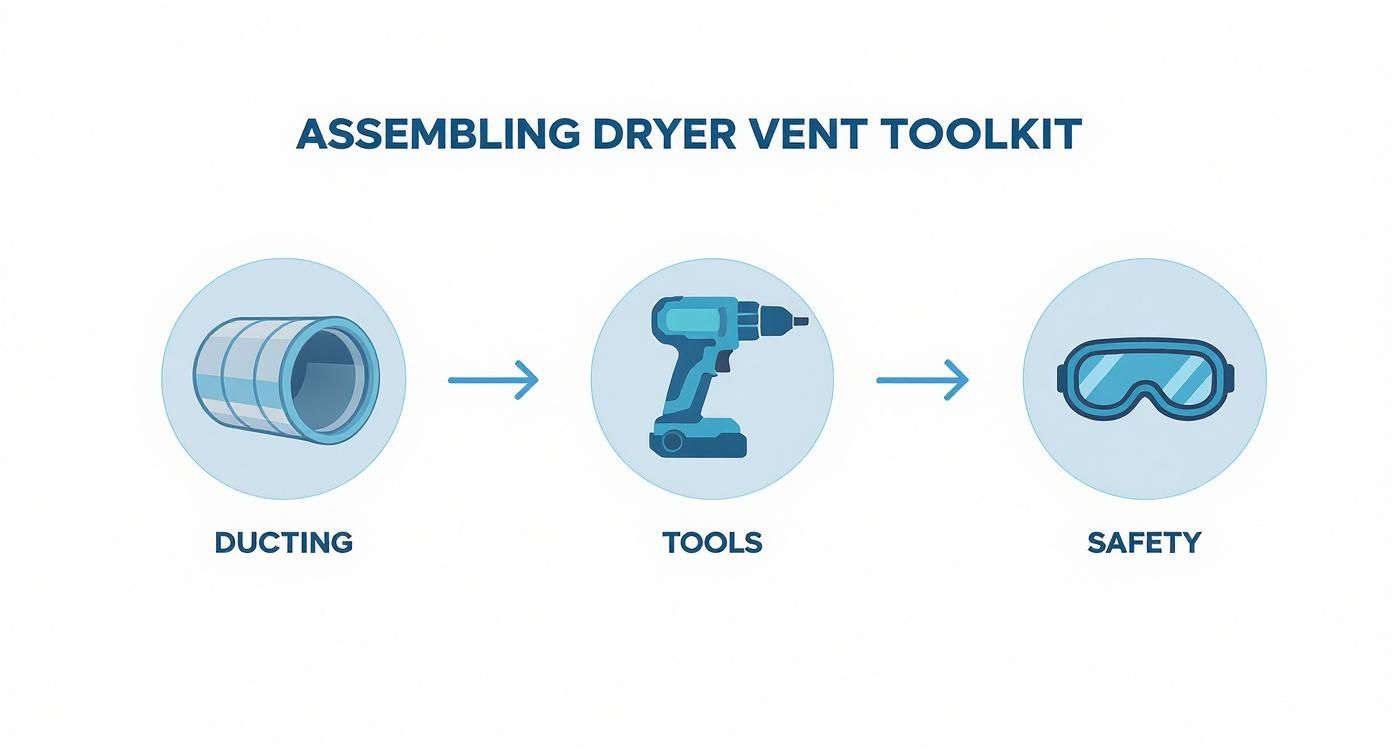
As you can see, a successful installation comes down to three things: choosing the right ducting, using the proper tools, and prioritizing safety gear.
Choosing Your Exit Point
The best-case scenario is an exit point on an exterior wall, as close to the dryer as you can get. Sometimes, the layout of a home makes this tricky. You might be tempted to run the vent up through the attic or into a crawl space, but these are dangerous shortcuts that create serious moisture and fire risks. Check out our detailed guide to learn more about the serious risks of venting a dryer into an attic.
Always terminate your vent directly to the outdoors. Steer clear of spots too close to windows, doors, or A/C units, as the moist, lint-filled air can easily get sucked right back into your house. With your path mapped and your exit point chosen, you're ready to get to work.
A Practical Guide to Vent Installation
Alright, with a safe and clear path mapped out, it’s time to stop planning and start doing. This is the moment where all that careful prep work pays off, letting you tackle each step with real confidence. We're going to move through this methodically, making sure every cut is clean and every connection is rock-solid.
Precision is the name of the game here. From drilling that first tiny pilot hole to sealing the exterior vent hood against the weather, every action you take contributes to the safety and efficiency of your new system. Let's get to it.
Creating the Vent Opening
The very first physical step is making the pathway from inside your home to the great outdoors. This all starts with a small, precise pilot hole drilled from the interior, right in the center of where you want the vent to exit. This little hole is your guide, ensuring the much larger opening will be perfectly lined up on both sides of the wall.
Once that pilot hole is through, pop outside. You should see the tip of the drill bit sticking through the siding, that’s your target. Now, attach your 4.25-inch hole saw to your drill and line up its center bit with the pilot hole.
Using a slightly oversized hole saw gives you just enough wiggle room to slide the rigid duct through without a fight. It's a pro tip that can save you a ton of frustration.
Apply firm, steady pressure as you start drilling with the hole saw. Let the tool do the heavy lifting and avoid forcing it, especially as it chews through different layers like siding, sheathing, and finally, the interior drywall.
After the circular piece of wall is cut out, pull it free and clean up any splintered or rough edges around the opening. You now have a clean, perfectly sized hole, ready for the next stage.
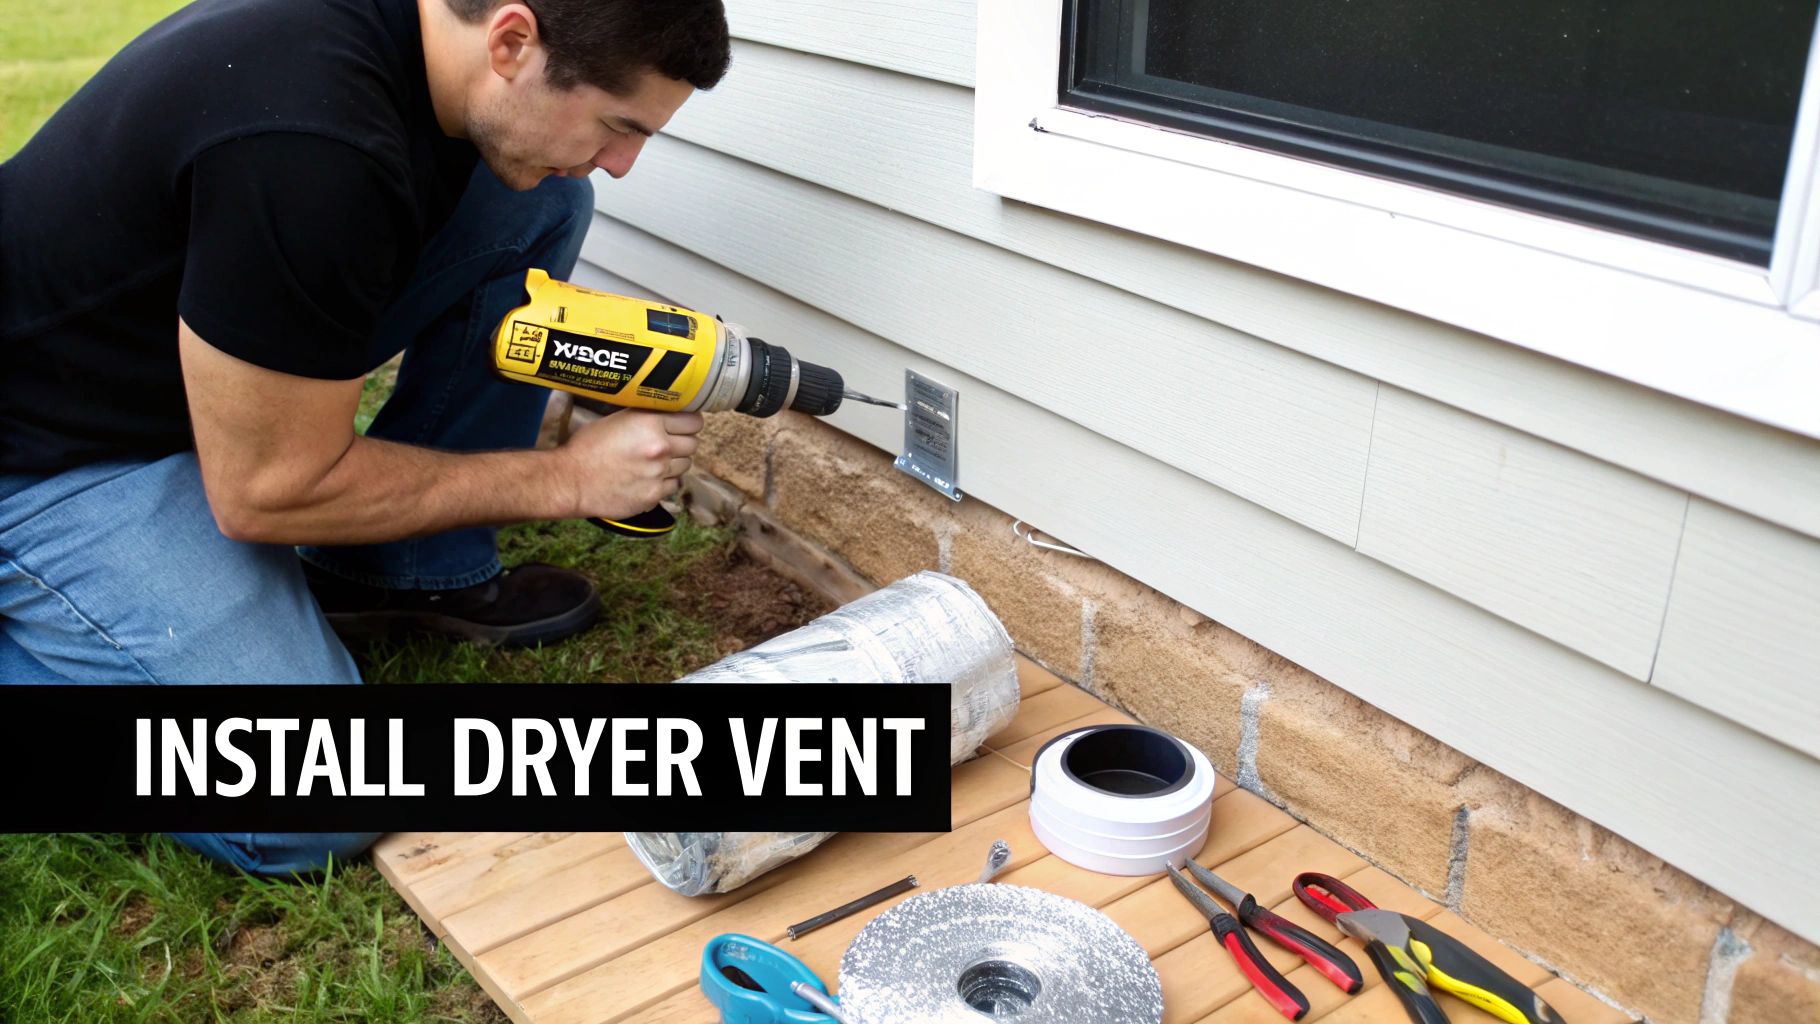
Mounting and Sealing the Exterior Vent Hood
Think of the exterior vent hood as your system's first line of defense against rain, pests, and annoying backdrafts. Getting this part right isn't just about performance; it's about protecting the very structure of your home.
Begin by sliding the vent hood's pipe stub through the hole from the outside. Make sure the hood is facing the right way, louvers or dampers pointing down, and that its flange sits flat against your home's siding. Grab a pencil and mark the screw holes.
Before you fasten it down, lay a generous bead of high-quality, exterior-grade silicone caulk around the backside of the vent hood's flange. This caulk creates a tough, waterproof gasket between the hood and your house, stopping water from sneaking in behind the siding.
Now, position the hood back over the hole, align it with your pencil marks, and drive in the mounting screws. As you tighten them, you'll see a little caulk squeeze out, which is a good sign you have a solid seal. For good measure, apply one last bead of caulk around the top and sides of the mounted flange for an extra layer of weatherproofing. A good seal is key to preventing moisture problems, and if you ever spot condensation, our guide on how to fix water in your dryer vent has some valuable advice.
Assembling the Ductwork Correctly
With the exterior exit locked in, it's time to connect the dots. The goal is to build a duct run from your dryer to the outside wall, and the technique you use here is critical for preventing future lint clogs.
Measure and cut your rigid metal duct sections to length with a pair of tin snips. When you connect two pieces, the male end (the crimped side) must always point in the direction of the airflow, away from the dryer. This small detail ensures that lint glides smoothly over the joints instead of catching on an internal lip.
Here’s the single most important rule of this entire process: do not use screws. Screws might seem like a sturdy way to join ducts, but their tips poke into the vent's interior and create perfect little hooks for lint to grab onto. This is a massive fire hazard.
Instead, every single seam and joint must be sealed with heat-resistant aluminum foil tape. Wrap each connection point with at least two full layers of tape, smoothing it down firmly to create a completely airtight seal. This method leaves you with a perfectly smooth interior, which is the secret to a safe, low-maintenance dryer vent.
Here's a quick breakdown of why this matters so much:
Feature | Aluminum Foil Tape (Correct Method) | Screws (Incorrect Method) |
|---|---|---|
Interior Surface | Perfectly smooth, allowing lint to pass freely. | Protruding tips that create snags for lint. |
Fire Safety | High. Reduces points of lint accumulation. | Low. Actively creates blockages and fire hazards. |
Airflow | Optimal. Maintains unrestricted airflow. | Restricted. Turbulent airflow around screws. |
Code Compliance | Meets building code requirements. | Fails most building code inspections. |
This table makes it crystal clear: using the right sealing material isn't just a suggestion; it's a non-negotiable safety requirement when you're learning how to install a dryer vent.
Making the Final Connections
You're on the home stretch now. The last step is to connect the fully assembled duct run to both the dryer and the exterior vent hood, bringing the whole system online.
First, attach the ductwork to the pipe stub of the exterior vent hood. Just like you did with the other sections, ensure a snug fit and seal that joint thoroughly with aluminum foil tape. If you're using support clamps, make sure they are installed inside the wall cavity or along the path to keep the duct from sagging over time.
Next, carefully slide the dryer back toward the wall. You'll connect the final piece of ducting, often a flexible or semi-rigid elbow, from the main duct run to the exhaust port on the back of your dryer. Use hose clamps for the connection at the dryer itself, then use foil tape to seal its connection to the rigid duct run.
Once everything is hooked up, give each joint a final once-over. Gently tug on the connections to make sure they're secure and run your hand over the foil tape to feel for any gaps. That's it, your dryer vent installation is complete, providing a safe and efficient path for hot, moist air and lint to exit your home.
Final Checks and Long-Term Maintenance
Alright, with the final connection made, you're on the home stretch. But don't pack up your tools just yet. These last few steps are what really separate a decent installation from a great one, ensuring your hard work pays off safely for years to come.
First things first, perform a thorough leak inspection. With the dryer unplugged, carefully run your hands over every single seam you sealed with aluminum foil tape. You're feeling for any gaps, wrinkles, or loose edges where air could escape. Every joint needs to be completely airtight and secure.
Verifying Airflow and Performance
The real test of your work is the airflow. Go ahead and plug the dryer in, then run it on an air-only or low-heat cycle. Step outside and hold your hand in front of the exterior vent hood. What you're looking for is a steady, strong stream of air pushing out. The damper flap should open fully on its own without any hesitation.
If you feel weak airflow, that's a red flag. It could signal a problem like a kinked line or an obstruction you can't see. If that flow feels sluggish, you absolutely must troubleshoot the issue before even thinking about running a load of laundry.
A powerful, consistent exhaust stream is your final confirmation that you've correctly learned how to install a dryer vent. It means lint and moist air have a clear, unrestricted path out of your home.
Creating a Simple Maintenance Schedule
Just because the vent is installed doesn't mean the job is completely finished. Setting up a regular cleaning routine is non-negotiable for long-term safety and efficiency. A clean vent not only keeps your dryer running at its best but also prevents the dangerous buildup of flammable lint.
You should plan to clean your entire dryer vent system at least once a year. However, some homes need a more frequent schedule.
Large Families: More people means more laundry, which means more lint. In this case, consider cleaning it every six to nine months.
Homes with Pets: All that pet hair loves to mix with lint and can create clogs much faster.
Long or Complex Vents: If your vent run is pushing that 35-foot maximum or has several elbows, more frequent inspections are a very smart move.
This focus on safety isn't just a local concern. In Europe, countries like Germany and France enforce strict building codes, such as the Energy Saving Ordinance (EnEV), to promote high-quality, well-maintained vent systems.
Once your dryer vent is properly installed, ongoing maintenance is essential for safety and efficiency. Consider exploring professional dryer vent cleaning services to ensure your vent remains clear of lint buildup over time. For DIY maintenance, our guide offers detailed instructions. You can learn more about how to clean dryer vents and ducts in our article.
Common Dryer Vent Installation Questions
Even when you follow a guide to the letter, a few questions always seem to pop up during a real-world dryer vent installation. Let's tackle some of the most common ones I hear from homeowners. Getting these details right is just as crucial as the physical work itself, because a small mistake can undo all your hard work.
Where Can I Safely Terminate a Dryer Vent
This is probably the most critical question, and the answer is an absolute, non-negotiable rule.
Can I vent my dryer into a garage, attic, or crawl space?
No. Absolutely not. You must never terminate a dryer vent in any enclosed space. When you do, you're pumping huge amounts of hot, moist air into an area that can't handle it. This is a fast track to mold, mildew, and even structural rot in your home's framing.
On top of the moisture damage, it creates a massive fire risk by letting flammable lint pile up inside your house. And if you have a gas dryer? It’s even more dangerous. Venting indoors can lead to a deadly buildup of carbon monoxide. Building codes are crystal clear on this: all dryer vents must terminate directly to the outdoors.
Understanding Vent Length and Connections
The path your vent takes and how you put it together are governed by strict rules designed for safety and airflow. It's easy to get this wrong, ending up with a system that looks fine but performs poorly and dangerously.
What is the maximum length my dryer vent can be?
Most building codes and dryer manufacturers set the maximum equivalent length at 35 feet. Notice that word: equivalent. This isn't just a straight tape measure reading. You have to add "feet" for every turn the ductwork makes.
A 90-degree elbow is like adding 5 feet of straight pipe.
A 45-degree elbow adds about 2.5 feet.
Your goal should always be to find the shortest, straightest path from the dryer to the outside wall. If your layout forces you to go beyond that 35-foot equivalent length, you’ll need to install a dryer booster fan to keep the air moving safely.
Why can't I use screws to connect the duct sections?
Screws seem like a sturdy way to join ductwork, but inside a dryer vent, they're a major hazard. The tips of the screws poke through to the inside of the pipe, creating perfect little hooks for lint to catch on.
Over time, that snagged lint builds up into a significant blockage. This chokes off airflow, makes your dryer work harder, and creates a serious fire hazard. The only right way to connect vent sections is with high-quality, heat-resistant aluminum foil tape. It creates a smooth interior surface that lets lint pass right through.
Planning for Long-Term Maintenance
Getting the vent installed correctly is just the start. To keep your dryer running safely and efficiently for years, you need a plan for regular upkeep. If you skip this part, you'll eventually face the same problems you worked so hard to prevent.
How often should I clean my new dryer vent?
Even a perfectly installed vent will clog with lint over time. To stay safe and efficient, plan on giving your dryer vent a thorough cleaning at least once a year.
Some homes need more frequent cleanings. If you have a big family, pets that shed heavily, or just do a lot of laundry, you should probably clean it every six months. For a deeper dive on this topic, check out our guide on how often you should clean the dryer vent for optimal safety.
Be on the lookout for warning signs that it’s time for a cleaning: clothes taking forever to dry, the dryer feeling unusually hot to the touch, or a faint burning smell when it's running.
If you're unsure about any step of the installation or prefer a professional touch to guarantee safety and compliance, the certified technicians at Purified Air Duct Cleaning are here to help. We ensure your dryer vent is installed correctly the first time for optimal performance and peace of mind. Learn more and get a free quote at purifiedairductcleaning.com.