Top guide: best way to clean dryer vent for safety and efficiency
- Jan 18
- 15 min read
The only way to really clean a dryer vent is to tackle it from end to end. I’m not just talking about swiping out the lint trap. A proper cleaning means clearing out the trap, the vent duct right behind the dryer, the entire run of ductwork through your walls or floors, and the vent cap on the outside of your house.
Just running a vacuum over the trap won't cut it. To break up years of caked-on, hazardous lint, you need a dedicated rotary brush kit paired with a powerful vacuum. This is the only approach that truly cuts down the fire risk and gets your dryer running like it should again.
Why a Clogged Dryer Vent Is a Silent Hazard
That thick, fuzzy blanket of lint building up inside your dryer vent is more than just a hidden mess. It's highly flammable, and it poses a direct and serious threat to your home and everyone in it. With every load of laundry, another layer gets added, slowly choking off the airflow and creating the perfect conditions for a fire.
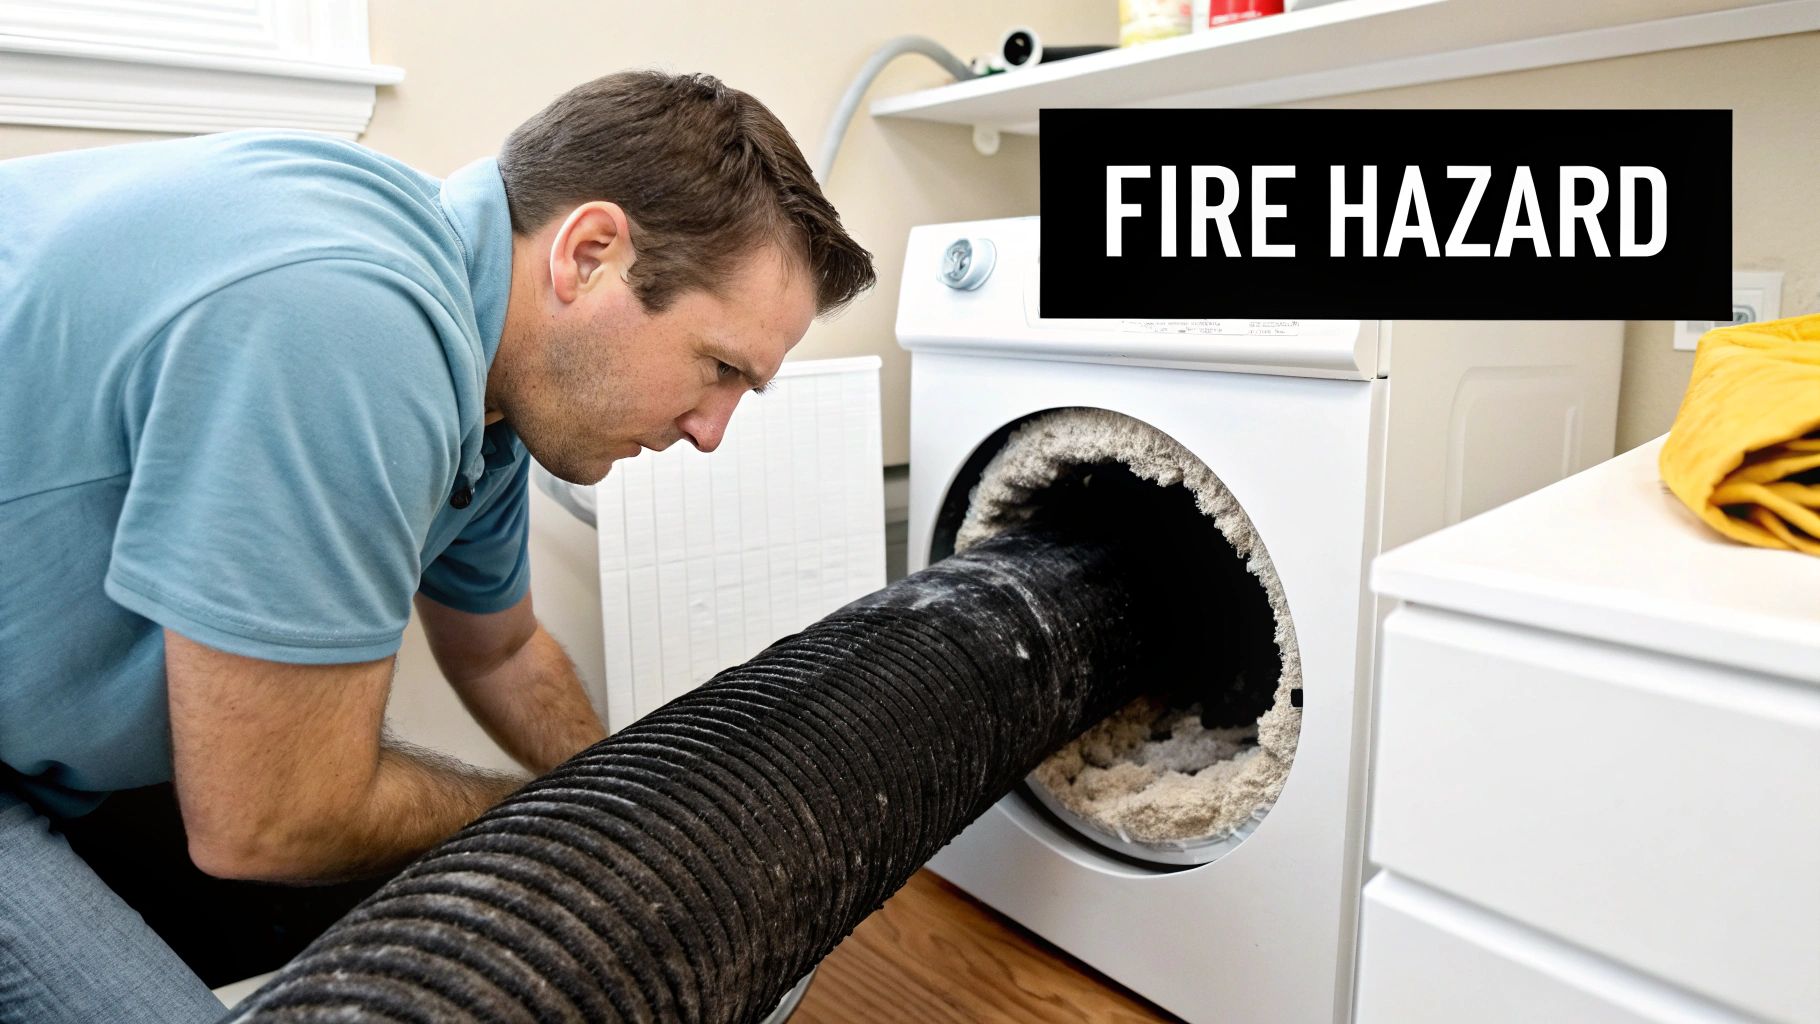
This blockage also forces your dryer to work way harder and run longer. The machine overheats, key parts wear out faster, and your energy bills start creeping up. I've seen it countless times: homeowners blame a perfectly good dryer for poor performance when a clogged vent is the real culprit.
The Hidden Costs of Neglect
Putting off this task has real-world consequences that go far beyond the safety risks. The financial and environmental toll can be surprisingly high, turning what should be a simple maintenance chore into a much bigger, more expensive problem down the line.
Just look at the domino effect:
Skyrocketing Energy Bills: A clogged vent can jack up your dryer's energy use by up to 30%. It’s simple: the longer it has to run, the more you pay.
Premature Appliance Failure: The constant strain and overheating can fry expensive components or, even worse, force you to replace the whole machine years before you should have to.
Damage to Your Clothes: When all that hot, moist air gets trapped, it can literally cook your clothes, causing delicate fabrics to shrink or wear out fast.
A clean dryer vent is one of the most impactful, yet overlooked, ways to improve home safety and efficiency. It directly reduces one of the leading causes of household fires and lowers monthly energy costs, making it a maintenance task with an immediate return on investment.
More Than Just a Fire Risk
While preventing a fire is obviously the number one reason to keep your vent clean, the benefits don't stop there. Regular maintenance makes your home safer, healthier, and more efficient. For homes with gas dryers, this is even more critical; a blockage could cause deadly carbon monoxide to back up into your living space.
It's no surprise that more homeowners are catching on. The global market for dryer vent cleaning services was valued at around $2.5 billion in 2025 and is expected to hit $4.8 billion by 2033. This isn't just a trend; it's a sign that people understand this is a necessary part of homeownership, not just a suggestion.
The payoff for keeping that airway clear is obvious: clothes dry faster, your indoor air is cleaner, and you get the priceless peace of mind that comes from knowing you've eliminated a major hazard. The first step is learning the common dryer fire warning signs you can't ignore. Including this task in a comprehensive seasonal home maintenance checklist is one of the smartest things you can do to protect your home.
Gathering the Right Tools for the Job
Trying to tackle this project without the right gear is a surefire way to get frustrated and, worse, leave the job half-finished. Having the proper equipment ready to go doesn't just make the process smoother; it's what allows you to do the job safely and actually get all that packed-in lint out. Cleaning a dryer vent right takes more than just a vacuum cleaner, it calls for a few specific tools designed to break up stubborn, caked-on gunk.
Before you even think about the specialized tools, take a quick inventory of your basic cleaning supplies. Making sure you're stocked up on the essentials is always a good first step. If you're not sure what you might need, this ultimate guide to home cleaning supplies is a great resource to have bookmarked.
Essential Tools and Safety Gear
Your most important weapon in the fight against lint buildup is a good dryer vent cleaning kit. These kits usually come with a flexible brush that attaches to a series of connecting rods, giving you the reach you need to get deep inside the vent. This is the key piece of equipment that will physically dislodge compacted lint that a vacuum could never touch on its own.
You’ll also want to have a few other things on hand to do the job properly:
A Powerful Vacuum: A shop vac is the best tool for this, but a regular household vacuum with a good hose attachment can get the job done. You'll use this to suck up all the lint after the brush loosens it.
Screwdriver or Nut Driver: You'll need one of these to loosen the clamp that holds the vent hose to the back of your dryer and to the wall duct.
High-Quality Foil Tape: This is non-negotiable for securely resealing the connections when you're finished. Don't even think about using standard duct tape; it will break down from the heat and eventually fail.
Trash Bag: Have one right next to you for the massive clumps of lint you're about to pull out. Trust me, you'll be shocked at how much comes out of there.
Safety has to be your number one priority here. You're about to stir up a lot of dust, debris, and potentially even mold spores, none of which you want to be breathing in. Don't start this job without the right protective gear.
Here’s your non-negotiable safety list:
Dust Mask or Respirator to keep fine lint particles and other allergens out of your lungs.
Safety Glasses to protect your eyes from any debris that gets kicked up.
Work Gloves to keep your hands clean and safe from any sharp metal edges on the ducting.
Choosing the Right Cleaning Kit
Not all dryer vent cleaning kits are built the same. You'll mainly find two types: rotary brush kits and air-powered kits, and each has its place. For most homeowners doing a DIY cleaning, a rotary brush kit that attaches to a power drill is the most effective and versatile choice. The spinning action of the brush is aggressive enough to scrub the inside of the vent walls clean, breaking up even the most stubborn lint. If you want more pointers on getting professional-level results, we've got a whole guide on cleaning dryer duct work like a professional.
If you’re dealing with a particularly long vent run or one made of rigid metal, a rotary kit is practically a must-have. The flexible rods can navigate those gentle curves, while the power from the drill provides the force needed to clean out the entire length. By getting these specific tools together before you start, you’re setting yourself up for a successful, thorough cleaning that will get your dryer running efficiently and, more importantly, keep your home safe.
Your Guide to Thoroughly Cleaning the Dryer Vent
Alright, let's get our hands dirty and walk through the best way to clean your dryer vent from start to finish. This isn't just a random list of tasks; it’s a systematic process that puts safety first and aims for a truly thorough cleaning, ensuring you get every last bit of that hazardous lint.
Before you even think about picking up a tool, the first move is always to make your workspace safe.
For an electric dryer, that means unplugging it completely from the wall. No exceptions. If you have a gas dryer, you need to shut off the gas supply. You'll find a valve on the gas line right behind the dryer, give it a quarter turn so it's perpendicular to the pipe. This simple step is critical to prevent any gas from leaking while you work.
With the power and gas off, gently pull the dryer away from the wall. You'll want plenty of room to work comfortably behind it, so don't be afraid to give yourself a good couple of feet of space. Getting this prep work right is honestly the most important part of the job.
This visual guide breaks down the essential gear you’ll need, highlighting the cleaning kit, a good vacuum, and the safety equipment you shouldn't skip.
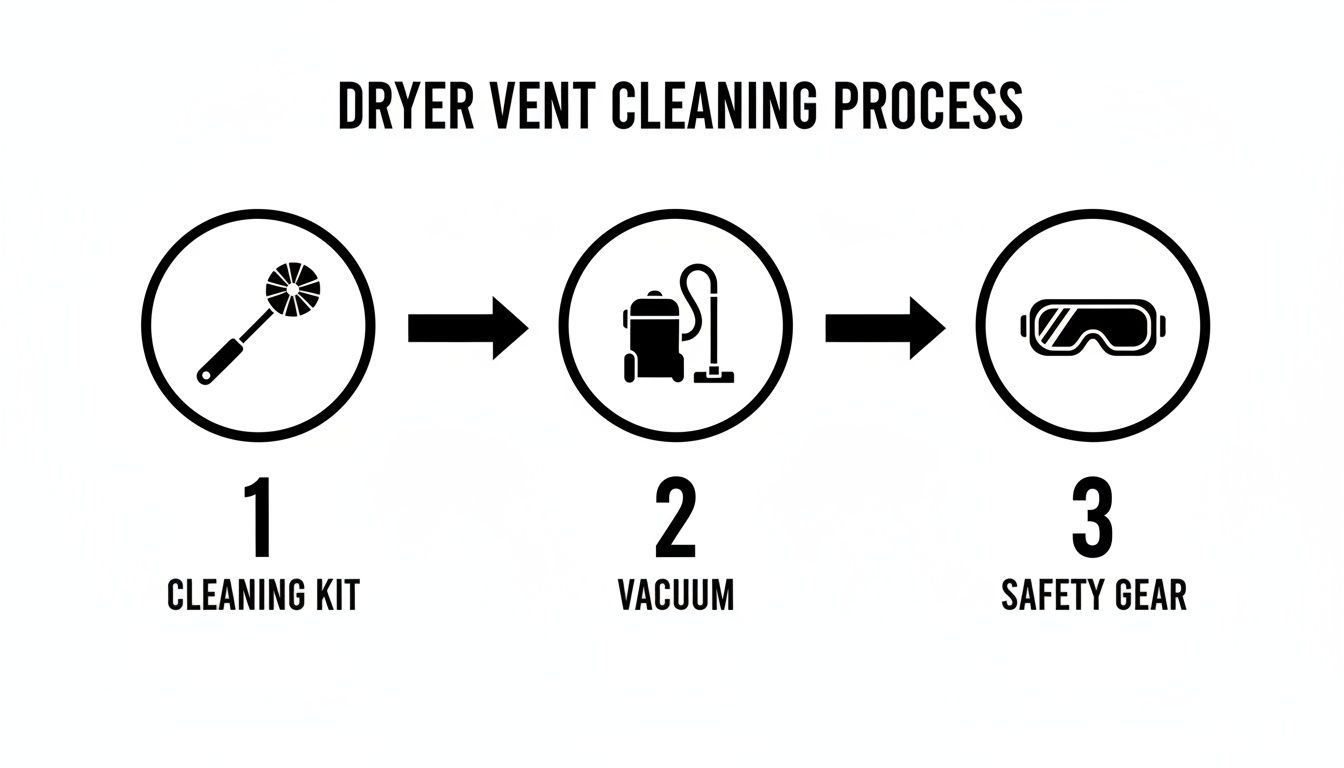
The key takeaway here is that a successful cleaning combines the mechanical action of a brush to break lint free with the power of a vacuum to remove it, all while keeping yourself protected.
Tackling the Hidden Lint Hotspots
Now that the dryer is pulled out and safely disconnected, you can get to the spots where lint first starts to pile up. A lot of people miss these areas, but cleaning them is vital for stopping fires and boosting airflow right at the source.
Start with the lint trap housing, that's the slot you slide the lint screen into. Even if you're diligent about cleaning the screen after every load, a surprising amount of lint slips past and gets caked deep inside. Grab the crevice tool for your vacuum and suck out everything you can reach.
Next, take a long, flexible brush (the kind that usually comes in a dryer vent cleaning kit) and work it down into the housing. Gently scrub the sides to knock loose any stubborn, stuck-on gunk, then hit it with the vacuum one more time. You’ll be shocked at what comes out of a spot you probably thought was clean.
Cleaning the Main Vent Duct
Time to move on to the main event: the ductwork running from your laundry room to the outside world. This is where the most dangerous clogs form. You’ll need a screwdriver or a nut driver to loosen the clamp holding the flexible vent hose to the back of the dryer and to the wall duct. Carefully pull off both ends.
With the hose free, take it outside if you can to keep the mess contained. Use the brush from your cleaning kit to scrub the inside of the hose from one end to the other. You'll see massive clumps of lint breaking loose as you work. Use your vacuum to clean out the debris from the hose itself and from the dryer's exhaust port.
Now for the main duct inside the wall. This is where a rotary brush kit attached to a power drill really proves its worth.
Start Slow: Begin by feeding the brush just a few feet into the duct.
Drill on Low Speed: Set your drill to a low-speed, clockwise rotation. Never, ever run it in reverse inside the duct, or you risk the rod sections unscrewing and getting lost in the vent.
Work in Sections: Use short, in-and-out motions. Don't just try to shove the whole thing in at once, that’s how the brush gets stuck.
Add Rods as You Go: Once you clear a section, attach another flexible rod and push deeper. Keep repeating this until you feel the brush hit the vent cap on the outside of your house.
Here's a critical pro tip: Always keep the brush spinning and moving when it's inside the duct. If you stop the drill or stop moving the brush, the bristles can easily catch on screws or seams in the ductwork, making it a real nightmare to get back out.
While you're doing this, it's a huge help to have a partner hold a vacuum hose at the duct opening. They can catch the incredible amount of lint that you'll be pushing out, which keeps it from flying all over your laundry room.
Finalizing the Exterior and Reassembly
Your last stop is outside your home. Find the exterior vent cap and take a good look at it. It should have a flap or louvers that can open easily when air is pushing from inside.
These caps are notorious for getting clogged with a final layer of lint, leaves, or even pests' nests. Carefully pick out any blockages you see by hand or with your brush. If it’s really grimy, a quick wipe with a damp cloth will do the trick. Making sure this exit is totally clear is non-negotiable for good airflow.
Back inside, it's time to put it all back together. Reattach the flexible vent hose to the wall duct and the dryer, ensuring the clamps are snug and secure. For a professional-grade seal, you can wrap the connections with high-quality foil tape to prevent any air leaks.
Carefully push the dryer back into place. Be very mindful not to crush or kink the vent hose, a squashed hose is just as bad as a clogged one. Finally, plug the dryer back in and, for a gas model, turn the gas valve back on so it's parallel with the pipe.
To wrap things up, run the dryer on a no-heat or air-fluff cycle for about 10-15 minutes. This will blow out any last bits of lint still lingering in the system. Take one final trip outside to feel the air coming from the vent. You should feel a strong, steady flow, which is your confirmation of a job well done.
Critical Safety Checks You Cannot Afford to Skip
Cleaning your dryer vent is a straightforward job, but it’s one where you absolutely cannot cut corners on safety. This isn’t just about doing a good job; it’s about protecting yourself and your home from very real dangers. These are the non-negotiable rules that turn a potentially hazardous task into a safe, routine part of home maintenance.
Before you even think about disconnecting a hose or picking up a brush, your first priority must be to completely kill the power to the appliance. Ignoring this is a serious mistake with potentially severe consequences.
For any electric dryer, this means you must unplug the power cord from the wall outlet. Don't just turn off the cycle; physically disconnect it. This simple action eliminates any risk of electrical shock while you're working behind the machine, where wires and connections are exposed.
Gas Dryer Safety Protocols
If you have a gas dryer, you've got an extra, and absolutely critical, step. You must shut off the gas supply line before doing anything else.
Look for a small valve on the pipe that connects to your dryer. A quick quarter-turn of this valve, so it's perpendicular to the pipe, will stop the flow of natural gas. This single action prevents dangerous gas leaks while you move the appliance, which could otherwise lead to a fire or even an explosion.
Your safety, and the safety of your home, depends on diligence. Powering down and shutting off gas lines are not optional suggestions; they are the most important steps in the entire process.
Once the utilities are secured, you can proceed with the physical work, but the safety mindset doesn't stop there. You need to protect yourself from what you're about to unleash from that vent.
Personal Protective Equipment Is Non-Negotiable
Cleaning a dryer vent stirs up more than just lint. You're potentially agitating years' worth of fine dust, debris, and even hidden mold spores that have been festering in the dark, damp environment of the ductwork.
This is why personal protective equipment (PPE) is essential:
A Quality Dust Mask: Inhaling these fine particles can cause respiratory irritation or trigger allergic reactions. A good mask is your first line of defense.
Safety Glasses: Debris can easily get kicked up and fly toward your face, especially when using a rotary brush. Protect your eyes from irritation or injury.
Work Gloves: Vents and ductwork can have surprisingly sharp metal edges. A simple pair of gloves can prevent nasty cuts and keep your hands clean.
Ladder Safety for Exterior Vents
If your dryer vent exits on an upper floor, you'll need a ladder to get to the exterior cap. Never take this part of the job lightly.
Make sure your ladder is planted on solid, level ground. When you climb, always maintain three points of contact, that means two feet and one hand, or two hands and one foot, are on the ladder at all times. This simple rule dramatically reduces the risk of a dangerous fall.
Following these safety procedures is fundamental to cleaning your dryer vent effectively and without incident. For a deeper dive into proactive safety measures, our guide on how to prevent dryer fires provides even more simple tips to keep your home protected.
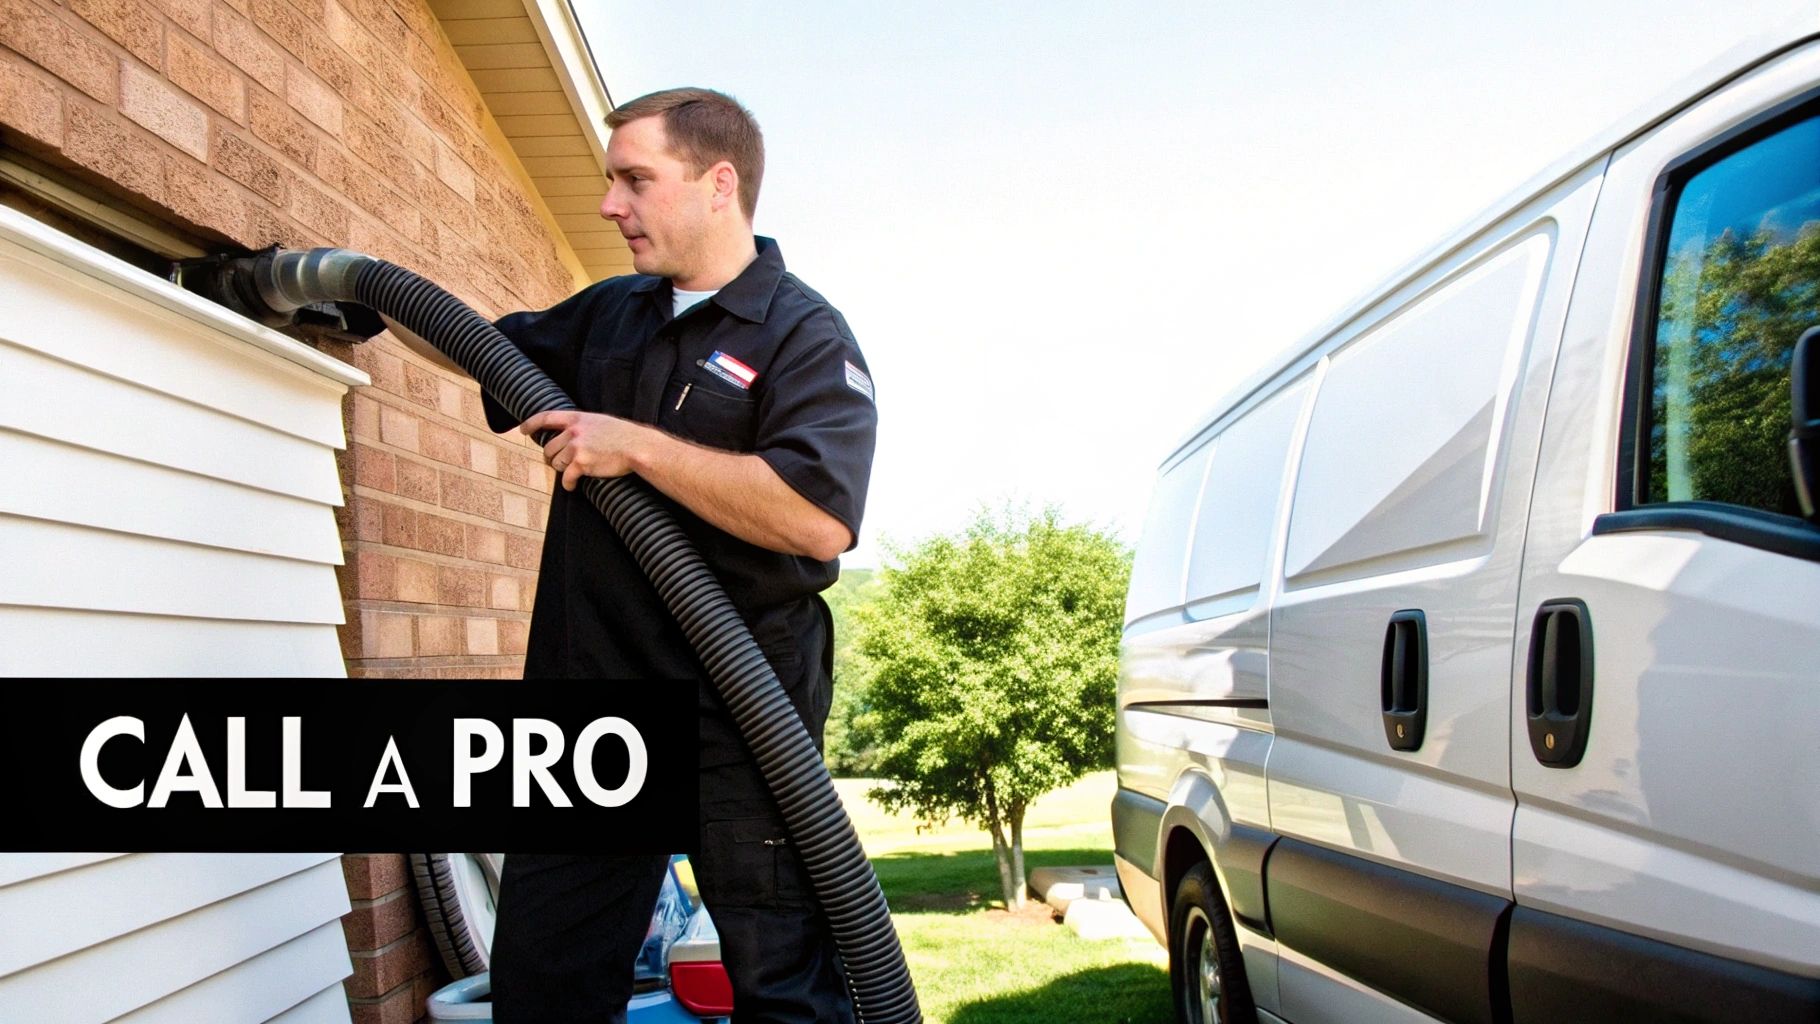
When to Call a Professional Cleaning Service
That feeling of accomplishment after a successful DIY project is fantastic, but sometimes, the smartest and safest move is to call in a professional. While many dryer vent cleanings are straightforward, some situations throw a wrench in the works, presenting risks and complexities a basic DIY kit just can't handle. Knowing when to wave the white flag is crucial for protecting your home.
Sometimes the problem isn't the lint itself, but the journey it has to take. If your vent system is unusually long, stretching over 25 feet, or has a bunch of sharp turns, a pro is your best bet. A standard brush kit can easily snap or get hopelessly stuck in those longer, more complicated ducts.
Scenarios That Demand an Expert
Certain home designs or unexpected discoveries can turn a weekend project into a major headache. These are the tell-tale signs it's time to put down the tools and pick up the phone.
You should definitely consider calling a professional if you run into any of these situations:
Rooftop Vents: If your vent terminates on the roof, the job suddenly involves ladders and navigating a steep, dangerous surface. Professionals have the training and safety gear to handle these high-risk cleanings without incident.
Suspected Nests: Noticed birds, mice, or other critters hanging around your exterior vent? There's a good chance they've built a home inside. These blockages are incredibly dense and need special tools to remove without damaging your ductwork.
Damaged or Crushed Ducting: You might pull your dryer out only to find the flexible hose behind it is torn, crushed flat, or disconnected. A technician can not only clean the entire line but also replace that damaged section with safer, more durable materials.
DIY Cleaning vs Professional Service Comparison
Deciding whether to tackle this job yourself or hire it out can be tricky. This table breaks down the key differences to help you make the right call for your situation.
Factor | DIY Approach | Professional Service |
|---|---|---|
Vent Length | Best for shorter, straight runs (under 25 feet). | Necessary for long, complex vents with multiple bends. |
Vent Location | Manageable for ground-level or easily accessible vents. | Essential for rooftop vents or hard-to-reach terminations. |
Type of Blockage | Good for routine lint buildup. | Required for dense blockages like bird nests or rodent debris. |
Equipment | Basic rotary brush kit, vacuum, and hand tools. | High-powered vacuums, compressed air tools, and inspection cameras. |
Safety Concerns | Minimal risks for simple jobs. | High risks (ladders, heights) are managed by trained experts. |
Duct Condition | Cannot fix damaged or crushed ducting. | Can identify and replace damaged sections on the spot. |
Ultimately, calling a professional isn't admitting defeat; it’s a strategic move to prioritize safety and a job done right. When you’re up against a complex vent system or a stubborn blockage, an expert brings the right tools and peace of mind.
The Difference in Equipment: Brooms vs. Industrial Vacuums
There’s a world of difference between a consumer-grade kit from the hardware store and the heavy-duty equipment a professional service brings to your home. A DIY rotary brush is great for routine maintenance in a simple system, it does a decent job of knocking lint loose.
However, professionals come armed with much more power. They often use truck-mounted, high-velocity vacuums that create powerful negative pressure, sucking out debris with incredible force. Many also use flexible cameras to inspect the entire duct line from the inside, spotting hidden damage, disconnections, or blockages that a brush would completely miss.
Think of it this way: a DIY kit is like a broom, while professional equipment is an industrial-strength cleaning system. Both can clean the floor, but one provides a much deeper, more thorough result.
Investing in a professional service is an investment in your home's safety and your dryer's longevity. While costs vary, it’s one of those expenses that’s easily justified by the reduced fire risk and improved efficiency. To get a clearer picture of what to expect, take a look at our detailed guide on understanding dryer vent cleaning costs.
Common Questions About Dryer Vent Cleaning
Even with a step-by-step guide, it's natural to have a few more questions pop up. We get it. Let's run through some of the most common things homeowners ask us about cleaning dryer vents, so you can feel confident tackling this critical maintenance task.
How Often Should I Clean My Dryer Vent?
For most families, a thorough, deep cleaning from the back of the dryer to the outside of your house is needed once per year. This annual clean-out is typically enough to stop dangerous lint from building up and keep your dryer running like it should.
However, life isn't always typical. You'll want to check your vent and probably clean it every six months if your situation involves:
A big family that's constantly running the dryer.
Pets that shed a lot of fur (it ends up in the vent!).
A really long vent duct, especially one with a lot of twists and turns.
And of course, the single best habit you can have is cleaning the lint trap screen after every single load. For a deeper dive into the specifics, check out our article on how often to clean your dryer vent for safety and efficiency.
Can I Use a Leaf Blower to Clean the Vent?
We see this "hack" online all the time, but please, don't do it. Using a leaf blower is a shortcut that can cause some serious problems. The force can be strong enough to blow apart the duct connections hidden inside your walls or ceiling. When that happens, you’re basically pumping flammable lint into your home’s framing, a hidden fire hazard you can't see.
Besides the safety risk, a leaf blower just doesn't do a good job. It lacks the scrubbing power of a proper brush, so it can't break loose the sticky, caked-on lint that really causes blockages.
What if I Find a White Plastic Vent Hose?
If you pull your dryer out and see that flexible, white plastic or vinyl tubing, stop what you're doing. That hose needs to be replaced immediately. Not only is this material flammable, but its ribbed, accordion-style design is a perfect trap for lint, making clogs happen much faster.
In fact, these white plastic ducts are against modern building codes for this very reason. The only safe fix is to replace it with either rigid or semi-rigid metal ducting. This creates a much smoother, more durable, and fire-resistant path for the hot air and lint to escape.
Are Damp Clothes Always a Sign of a Clogged Vent?
Yes and no, but it's always the first place you should look. A clogged vent is, by far, the most common culprit when clothes take forever to dry. If you're running multiple cycles for one load, it's a huge red flag that airflow is being choked off somewhere in the line.
A professional dryer vent cleaning is often the simplest fix for poor drying. Before you spend money on an appliance repair call, make absolutely certain the entire vent path is clear.
That said, if you've done a thorough cleaning from the appliance all the way to the exterior vent cap and the problem continues, it might be the dryer itself. Common failures include a burnt-out heating element, a broken moisture sensor, or (for gas models) a problem with the fuel supply. If you've ruled out the vent, it's time to call an appliance technician.
When you want the peace of mind that comes with a guaranteed, professional cleaning, trust the experts. Purified Air Duct Cleaning provides comprehensive dryer vent services across the Phoenix metropolitan area, using powerful equipment that gets results a DIY kit simply can't match. Contact us today for a free quote and breathe easier knowing your home is protected.