How to Check Dryer Vent: Fast, Safer Drying Tips (how to check dryer vent)
- Dec 13, 2025
- 14 min read
Checking your dryer vent is a quick two-part process: take a look at the ductwork right behind the dryer for any damage or clogs, then pop outside to inspect the exterior vent. You're looking to see if the flap opens easily and isn't blocked by debris. This simple visual check can tell you if flammable lint is building up and creating a serious fire hazard.
The Hidden Dangers of a Neglected Dryer Vent
It’s easy to ignore that simple tube running from your dryer to the outside. Out of sight, out of mind, right? But that humble component is absolutely critical to your home's safety. Every time you do a load of laundry, lint, that fluffy stuff from your clothes, gets trapped inside the vent. As it builds up, it chokes off the airflow and traps super-hot air that can hit 135°F or more during a normal cycle.
That combination of intense heat and highly flammable lint creates a perfect storm for a fire, a risk that quietly grows with every single load you dry.
This isn't just a "what if" scenario; it's a documented danger playing out in thousands of homes every year. A clogged vent goes way beyond just making your dryer run poorly: it poses a real, tangible threat to your property and your family.
The Real Cost of Lint Buildup
The statistics on dryer fires are pretty sobering. The U.S. Fire Administration reports that an estimated 2,900 clothes dryer fires break out in homes each year, often with tragic results. What’s really alarming is that 34% of these preventable disasters are caused by one simple thing: a failure to clean the dryer vent. It’s a critical maintenance task that too many of us forget about.
Beyond the terrifying risk of a fire, a blocked vent forces your dryer to work overtime, pushing air through a dense obstruction. This strain leads to a whole host of other issues you might not immediately connect to a dirty vent.
More Than Just a Fire Risk
A neglected dryer vent doesn't just put your safety on the line; it also hits your wallet and can even affect your home's air quality. That inefficiency from poor airflow means higher energy bills and a much shorter lifespan for your appliance.
Here’s what you gain by keeping that vent clear:
Lower Energy Bills: An efficient dryer doesn't have to work as hard, using less energy and trimming down your monthly utility costs.
Faster Drying Times: When hot, moist air can escape freely, your clothes dry in a fraction of the time. No more running the same load twice.
Longer Appliance Lifespan: Taking the strain off the heating element and motor helps you avoid premature breakdowns and expensive repair calls.
A clean dryer vent is one of the easiest ways to protect your investment and make your home more efficient. Ignoring it means you're not only risking a fire but also paying more for a dryer that's not even working at its best.
And while fire is the biggest worry, a clogged vent also traps moist, humid air, the perfect breeding ground for microbial growth. It's worth understanding the hidden dangers of mould and how it can impact your indoor air. Catching the problem early is everything, which is why our guide on dryer fire warning signs can help you spot trouble before it gets out of hand.
Spotting the Telltale Signs of a Clogged Vent
Long before a serious clog happens, your dryer will usually give you a few subtle (and not-so-subtle) warnings. Think of it as your appliance’s cry for help. Learning to read these signs is the first step toward preventing a bigger headache, or even a potential fire.
The most common clue I see is how the clothes feel after a cycle. If you pull out a load that’s still damp or feels strangely hot to the touch, poor ventilation is almost always the reason. All that moist, hot air gets trapped inside the drum with nowhere to go, essentially steaming your laundry instead of drying it.
Is Your Dryer Overheating?
Another dead giveaway is the dryer itself. Go ahead and place your hand on top of the machine while it’s running or right after it finishes. It shouldn’t be excessively hot. When you feel that kind of intense heat, it’s a sign the dryer is working way too hard to force air through a blockage. This overwork not only drives up your energy bill but also puts a massive strain on the heating element, leading to costly, premature breakdowns.
You might also notice the laundry room getting muggy or warmer than usual during a cycle. This happens when hot, humid air can't escape outside and instead leaks back into the room. It’s a classic sign of restricted airflow.
A dryer that's hot on the outside is a classic symptom of an internal clog. It’s working much harder than it should to do its job, which is both inefficient and dangerous.
Trust Your Senses: Smells and Sounds
Your nose is actually one of the best tools for diagnosing a vent problem. If you notice a musty, mildew-like odor in the laundry room or clinging to your "clean" clothes, it’s pointing directly to moisture trapped in the vent line. That dark, damp environment is the perfect breeding ground for mold.
Even more serious is a distinct burning smell. This odor is an urgent red flag, often meaning the lint packed inside the vent is getting so hot it’s beginning to scorch. If you smell this, stop using the dryer immediately and get that vent checked. It’s a sign you’re dangerously close to a fire.
For a deeper dive into these warnings, you can find a comprehensive list of dryer vent clogged symptoms to watch for.
Visual Clues Inside and Out
Sometimes, the evidence is right in front of you. A quick visual inspection around your dryer and on the exterior of your home can confirm your suspicions.
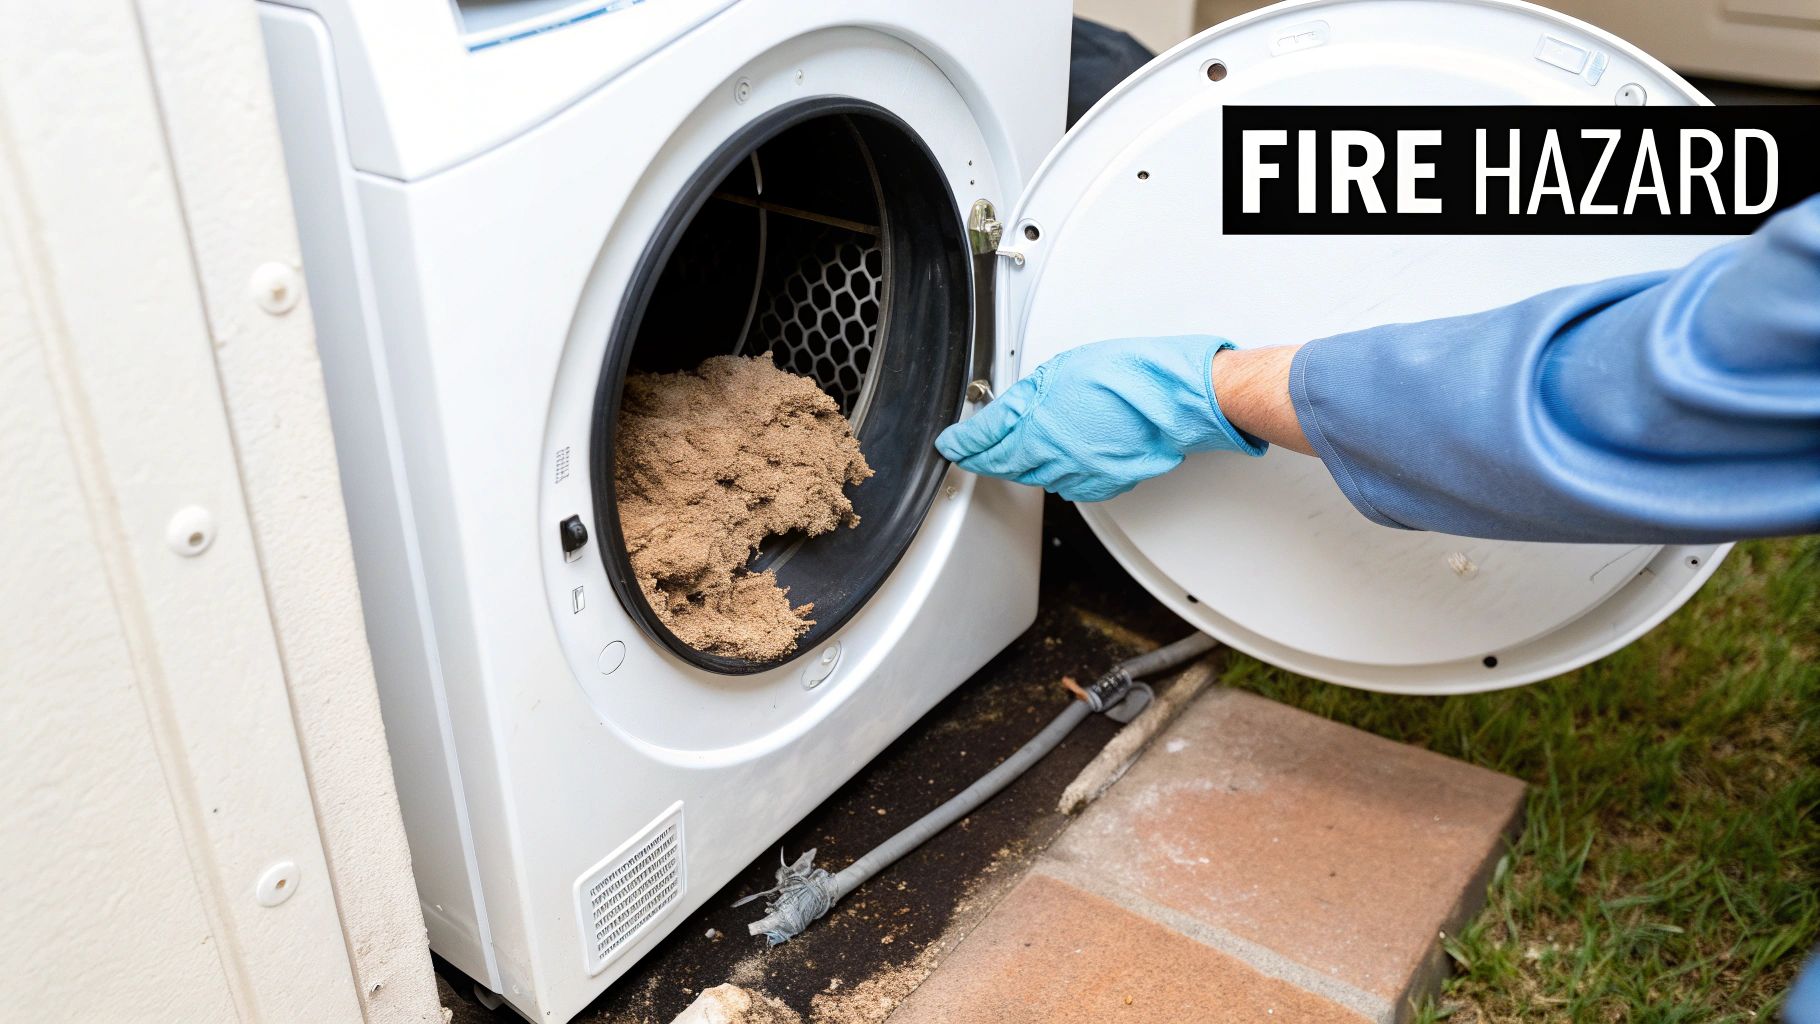
Excessive Lint: Seeing piles of lint behind your dryer or caked around the door seal? That’s a clear indicator that the lint isn’t making its way outside and is being forced back into your home.
No Air Outside: This one is simple. While the dryer is running, go outside to where it vents. You should feel a strong, steady puff of warm air. If you feel little to nothing, or if the vent flap isn't even opening, you’ve got a significant blockage.
Debris at Vent Opening: Take a close look at the exterior vent cover. Here in Arizona, it’s not just lint we find. It's common to see bird nests, leaves, and other debris completely sealing off the exit.
Dryer Vent Problem Indicator Checklist
To make it even simpler, use this quick checklist. These are the symptoms I tell homeowners in Avondale and Phoenix to look out for. Match your symptom to what it means about your dryer's airflow.
Symptom | What It Means | Urgency Level |
|---|---|---|
Damp Clothes After Full Cycle | Airflow is restricted; moisture can't escape. | Medium |
Dryer is Hot to the Touch | The dryer is overheating from the strain. | High |
Burning Smell | Lint inside the vent is scorching. Fire hazard! | Immediate |
Musty Odor on Clothes | Trapped moisture is leading to mold/mildew. | Medium |
Excess Lint Behind Dryer | The vent is clogged, pushing lint back inside. | Medium |
No Airflow from Outside Vent | There is a complete or near-complete blockage. | High |
This checklist isn't exhaustive, but it covers the most pressing issues. If you're checking off anything in the "High" or "Immediate" columns, it’s time to take action right away.
A Practical Walkthrough for Inspecting Your Dryer Vent
Alright, let's get our hands dirty and figure out exactly what's going on with your dryer vent. This might sound like a job for a pro, but honestly, it's a straightforward inspection that any homeowner can tackle. We'll walk through it together, starting from behind your dryer and working our way to the outside wall.
First things first: safety. Before you move anything, unplug your electric dryer from the wall. If you have a gas dryer, you absolutely must shut off the gas supply. Look for a small valve on the pipe behind the appliance and turn it so it's perpendicular to the pipe, which stops the flow.
Taking a couple of minutes for this prep work is non-negotiable. It ensures the whole process is safe from start to finish.
Inspecting the Interior Connection
With the power and gas safely off, gently pull the dryer away from the wall. You just need enough space to comfortably see and work back there. What you're looking at is the transition duct, which is that flexible tube connecting the back of your dryer to the main vent line in the wall.
This is a notorious trouble spot. Give it a good look for any obvious problems.
Crushing or Kinks: Has the dryer been shoved back too far, flattening the duct like a pancake? A crushed duct is a major bottleneck that chokes off airflow and lets lint pile up.
Holes or Tears: Check for any rips or places where it's come loose. Hot air escaping from these gaps can blow flammable lint into your wall cavities, creating a serious hidden fire hazard.
Material Check: Is that duct the flimsy, white plastic or foil kind? Those are a major fire risk and not up to code. You want to see a rigid or semi-rigid metal duct for safety.
Go ahead and disconnect the transition duct from both the dryer and the wall. It's usually held on by a simple clamp. Once it's off, peek inside. A little bit of lint is normal, but if it's thick and matted, you've found a problem. Shake out whatever you can and set it aside.
Checking the Exterior Vent Outlet
Next up, head outside your house to find where the vent exits. This is the final stop for all that hot air and lint, making it a prime spot for clogs. I've seen some wild things blocking these vents over the years.
Once you find the exterior vent cover, you can do a quick airflow test. Have someone turn the dryer on an air-only or fluff cycle. Stand outside and feel for a steady stream of air coming out. If it's weak or you feel nothing at all, you've just confirmed there's a blockage somewhere in the line.
These are the three big clues your senses will pick up on if there's a clog.
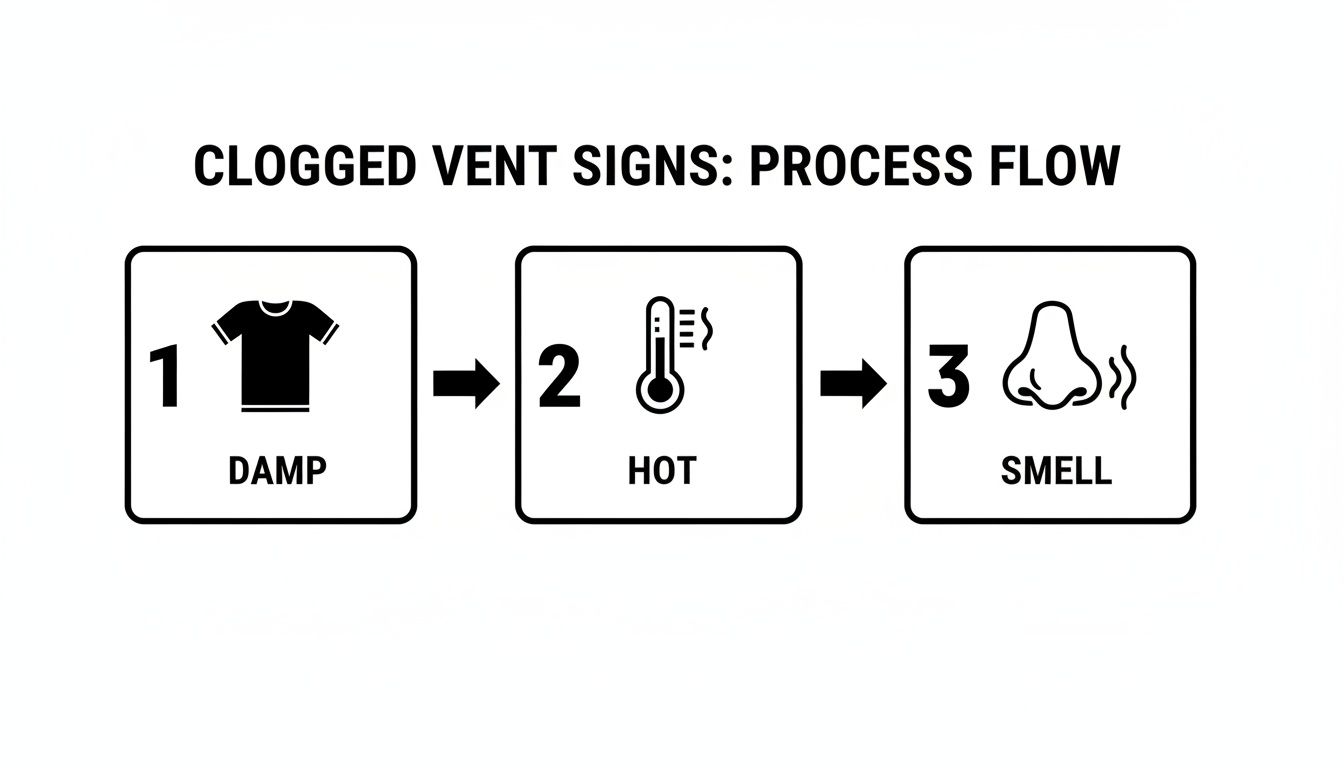
As the infographic points out, if your clothes are still damp, the dryer feels unusually hot, or you notice a strange smell, a clogged vent is the likely culprit.
Remember, a clear exterior vent allows your dryer to breathe. A blockage here forces everything, including heat and moisture, back into your home.
Take a close look at the vent flap or louvers. They should open easily when the dryer is running and fall closed when it's off. Lint, debris, or even pests can jam them shut. Here in Phoenix and Avondale, it’s not uncommon to find bird or rodent nests completely sealing the opening, a huge fire risk that needs immediate attention.
This inspection should also include a rough assessment of your vent's length. The National Fire Protection Association (NFPA) points to clogged vents as the leading cause of dryer fires, accounting for a shocking 33% of the nearly 16,000 dryer-related fires each year. The International Residential Code caps the maximum length at 35 feet, but that number drops by 5 feet for every 90-degree turn. A vent run that's too long or has too many bends is practically begging for a clog. You can find more insights about dryer fire statistics on DryerVentWizard.com.
Tools and Techniques for a DIY Vent Cleaning
Okay, so you've done your inspection and it looks like you've got some lint buildup. The good news is you don't need a whole truckload of gear for a basic cleanout. Just a few simple tools can make a world of difference for your dryer's performance and, more importantly, your family's safety.
Having the right equipment ready to go turns this from a frustrating chore into a quick, effective job.
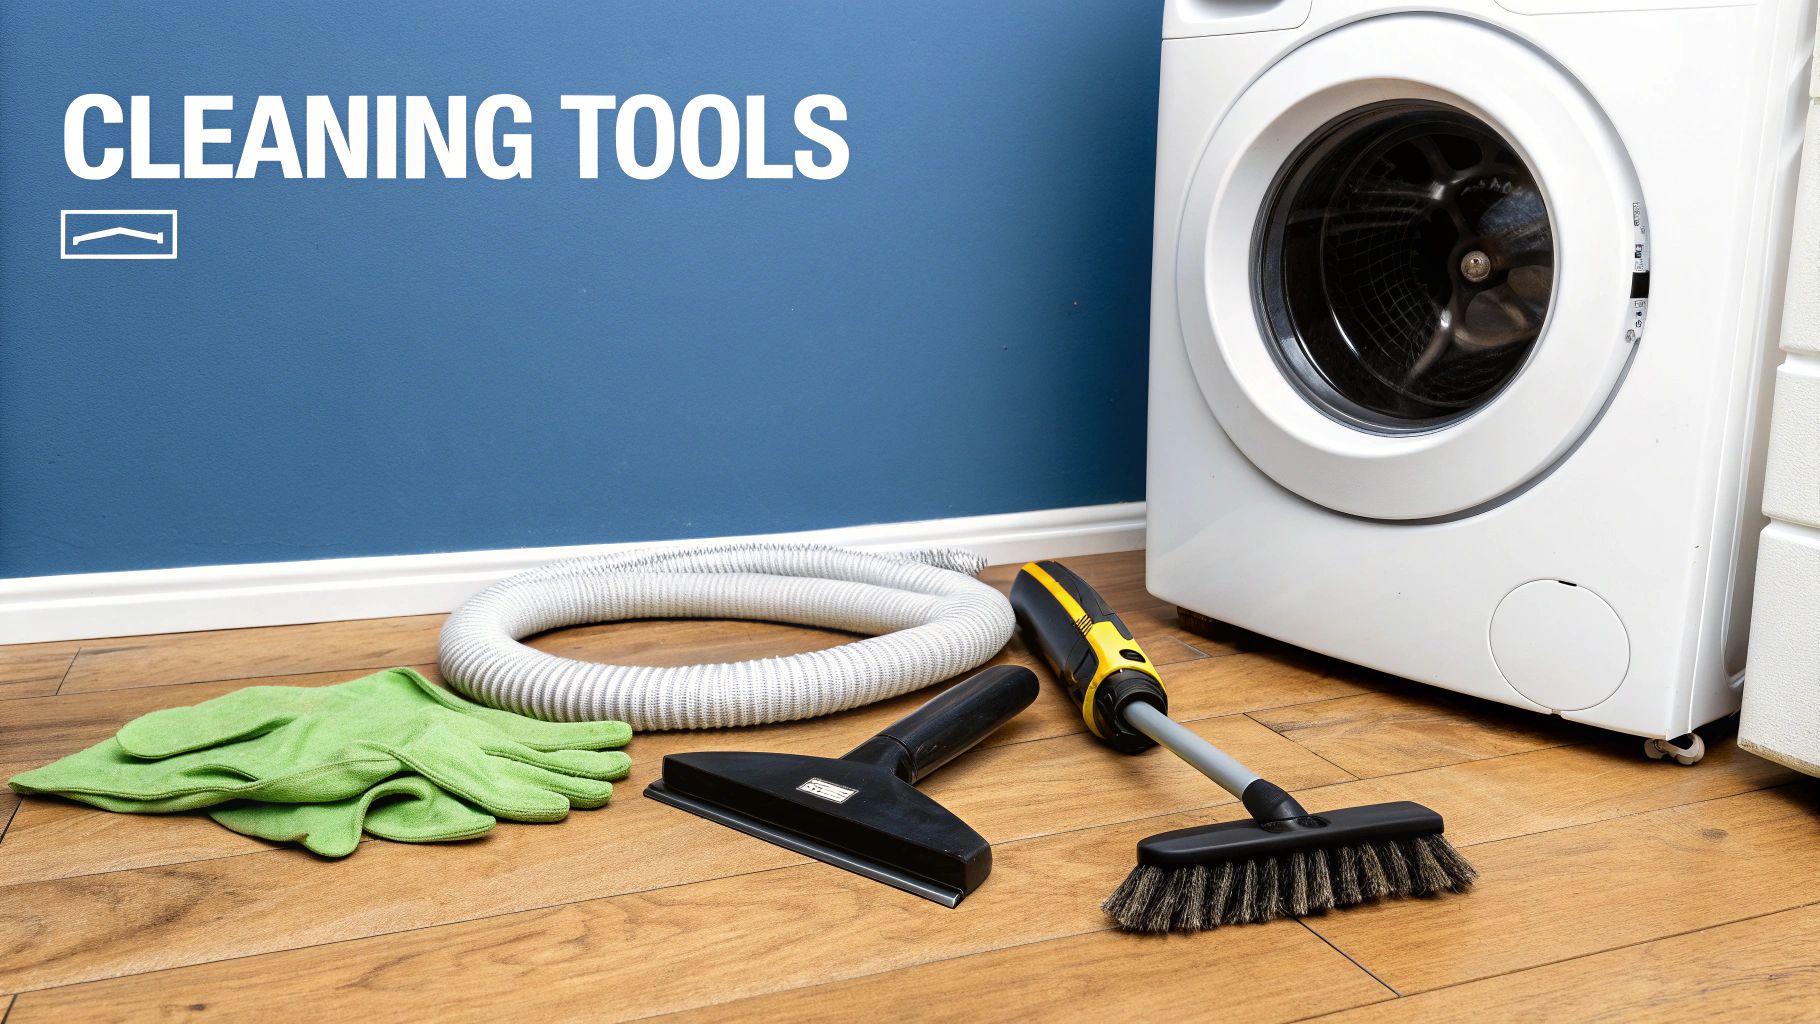
Honestly, the two most critical items are a decent shop vacuum with hose attachments and a flexible dryer vent cleaning brush kit. These kits are cheap and designed specifically to snake through the twists and turns of your ductwork without tearing anything up. They usually come with a brush head and several flexible rods you can screw together to get deep inside the vent line.
Your Basic Cleaning Toolkit
Before you dive in, get everything you need in one spot. This simple setup will handle the most common problem areas: the lint trap housing, that flexible tube behind the dryer, and the vent cap on the outside of your house.
Here’s what to grab:
Shop Vacuum or Canister Vacuum with a Hose: Your standard household vac just doesn't have the oomph. A shop vac is powerful enough to suck out those bigger, stubborn clumps of lint.
Dryer Vent Brush Kit: This is your main weapon for breaking up the lint that’s caked onto the inside of the vent. The flexible rods are key for cleaning several feet into the duct from both ends.
Screwdriver or Nut Driver: You’ll likely need one to loosen the clamp holding the flexible duct to the wall and the back of your dryer.
Gloves and a Dust Mask: Trust me, lint and dust will get everywhere. It’s smart to protect your hands and lungs.
Using these tools is pretty intuitive. Start by vacuuming any loose lint you can see in the lint trap slot and the wall opening. After that, you'll gently work the cleaning brush into the duct, spinning it as you go to break up the really packed-in stuff.
Executing the Cleanout Process
With your gear ready, let's get to work. Start right at the source, the dryer itself. Use your vacuum's skinny crevice tool to get all the lint out of the cavity where the lint screen slides in. You'll be amazed at how much gunk collects down there.
Next, disconnect the transition duct (the tube connecting the dryer to the wall) and clean it out completely with the vacuum and brush.
Now for the main event: the ductwork inside the wall. You'll want to attack this from both inside your laundry room and outside your house. Push the brush kit in as far as it can comfortably reach, rotating it the whole time to scrub the vent walls. Pull it back out, and then follow up with the vacuum to suck up all the debris you just loosened.
For a more detailed walkthrough, our guide on how to safely and effectively clean your dryer vent pipe has you covered.
The biggest mistake people make is only cleaning the first couple of feet. To do this right, you have to clean the entire length of the duct. Working from both the inside and outside openings is the only way to be sure you've cleared the middle.
The Importance of Proper Materials
While you’re cleaning, take a good look at the materials that make up your vent system. If you see a flimsy, white plastic or foil accordion-style duct, it needs to be replaced immediately. That stuff is a hazard. It crushes easily, which chokes off airflow, and it's also highly flammable.
The best and safest option is a rigid or semi-rigid metal duct. The smooth walls on these let lint pass through much more easily, which means fewer clogs. Also, make sure all the connections are fastened with metal clamps, not duct tape, that tape will dry out from the heat and eventually fail.
Knowing When to Call a Professional for Help
While rolling up your sleeves for a DIY cleaning is a great first step, it's just as important to know when you're out of your depth. Sometimes, a quick inspection or a basic cleanout uncovers a problem that your home toolkit simply isn't equipped to handle. Recognizing these red flags is your cue to pick up the phone and call in an expert.
Not every dryer vent is a simple, straight shot out the side of the house. I've seen countless homes, especially around Phoenix and Avondale, with incredibly complex vent runs. They might snake through a tight attic, twist through a crawlspace, or even go straight up through the roof. These long, winding paths often have multiple bends and can easily stretch beyond the recommended maximum length, making them impossible to clean properly with a standard kit.
Red Flags That Demand an Expert
Let's say you've cleaned out the accessible parts of your vent, but your dryer is still taking forever to dry a load. That’s a massive sign of a deeper issue. If you're still getting that slightly burnt smell or your drying times haven't improved, it almost certainly means there's a stubborn blockage your tools just can't reach.
There are a few other situations where you should stop what you're doing and call a pro:
You Find Mold: If you see or smell that musty scent of mold inside the duct, a simple lint cleaning won't cut it. Professionals have the right treatments and equipment to safely remediate the mold and prevent it from coming back.
You Discover a Pest Nest: Pulling out a bird or rodent nest is more than just clearing a clog. You have to make sure no hazardous materials, droppings, or other debris are left behind that could affect your air quality.
The Ductwork is Damaged: If you spot crushed sections, gaps, or holes deep inside the wall or attic, an expert needs to step in. They can safely repair or replace the damaged line to restore proper airflow and prevent hazards.
A professional service isn't just about a more powerful vacuum; it's about accurately diagnosing and solving complex ventilation problems. Their specialized equipment offers a level of thoroughness and safety that DIY methods just can't touch.
The Professional Advantage
Experts come armed with tools you won't find at the hardware store, like high-powered reverse-air vacuums and tiny cameras that can snake through the entire vent line. This tech is absolutely essential for spotting hidden blockages or damage in those long, complicated runs.
The stakes are higher than you might think. According to the U.S. Fire Administration, 34% of the 2,900 residential dryer fires reported each year are directly caused by a failure to clean the vents. When your vent run is unusually long or you’re still seeing warning signs after a cleanout, it’s a critical moment to call for help. You can learn more about these important fire safety statistics from the USFA.
Ultimately, understanding the benefits of professional dryer vent cleaning services for fire prevention isn't just about convenience; it's about giving yourself the peace of mind that your home is truly safe.
Common Questions About Dryer Vent Maintenance
Once you've gone through an inspection and cleaning, it's natural for a few questions to linger. Getting solid, real-world answers is key to feeling confident enough to make this a regular part of your home maintenance schedule. Let's walk through some of the most common things homeowners ask us.
Probably the biggest question we get is about timing: how often should you really be cleaning out that dryer vent? For an average family, a thorough inspection and clean-out at least once a year is a good rule of thumb. But if you have a big family and the laundry machine is running almost every day, checking it every six months is a much safer approach.
Clarifying Common Concerns
It's also totally normal to wonder what to do if you find something... unexpected. A bird's nest is a common one, as are signs of other pests. If you find a nest, it has to be removed completely, no question. Critters love the warm, protected space, so after you clear it out, make sure to install a proper pest-proof vent cover on the outside to keep them from moving back in.
Another hot topic is the vent material itself. We're often asked if those white, plastic, accordion-style ducts are okay to use.
The answer is a firm and absolute no. Those flimsy vinyl ducts are a serious fire hazard and don't meet most modern building codes. If you see one behind your dryer, replace it immediately with a rigid or semi-rigid metal duct. It's a critical safety upgrade.
Dryer Venting and Home Systems
What if your vent runs up through the roof instead of out a side wall? This is a pretty common setup in many homes, but it demands more attention. Gravity is working against you here, making it way easier for heavy, damp lint to build up and cause a blockage. These vertical runs are usually best left to the pros who have the specialized tools to clean them from top to bottom without causing damage to your shingles or roofing.
Creating a truly clean and safe laundry room involves looking at all the appliances. While you're focused on the dryer vent, you might find some useful tips on disinfecting your washing machine to knock out musty odors and bacteria. And if you're still on the fence about just how important this all is, our guide on if dryer vent cleaning is necessary breaks down even more reasons to stay on top of it.
Keeping that dryer vent clear is one of the single most effective things you can do to protect your home and family from a preventable fire. If your vent system has a long or complicated run, or you’re just not getting the results you want from a DIY clean, don't hesitate to call in a professional. For expert service in Avondale and the greater Phoenix area, contact Purified Air Duct Cleaning for a free quote. We'll make sure your system is running safely and at peak efficiency. Learn more at https://www.purifiedairductcleaning.com.