Your Guide to Air Duct Cleaning Mold Removal
- Jun 27, 2025
- 17 min read
That musty, earthy smell wafting from your vents? It’s more than just a passing annoyance, it's your HVAC system sending up a major red flag. For too many homeowners, that odor is the first sign of a hidden mold problem, one that’s turning their ductwork into a superhighway for allergens.
Taking on air duct cleaning mold removal isn't just another chore to tick off your list. It's a critical step toward protecting your home's air and your family's health.

Why You Can't Ignore Mold in Your Air Ducts
When you first catch a whiff of that faint, damp smell every time the heat or AC kicks on, it's tempting to ignore it. But that scent often means your ductwork has become an ideal incubator for mold. The dark, damp, and undisturbed spaces inside your air ducts offer the perfect conditions for mold to take root and spread, especially if there's any condensation from the HVAC system.
And it’s not just about a funky smell. Once a mold colony gets established, your HVAC system does the rest of the work, blasting millions of microscopic spores into every single room. Your air goes from being a source of comfort to a potential health hazard, compromising the very air you and your family breathe every day.
Common Molds Found in HVAC Systems
Not all molds are the same, but you don't want any of them setting up camp in your ventilation system. During professional air duct cleanings, we frequently find two common culprits: Aspergillus and Stachybotrys chartarum, which you probably know as black mold.
**Aspergillus**: This is a very common mold found both indoors and outdoors. For sensitive individuals, it can trigger allergic reactions, sinus infections, and other respiratory problems, especially if someone has a weakened immune system.
**Stachybotrys chartarum**: Often called "toxic black mold," this one loves to grow on consistently damp, cellulose-rich materials like drywall or fiberboard. Exposure can lead to more serious health issues.
The presence of either of these—or any mold, for that matter—is a clear sign your indoor air quality is compromised. We see it all the time. A family starts experiencing mysterious, persistent allergy symptoms—sneezing, coughing, watery eyes—that only flare up when they're at home. After weeks of misery, an HVAC inspection uncovers significant mold growth on the evaporator coil and inside the supply plenum, which was essentially pumping allergens directly into their living space.
Key Takeaway: That musty odor is your first and most reliable clue that you might have mold in your air ducts. Ignoring it just gives the problem time to get worse, which ramps up the health risks and makes the eventual cleanup more difficult and expensive.
Here's a quick reference to help you connect the dots between what you're experiencing and what might be happening inside your HVAC system.
Quick Guide to Spotting HVAC Mold
Symptom or Sign | What It Likely Means | Your First Action |
|---|---|---|
A persistent musty or earthy smell coming from vents | There's likely active mold growth somewhere in the system, releasing microbial volatile organic compounds (MVOCs). | Schedule a visual inspection of your HVAC unit and accessible ductwork. Do not ignore this smell. |
Visible black, green, or white spots on vent covers or grilles | Mold has grown to the point where it's visible at the system's exit points. This is a serious sign. | Stop the HVAC system to prevent further spread and call a professional for an assessment immediately. |
Unexplained allergy symptoms that improve when you leave the house | Your home's air is likely circulating mold spores or other allergens, triggering your immune system. | Change your HVAC filter. If symptoms persist, a professional duct inspection is the next step. |
Signs of moisture or water stains around vents, ducts, or the air handler | A water leak or excess condensation is creating the perfect environment for mold to thrive. | Find and fix the source of the moisture first. Then, have the area inspected for mold. |
Remember, these signs are your home's way of telling you something is wrong. Acting quickly can make a huge difference.
The Real-World Health and Economic Impact
The fallout from moldy ductwork isn't just a household issue; it's a global one with serious health and economic consequences. Research shows that roughly 25-50% of buildings in developed countries have dampness problems that can directly impact HVAC systems. This widespread contamination is linked to a higher risk of respiratory conditions like asthma and allergies, a problem that only gets worse in humid urban areas. For more details, you can read about the far-reaching effects of HVAC contamination.
Ultimately, getting to the root of the problem is always better than just treating the symptoms. For a deeper dive into being proactive, check out our guide on how to avoid mold in your home and damp buildings. Your best defense is to control moisture and ensure your home has proper ventilation—this will stop mold before it even has a chance to start.
How to Confirm You Have Mold in Your Ductwork

Believe it or not, your own senses are the best tools you have for this first round of investigation. Let's walk through how to use them to figure out what's really happening inside your ducts.
Start with Simple Sensory Checks
Your nose usually picks up on mold before your eyes do. If you notice a persistent, musty, or earthy smell that seems to get stronger right after your HVAC system turns on, that’s a huge red flag. Don’t just stand in one spot; walk around your home and do a "sniff test" near different supply registers. If the odor is more potent in certain rooms, you're getting closer to the source.
Next, it's time for a visual check of your vent covers, or registers. Just grab a flashlight and look for any dark, fuzzy spots or discoloration on the grille. While it could just be a heavy layer of dust, mold often looks splotchy, slimy, or even a bit hairy. Dust, on the other hand, is typically a more uniform, flat gray color.
A Safe Look Inside Your Ductwork
If the registers themselves look funky, it’s time to peek inside the duct. This is critical: put on an N95 mask and gloves before you do this. You don't want to breathe in any spores you might accidentally stir up.
Find a supply vent where the smell is strong and unscrew the cover. With a bright flashlight and a small mirror (a simple compact mirror works great), try to get a look at the interior surfaces of the duct. You’re looking for the same signs—visible splotches, streaks, or fuzzy patches of black, green, or white growth.
Keep in mind, a fine layer of gray dust is perfectly normal in any duct system. You're searching for something that looks like it has grown there, especially if the area looks damp.
From experience, one of the biggest mistakes homeowners make is confusing simple dust buildup with mold. Dark, compacted dust can look like mold at first glance. However, mold growth is often patchy and irregular, whereas dust tends to coat surfaces more evenly.
Checking the Heart of the System
Sometimes the problem isn't hidden deep in your ductwork maze. The mold could be growing right at the air handler unit, the central hub of your HVAC system. There are two main culprits to check here:
The Evaporator Coil: This part is designed to pull humidity from the air, so it's constantly wet when your AC is running—a perfect environment for mold. Check the coil's fins for any visible growth.
The Condensate Drip Pan: This pan sits underneath the evaporator coil to catch moisture. If the drain line gets clogged, water will pool in the pan, creating a perfect breeding ground for mold. The blower fan can then pick up these spores and blast them throughout your home.
The Debate: DIY Mold Kits vs. Professional Testing
You’ve probably seen those DIY mold testing kits at your local hardware store. They seem like a simple and cheap solution, but frankly, their results can be very misleading. Most of these kits just use a petri dish to catch airborne spores. Since mold spores are literally everywhere, all the time, you're almost guaranteed to grow something.
A positive result from a DIY kit doesn't tell you if you have an active colony inside your ducts or what the spore concentration is. It just confirms that mold exists in the air—which we already know.
When is Professional Testing Necessary?
Situation | DIY Kit Usefulness | Professional Testing Value |
|---|---|---|
You have visible mold | Low. You already have visual confirmation. The priority is removal. | High. An expert can identify the type of mold and assess the full extent of hidden contamination. |
You have a persistent musty smell but no visible mold | Low. The kit won't pinpoint the hidden source of the odor. | High. Professionals use specialized tools like air sampling pumps and borescopes to locate hidden mold colonies. |
For post-remediation verification | Very Low. A DIY kit is not accurate enough to confirm successful removal. | Essential. Air quality testing is the only way to scientifically verify that spore levels have returned to normal. |
If you've done all the visual checks and still have a strong suspicion of a hidden problem, or if anyone in your home is having unexplained health issues, calling in a certified professional is your best bet. They can provide the definitive answers you need to map out an effective air duct cleaning mold removal plan.
The Right Tools and Safety Gear for Mold Cleanup

When you disturb mold, it releases millions of microscopic spores into the air. Your top priority has to be protecting yourself from breathing them in while also stopping them from spreading all over your home. Before you even think about popping off a vent cover, let's get your personal protective equipment (PPE) sorted out. This is no place to cut corners—your lungs, eyes, and skin are on the line.
Your Personal Protective Equipment Checklist
Think of your PPE as your personal armor. Every single piece is there for a reason: to shield you from direct contact with mold spores and any chemicals you use for the cleanup.
N95 or P100 Respirator: This is your most important piece of gear. A simple dust mask is useless here. You need a respirator specifically designed to filter out microscopic mold spores. An N95 is the bare minimum, but a P100 mask offers superior protection.
Safety Goggles: Spores and cleaning solutions can easily splash and irritate your eyes. Get a pair of non-vented goggles that form a complete seal around your eyes.
Disposable Gloves: Go for heavy-duty rubber or nitrile gloves. You'll be scraping and scrubbing, so you need something that won’t tear easily.
Disposable Coveralls: To keep spores off your clothes and avoid tracking them through the house, a full-body coverall with a hood is a must.
A critical pro tip from experience: After the job is done, remove your coveralls and gloves before you leave the contaminated work area. Place them directly into a heavy-duty trash bag and seal it to prevent cross-contamination.
Essential Tools and Supplies for the Job
Once you're suited up, it's time to gather your tools. The goal here is to physically dislodge the mold, completely capture it, and then treat the surfaces so it doesn't come back. Grabbing random household items won’t cut it and could actually make the problem much worse.
This need for specialized equipment is exactly why the professional air duct cleaning service market is booming. The global market, which was valued at around USD 3.87 billion, is on track to hit USD 5.6 billion. It's clear more and more homeowners are understanding the health risks of contaminated ducts. You can find more details about this market growth, which is driven by a greater focus on indoor air quality.
To do this right, you'll need a few key pieces of equipment.
Primary Cleaning Equipment
Tool Type | Why It's Necessary | What to Look For |
|---|---|---|
HEPA-Filtered Vacuum | A regular vacuum will just spit those tiny mold spores right back into the air. A High-Efficiency Particulate Air (HEPA) filter is engineered to capture 99.97% of particles as small as 0.3 microns, effectively trapping the mold for good. | Look for a powerful shop-vac with a certified HEPA filter. Make sure the hose is long enough to reach deep into your ductwork. |
Soft-Bristled Brushes | You need to physically scrub the mold off the duct walls. Using stiff brushes can easily damage or tear flexible or fiberboard ducts, which just creates another expensive problem. | Find a set of brushes with long, flexible handles. Having different shapes (round, rectangular) will help you tackle various duct sizes and get into tight corners. |
EPA-Approved Biocide | After you've removed all visible mold, you need to kill what's left behind and stop it from regrowing. Stay away from bleach—it doesn't work well on porous surfaces and can corrode metal ducts. | Choose a product specifically registered with the EPA for use in HVAC systems. Always read and follow the manufacturer’s instructions for application and safety. |
You'll also need some basic containment supplies. Grab some thick plastic sheeting and duct tape to seal off vents in other rooms, plus some heavy-duty contractor trash bags for safely getting rid of contaminated materials like your old filter and used PPE.
Your Action Plan for Cleaning Mold from Air Ducts
Alright, this is where the real work begins. A solid air duct cleaning mold removal plan is methodical. It’s all about two things: getting the existing mold out and making sure it doesn’t come right back. We'll walk through a practical plan covering containment, cleaning, and the final sanitizing steps.
Just remember, this isn't a small weekend project. If you're looking at mold covering more than 10 square feet or you think it’s deep inside the system where you can't reach, your best and safest bet is to call in a professional. For smaller, more accessible spots, careful preparation is everything.
Prepare the Area and Contain Spores
Before a single tool comes out, your number one job is to stop mold spores from going airborne and touring the rest of your house. Don't skip this containment phase—it's absolutely critical.
First, walk over to your thermostat and shut the HVAC system down completely. The last thing you want is the fan kicking on and blowing spores everywhere. Next, grab some plastic sheeting and painter's tape to seal off all the supply and return air registers in the rooms you aren't actively cleaning. This walls off your work zone.
The infographic below gives you a bird's-eye view of how to approach duct mold, from the initial look-see to keeping it gone for good.
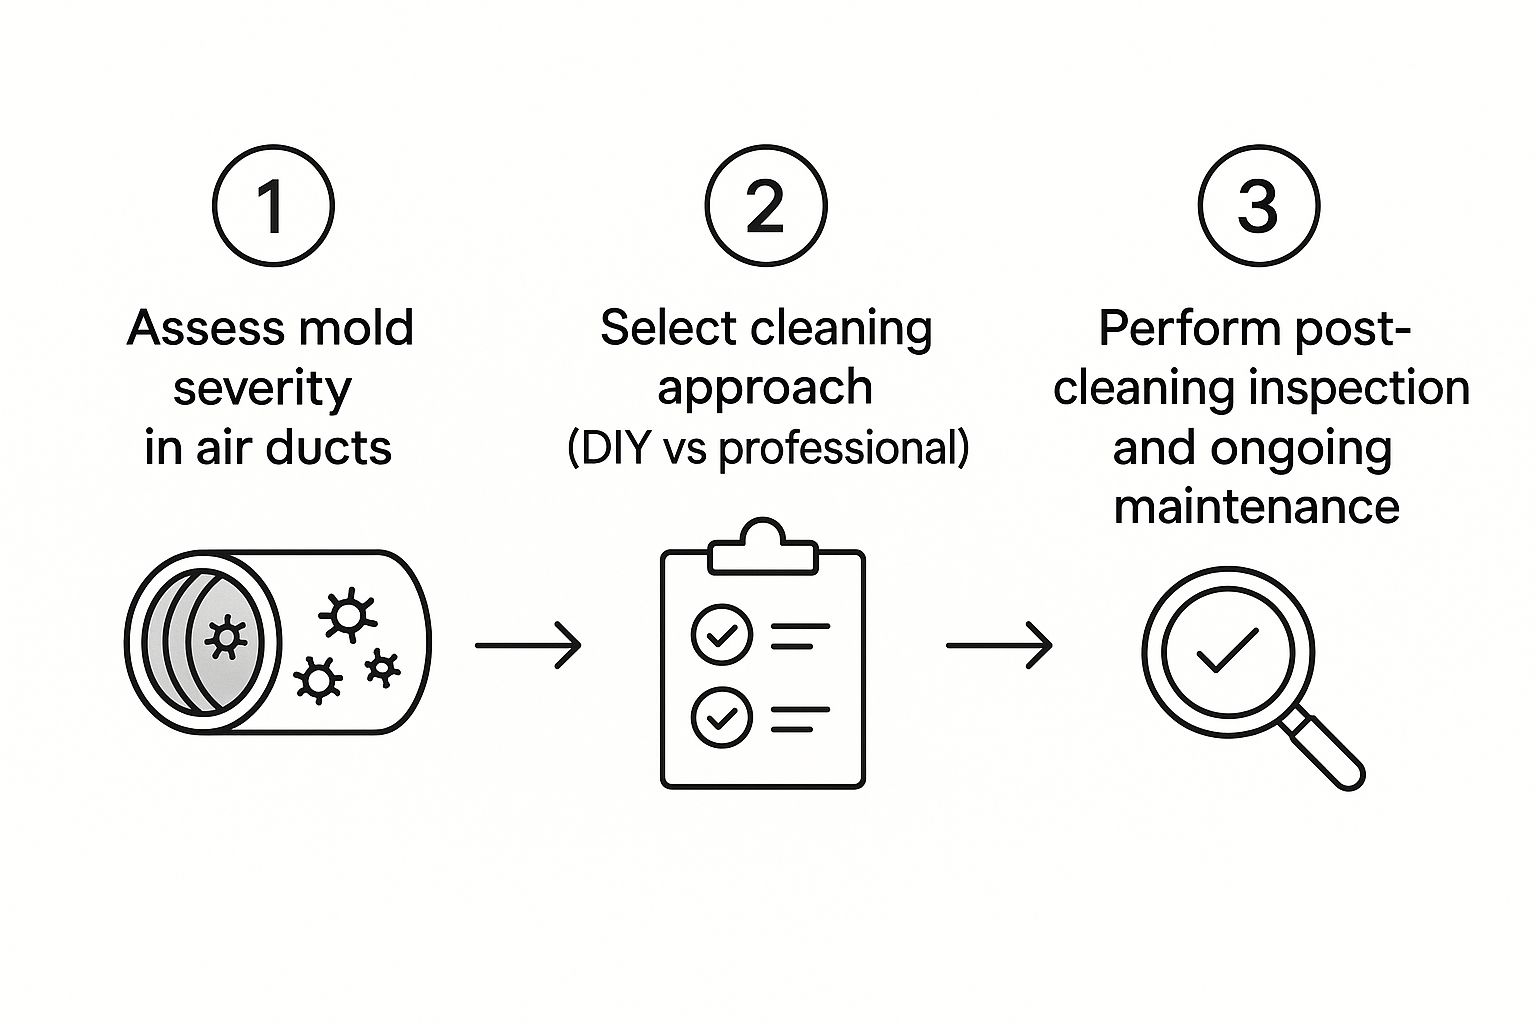
As you can see, a proper assessment is always the first move. It tells you whether a DIY job is even realistic before you get into the nitty-gritty of cleaning and prevention.
The Physical Cleaning Process
Once you've prepped the area and have your safety gear on, it’s time to get that mold out. It's best to tackle the ductwork one section at a time. Pop off the vent cover and give it a good cleaning separately with a simple detergent solution.
Now for the ducts. Using a long-handled brush with soft bristles, start scrubbing the inside surfaces to loosen up all the visible mold and gunk. You need to be firm enough to dislodge the growth but gentle enough that you don't damage the duct, especially if you have the flexible or fiberboard kind. While you scrub, keep the hose of a HEPA-filtered vacuum right at the opening to suck up the debris as it breaks free.
This one-two punch of scrubbing and vacuuming is what we in the industry call "source removal," and it's the heart of any cleaning that actually works. In fact, the demand for proper techniques is a big reason the HVAC cleaning services market, valued around USD 15 billion, is expected to skyrocket to USD 27 billion. It shows people are finally getting serious about their indoor air. You can read more about the factors driving this industry expansion and what it means for homeowners.
A Common Mistake to Avoid: Whatever you do, don't reach for bleach. It's corrosive and will eat away at metal ducts. On top of that, it’s not very effective on porous materials like the fiberboard insulation inside some ducts. The high water content in bleach can actually soak into the material and feed the mold's roots, setting you up for regrowth.
Applying a Biocide and Ensuring a Dry Finish
After a section of ductwork is scrubbed clean and vacuumed out, the last step is to treat the surface to eliminate any microscopic spores left behind. For this, you'll need an EPA-registered biocide or antimicrobial agent specifically made for HVAC systems.
Following the manufacturer’s instructions is key here. You’ll typically use a fogger or a spray bottle to apply a fine mist that coats the inside of the duct.
Application: Lightly mist the solution onto the surfaces. The goal is damp, not drenched. You don't want any puddles.
Dwell Time: Let the product sit for the "dwell time" listed on the label. This is how long the agent needs to do its job and kill the spores.
Drying: This is the make-or-break part of the final phase. The ducts have to be 100% dry before you even think about turning the HVAC back on. Any moisture left behind is an open invitation for mold to come right back. Pointing fans into the duct openings can help speed this up.
Only when everything is clean and bone-dry should you take down your plastic barriers and power the system back on. If you're thinking about taking this on yourself, our guide on how to clean air ducts at home has even more tips for doing it safely and effectively.
Getting mold out of air ducts is a meticulous job. From containment to drying, every single step is vital for getting your home's air healthy again and keeping the problem from coming back.
Keeping Your Air Ducts Mold-Free for Good
Getting through a full air duct cleaning mold removal job feels like a major win, and it is. But the work doesn't stop once the equipment is packed up. The real victory is making sure mold never gets a foothold in your home again.
This isn't about cleaning your ducts over and over. It's about changing the game entirely by taking away the one thing mold desperately needs: moisture. By taking control of your home's environment, you can make your ductwork a place where mold simply can't survive. This last step is all about smart, long-term strategy.
Master Your Home's Moisture Levels
If you only do one thing to prevent mold, make it this: control the humidity. Mold loves dark, damp environments, and your ductwork becomes a prime target if there's any moisture to be found. The main goal is to keep your home's indoor humidity within the ideal range.
You want to keep your indoor relative humidity between 30% and 50%. A simple, inexpensive digital hygrometer can tell you where you stand. If you notice your home is consistently creeping over that 50% mark, especially during sticky, humid months, a dehumidifier is one of the best investments you can make.
Beyond that, you have to be a detective for any direct water sources. Jump on plumbing leaks, roof drips, or foundation seepage the moment you spot them. It's also critical to periodically check your HVAC system's condensate drip pan. Make sure it's draining correctly and not overflowing, which creates a standing pool of water right at the heart of your system.
Upgrade Your Filtration and Maintenance Routine
Think of your HVAC air filter as the bouncer for your home's air, keeping out unwanted particles like mold spores. Using a cheap, flimsy filter is like trying to stop dust with a chain-link fence—it’s just not going to work.
For real protection, it's time to upgrade to a high-quality, pleated air filter with a MERV (Minimum Efficiency Reporting Value) rating of 11 or higher. These filters are built to trap tiny particles like mold spores without choking off your system's airflow.
A consistent maintenance schedule is non-negotiable. Don't wait until you smell a problem to take action. Proactive care is always less stressful and less expensive than reactive repairs.
Getting into a solid HVAC care routine can make a massive difference. This simple checklist is a great place to start:
Change Air Filters: Give them a look every month and replace them at least every 90 days. If you have pets or live in a dusty area, you'll need to do it more often.
Annual Professional Service: Once a year, have a certified HVAC pro give your system a full inspection and tune-up. They'll clean coils, check components, and make sure it's all running safely and efficiently.
Ductwork Inspection: You don't need a full cleaning every year, but a quick visual inspection can help you catch issues before they escalate. For a detailed schedule, check out our expert guide on how often to get air ducts cleaned.
This kind of regular attention helps keep your system clean and dry from the inside out.
The Role of In-Duct UV Light Purifiers
A technology that's getting a lot of buzz for mold prevention is the in-duct UV light purifier. These systems are installed right inside your HVAC unit, usually near the evaporator coil, where moisture often collects. They work by blasting UVC light onto the components, which destroys microorganisms like mold, bacteria, and viruses on contact.
The biggest plus is that it provides a constant, chemical-free sanitizing effect on the parts of your HVAC system that are most likely to grow mold in the first place.
But it's important to have a realistic view. A UV light is a powerful tool, but it's not a magic bullet that lets you ignore filtration or moisture problems. It's a supplement to a good prevention strategy, not a replacement for one.
UV Purifiers Pros vs Cons
Aspect | The Upside (Pros) | The Downside (Cons) |
|---|---|---|
Effectiveness | Fantastic at stopping mold growth on surfaces directly hit by the light, like the evaporator coil and drain pan. | Not as great at zapping airborne spores that fly by quickly, as the exposure time is just a fraction of a second. |
Maintenance | Pretty low-key. The UV bulb just needs to be replaced every 1-2 years. | The bulbs are an ongoing cost. If one burns out without you noticing, you've lost your protection. |
Cost | Delivers 24/7 protection without adding any chemicals to your air. | The upfront installation cost can be significant, and it does use a small amount of electricity all the time. |
For many people, especially those with bad allergies or living in super-humid climates, a UV purifier is a fantastic investment. It adds a strong defensive layer right where mold loves to start. When you combine that with tight moisture control, high-MERV filters, and a solid maintenance habit, you create a powerful defense that keeps your ducts, and your air, clean for years to come.
Common Questions About Duct Cleaning and Mold
We get it, you want to know about costs, how often you should be checking things, and what the real risks are. Getting straight answers is the first step to feeling confident about handling your home's air quality.
How Much Does Professional Mold Removal Cost?
This is the big question, and the honest answer is: it varies. I wish I could give a flat rate, but every home and every mold situation is different. A small, easy-to-reach patch of mold in a single duct is a world away from a widespread problem that’s taken hold in the air handler and throughout the system.
The price you'll be quoted really boils down to a few things:
How much mold is there? The total contaminated area is the biggest factor driving the cost.
Where is the ductwork? Ducts tucked away in tight crawl spaces or blistering hot attics mean more labor and higher costs.
What kind of ducts do you have? Cleaning sturdy sheet metal ducts is pretty straightforward. Fragile fiberboard or flexible ducts? Those require a much more delicate touch.
Is special equipment needed? If the job requires advanced containment zones or air scrubbers to protect the rest of your home, that will be reflected in the price.
As a ballpark, professional air duct mold remediation for a typical house can run anywhere from several hundred to a few thousand dollars. My best advice? Always get detailed quotes from a few different companies that spell out exactly what they plan to do before you sign anything.
How Often Should I Have My Ducts Inspected for Mold?
You definitely don't need to get your ducts cleaned every year "just because." That's overkill. What you should do is be proactive with inspections. A quick visual check of your registers and the area around your furnace or air handler each season is a smart habit. Just grab a flashlight and take a peek.
As for a professional inspection, I recommend scheduling one in these situations:
After any water damage. A leaky pipe, a damaged roof, or a flood are all prime opportunities for mold to start growing. Get your ducts checked right away.
You smell a musty odor. That damp, earthy smell is the number-one sign you’ve got a hidden mold problem somewhere in the system.
When you buy a new home. You have no idea what the previous owners did or didn't do. An inspection gives you a clean slate and peace of mind.
This approach is all about prevention over reaction, and trust me, that's always the cheaper route in the long run.
Is a Little Bit of Mold Really a Big Deal?
Yes. Without a doubt, it is. That little patch of mold you can see on a vent cover is often just the tip of the iceberg. Mold loves dark, damp places, which means the growth you can't see is usually much, much worse.
When you ignore even a "small" spot, you're letting it produce and launch millions of spores into the air. Your HVAC system then becomes the perfect delivery service, blowing those potential allergens and irritants into every single room of your house. What starts as a seemingly minor issue can quickly tank your indoor air quality and grow into a massive, expensive remediation project. It's always safest for your home and your health to treat any sign of mold as a top priority.
When it comes to safeguarding your home's air, professional expertise makes all the difference. If you're facing a mold issue or want to ensure your HVAC system is clean and efficient, trust the certified technicians at Purified Air Duct Cleaning. We provide comprehensive testing, air duct cleaning, and advanced air purification solutions across the Phoenix metro area. Get your free quote today and breathe easier knowing your home is in expert hands.