A Homeowner's Guide on How to Clean Dryer Vent From Inside
- Feb 13
- 13 min read
The process is pretty straightforward: you'll disconnect the dryer, snake a special brush kit through the ductwork, and then vacuum out all the gunk you just knocked loose. It's a simple job that tackles a serious fire hazard and helps your dryer run more efficiently. Best of all, you can knock it out in under an hour.
Why Cleaning Your Dryer Vent Is Not Just a Chore
Before you start wrestling your dryer away from the wall, let's talk about what's really at stake here. That fuzzy lint that sneaks past your dryer's trap isn't just a minor nuisance. It’s highly flammable fuel that packs itself deep inside your vent system over time, creating one of the most common, and overlooked, fire hazards in the modern home.
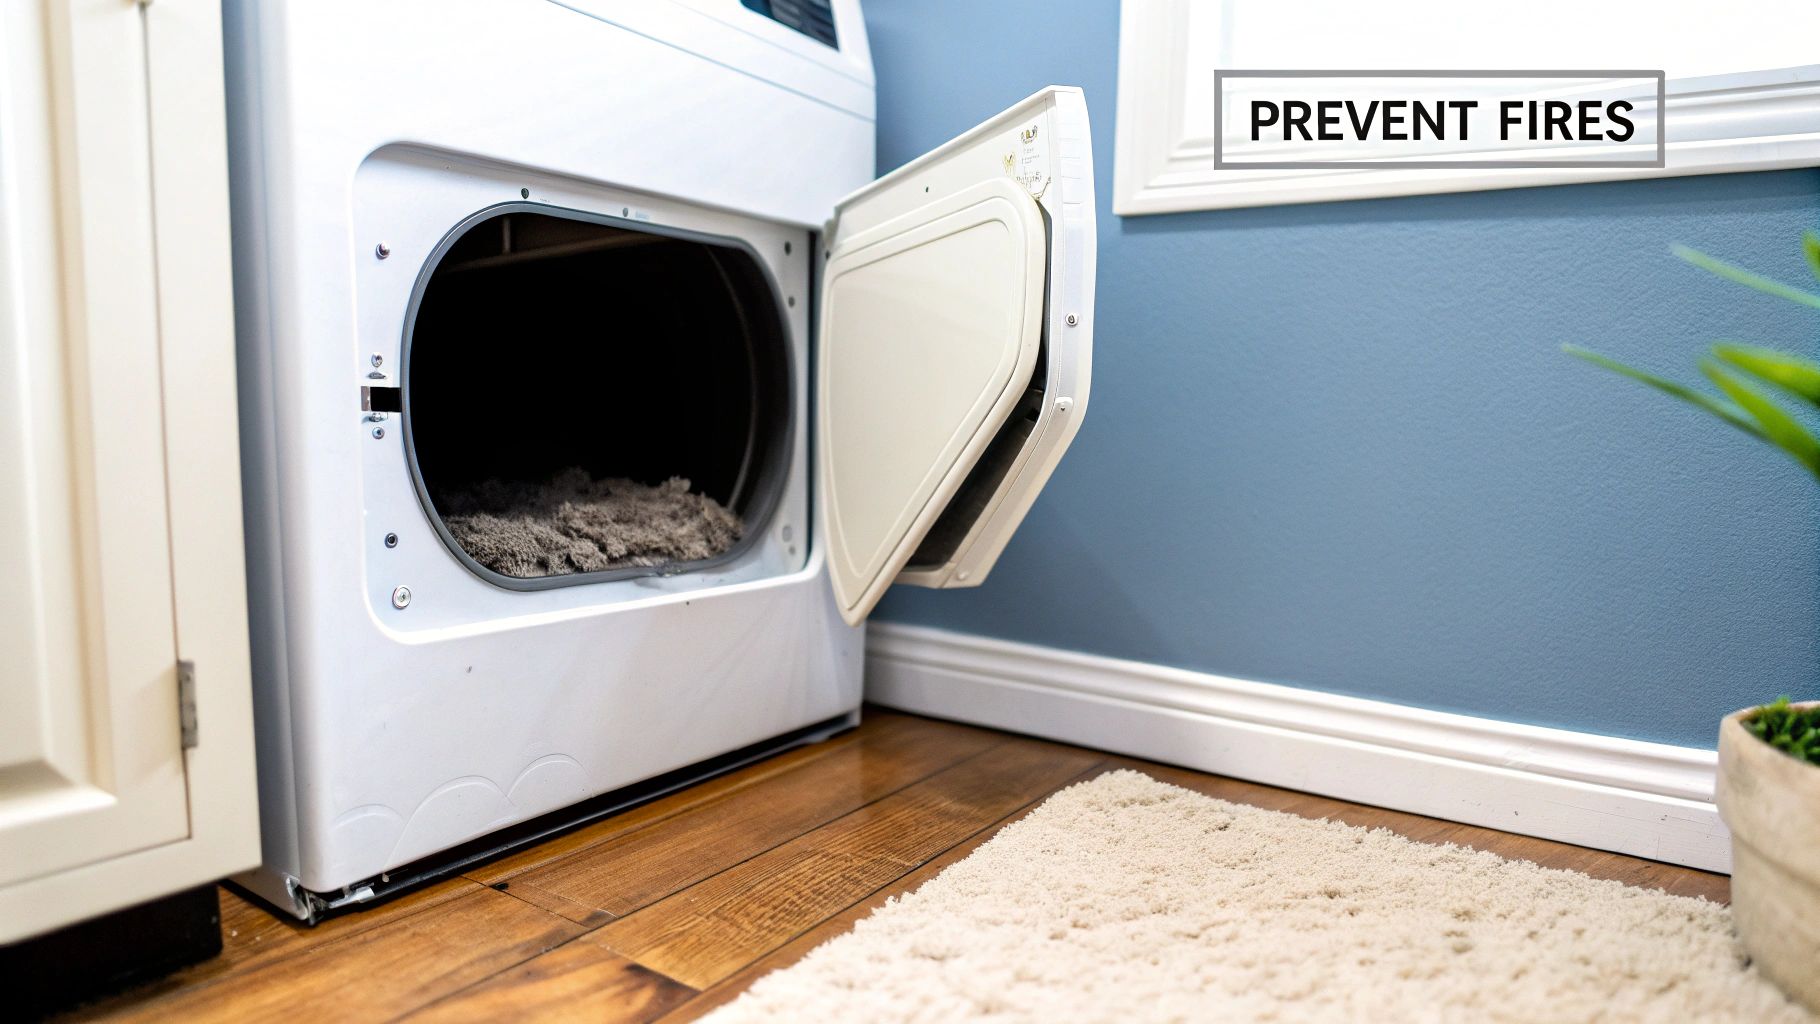
The numbers don't lie. Clogged dryer vents are responsible for a staggering 34% of all dryer fires in the United States. Year after year, this results in thousands of house fires, causing injuries, deaths, and millions of dollars in property damage. The main culprit is always the same: a thick buildup of lint that traps the dryer's intense heat until it has nowhere to go but up in flames.
More Than Just a Fire Risk
Besides the obvious fire danger, a clogged vent makes your dryer work much harder and longer than it was ever meant to. This inefficiency creates a domino effect of problems you'll definitely notice around the house and in your bank account.
When all that hot, damp air has no escape route, your dryer starts running hotter and for much longer cycles. This leads to:
Skyrocketing Energy Bills: The appliance has to burn more electricity or gas just to dry a single load of clothes, and you'll see that reflected on your monthly utility statements.
Premature Wear and Tear: Overworking the heating element and motor puts a ton of unnecessary strain on the dryer's internal parts, leading to costly repairs or a total breakdown long before its time.
Poor Indoor Air Quality: A blocked vent can actually push lint, dust, and even dangerous carbon monoxide (for gas dryers) back into your laundry room, impacting the air your family breathes.
Think of cleaning your dryer vent as a critical investment in your family's safety and your home's health. It prevents fires, cuts down on energy use, and helps your appliances last longer.
The Clear Benefits of a Clean Vent
Taking the time to clear out your dryer vent from the inside pays off immediately. Don't look at it as a chore; see it as one of the most impactful home maintenance tasks you can do.
You'll quickly notice your clothes dry in a single cycle again, your energy bills might dip, and you'll gain priceless peace of mind knowing you've eliminated a major fire hazard from your home. For a closer look, you can explore our guide on the key benefits of dryer vent cleaning for your home. At the end of the day, this simple task delivers a huge return on your time and effort.
Getting Your Dryer Vent Cleaning Gear Together
Having the right tools on hand is the difference between a frustrating Saturday afternoon and a job well done. Before you can even think about how to clean a dryer vent from inside, you've got to gather your gear. This simple prep work turns a potential headache into a straightforward task, keeping you safe and efficient.
The Essential Tools for Cleaning Your Dryer Vent
You can't improvise your way through this job. Certain tools are non-negotiable for getting it done right and, more importantly, safely. I've put together a quick checklist of what you'll absolutely need and a few things that are great to have.
Tool | Primary Use | Pro Tip |
|---|---|---|
Dryer Vent Cleaning Kit | The core of the operation. Contains flexible rods and a lint brush to navigate the ductwork. | Look for a kit with a drill attachment. Spinning the brush with a power drill is a game-changer for dislodging stubborn lint. |
Power Drill | Attaches to the cleaning kit rods to spin the brush at high speed for a deep clean. | A cordless drill gives you the most flexibility to move around without being tethered to an outlet. |
Powerful Vacuum | Sucking up the massive amount of lint you'll dislodge. | A shop vac with a hose and crevice tool is your best friend here. It has the suction power needed for the job. |
Dust Mask (N95) | Protects your lungs from inhaling fine, airborne lint particles. | Don't skip this. That dust is nasty stuff, and you don't want it in your lungs. |
Work Gloves | Shields your hands from sharp metal edges on the vent pipe and general grime. | Simple leather or heavy-duty fabric gloves will do the trick. |
Safety Goggles | Protects your eyes from flying debris, especially when using a power drill. | Lint flying at high speed from a spinning brush can easily irritate or injure your eyes. |
Old Towels / Drop Cloth | Catches falling lint and dust to make your final cleanup a breeze. | Lay it down right where the vent connects to the dryer before you disconnect anything. |
Getting these items ready before you start means you won't have to stop midway through the process to hunt for something. It's all about working smarter.
Time to Prep the Dryer and Your Workspace
With your tools laid out, the next move is to safely prep the dryer itself. This means disconnecting it from power and giving yourself enough room to work comfortably.
First and foremost: unplug your dryer. This is a critical safety step. For an electric model, just pull the heavy-duty cord from the wall socket.
If you have a gas dryer, you need to be extra cautious. You absolutely must turn off the gas supply using the shut-off valve, which is usually right behind the dryer. Once the gas is off, you can disconnect the line. If you feel even a tiny bit hesitant about this, stop and call a professional. It's not worth the risk. For a more detailed walkthrough, you can learn more about how to safely and effectively clean your dryer vent pipe.
The goal isn't just to clean the vent, it's to do it without causing any harm to yourself or your home. Taking a few extra moments for safety is always time well spent.
Once it's disconnected, you can gently slide the dryer away from the wall. I recommend putting a piece of cardboard or an old blanket underneath to avoid scratching your floor. Now you've got clear access to the vent opening and the space you need to get the job done right.
The Complete Process for Cleaning From Inside
Alright, with your workspace clear and your tools laid out, it's time to get to the main event: cleaning that dryer vent from the inside. This is the hands-on part where you'll really see a difference and tackle the lint buildup that poses a fire risk and kills your dryer's efficiency.
The first move is to disconnect the transition duct, that flexible, often foil-like tube that connects your dryer to the wall. It’s usually held on with a simple clamp. You'll likely find either a spring-style clamp you can squeeze by hand or a worm-gear type that loosens with a screwdriver. Gently wiggle the duct off the back of the dryer and then off the wall pipe. Don't be surprised if a puff of lint falls out immediately; it's a good sign you're on the right track.
This simple diagram breaks down the core of the job: power down, disconnect, and clean. It’s a great reminder to keep things simple and safe.
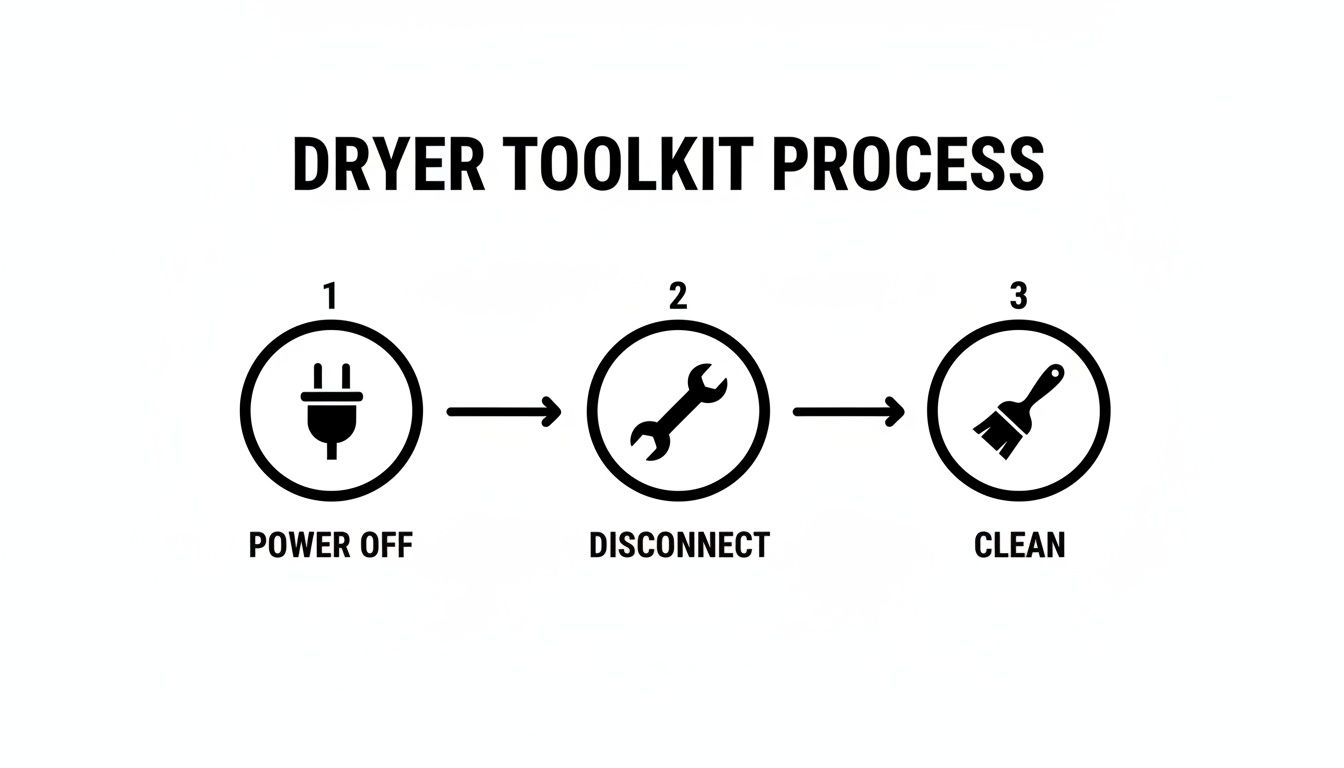
This visual really hammers home that safety and proper prep are non-negotiable before the cleaning even starts. Get this part right, and the rest of the project will go smoothly.
Using Your Cleaning Kit Effectively
Time to grab that dryer vent cleaning kit. Attach the brush head to one of the flexible rods. If you're using a drill, go ahead and connect the other end of the rod, making sure it's locked tightly in the chuck.
Here's a pro tip that can save you a massive headache: always keep the drill rotating clockwise. This applies when you're pushing the brush in and when you're pulling it out. If you run the drill in reverse (counter-clockwise), the rod sections can unscrew themselves deep inside the pipe. Trust me, fishing those out is a whole separate, frustrating project you want no part of.
Now, insert the spinning brush into the wall vent. The key is to work slowly. Don't just jam the whole thing in at once. Feed it forward in small sections, maybe 12 to 18 inches at a time. This approach helps the brush navigate corners without getting stuck.
As you push deeper, you'll feel the brush breaking up all that compacted lint. To avoid a lint explosion in your laundry room, hold your shop vacuum hose right at the opening. It will suck up all the debris as it gets knocked loose.
The goal is methodical progress. By feeding the brush slowly and letting the vacuum do its job, you prevent the mess from spreading and ensure a more thorough cleaning of the entire vent run.
Navigating Common Obstacles
Not every dryer vent is a straight shot to the outdoors. You might hit a couple of snags, but they're usually easy to work through.
Long Vent Runs: If your vent is longer than your initial set of rods, no problem. Just stop, detach the drill, screw on another rod section, and keep going. Repeat this until you can feel the brush hit the vent cap on the outside of your house.
Tight Corners: When you hit a 90-degree elbow, slow way down. Gentle forward pressure is all you need. Let the spinning motion of the brush work its way around the bend. Forcing it is a surefire way to snap a rod.
It's easy to forget how important this is, but the National Fire Protection Association reports that nearly 17,000 clothes dryer fires happen every year in the U.S. These fires lead to over 50 deaths and $236 million in property damage. The number one cause? A failure to clean the vents.
Once you’ve worked the brush through the entire duct, slowly pull it back out, making sure to keep the drill spinning clockwise and the vacuum running. If you want to level up your technique, check out our pro tips for quick results when cleaning dryer duct work. And for more general home maintenance knowledge, learning how to clean vent pipe systems can give you skills that apply to other ventilation jobs around the house. Finally, give that flexible transition duct a quick clean before you start putting everything back together.
Inspecting and Reconnecting Your Dryer Vent
You've done the dirty work and cleared out all that dangerous lint, but don't call it a day just yet. A clean vent is only as good as its connections. This final check is what makes all your effort worthwhile, locking in both safety and your dryer's performance.
Before you attach anything, take a good look at the flexible transition duct, the piece that connects your dryer to the wall. Grab a flashlight and give it a thorough once-over, inside and out. You're hunting for any signs of trouble that could undo all your hard work.
Conducting a Post-Cleaning Duct Inspection
This quick inspection is critical. A damaged duct can leak lint right back into your laundry room or, far worse, vent carbon monoxide from a gas dryer into your home. It's a small step that prevents huge problems.
Here’s what to look for:
Cracks and Pinholes: Hold the duct up to a light. Even tiny pinpricks of light mean the duct is compromised.
Crushed Sections: Check for any spots that are flattened or kinked. These create chokepoints where lint loves to build up, restricting airflow.
Brittleness: If the duct feels stiff or crumbles even slightly when you handle it, its lifespan is over. It needs to be replaced immediately.
Your transition duct is a crucial safety component. If you find any damage, no matter how small, the only safe move is to replace it. It's a cheap part that provides priceless peace of mind.
If you discover you have one of those flimsy, foil-style accordion ducts, now is the perfect opportunity for an upgrade. We strongly recommend replacing it with a semi-rigid or rigid metal duct. They're much more durable, have smoother interiors that are less prone to lint buildup, and are significantly more fire-resistant.
For a deeper dive, check out this great homeowner’s guide to correct dryer venting.
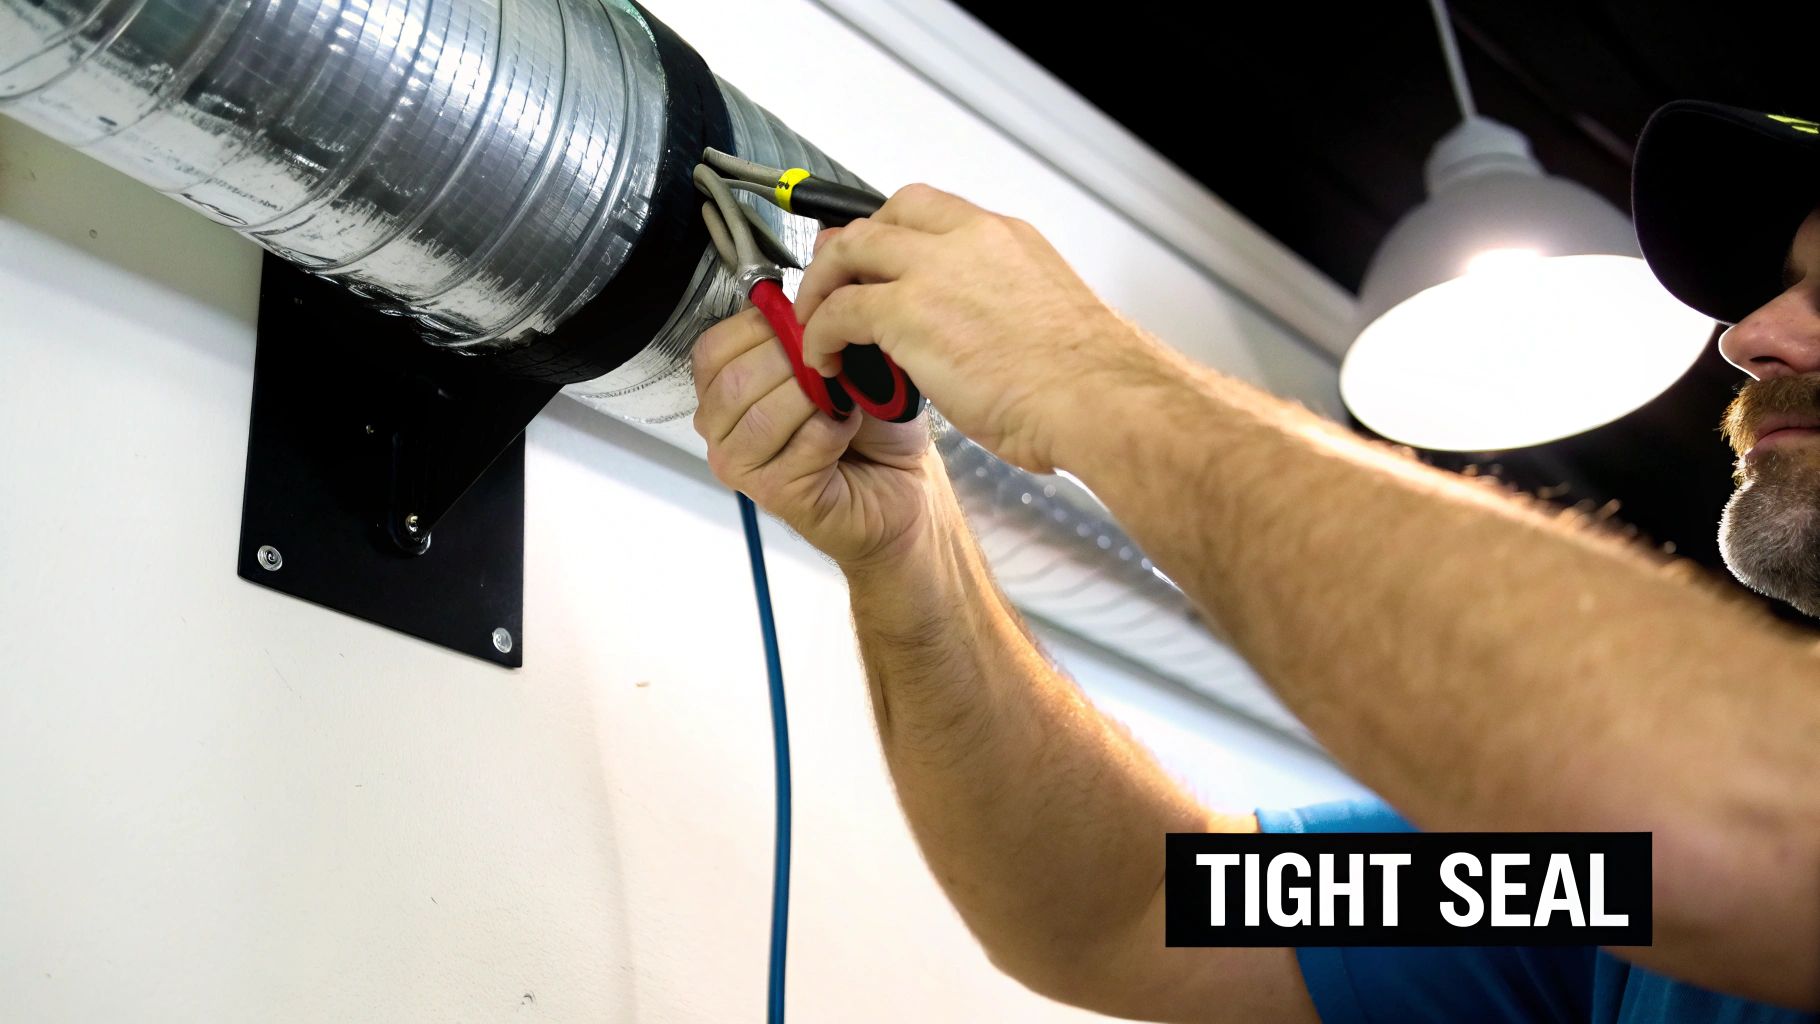
Securing the Connections for a Perfect Seal
With your duct either inspected or newly replaced, it's time to put it all back together. Your goal is simple: create a tight, leak-proof seal at both the dryer outlet and the wall pipe.
Slide the clamps into position and tighten them down. If you're using worm-gear clamps, use a screwdriver to get them snug, but don't go overboard and crush the duct. Give each connection a gentle tug to make sure it’s solid and won't wiggle loose from the dryer's vibrations.
The Final Confidence Test
Alright, the moment of truth. Carefully slide your dryer back into place, being mindful not to kink or crush the ductwork behind it. Plug the power cord back in (and reconnect the gas line, if you have one).
Now, run the dryer on a cool setting like "air fluff" for a couple of minutes. Head outside to your exterior vent. You should feel a strong, steady blast of air. That powerful airflow is your confirmation: job well done.
Knowing When to Call a Professional
Knowing how to clean your own dryer vent is a great skill to have in your homeowner toolbelt. But just as important is knowing your limits, and when a job is better left to the pros. Sometimes, making that call isn't just about saving time; it's a critical move for your safety and your home's health.
There are a few tell-tale signs that should have you putting down the DIY kit and picking up the phone. For instance, if your dryer vent has a particularly long journey from your laundry room to the outside wall, your standard cleaning brush just isn't going to cut it. It simply won't have the reach or the power to get the job done right.
Red Flags That Signal You Need an Expert
Some situations can make a DIY cleaning attempt ineffective, frustrating, or downright risky. If you run into any of these roadblocks, it's a smart move to pause and bring in a professional.
Excessively Long Vent Runs: Vents stretching more than 35 feet from the dryer to the outside are notoriously tricky for consumer-grade tools. They often lack the rigidity to push through that entire length.
Complex Ductwork: Is your vent system a maze of sharp turns? Multiple 90-degree bends can easily trap a DIY brush, causing it to snap off inside the duct, a much bigger headache.
Inaccessible Vents: If your ductwork snakes through a tight crawlspace, a cramped attic, or is buried deep inside a wall, it’s best to call in the experts. They have the specialized gear to clean it without causing any collateral damage.
If you hit a blockage that your brush just can't seem to budge, stop pushing. You could be dealing with a heavily compacted clog or even a bird's nest. Forcing it can damage or disconnect the ductwork inside your walls.
Stubborn blockages or any signs of moisture and mold inside the duct are non-negotiable reasons to call a professional. Mold is a red flag for a bigger ventilation problem that needs an expert diagnosis, not just a simple clean-out.
If you're dealing with complex home maintenance issues and aren't sure where to turn, understanding the process for Hiring a Rental Property Inspector can offer some clarity and ensure your home's systems are thoroughly checked.
The Professional Advantage: Specialized Equipment
Let's be honest, professionals come armed with tools and technology you just can't buy at the local hardware store. They aren't just using a fancier brush; they're deploying a completely different system built for tough jobs.
Here's a sobering fact: an estimated 15,600 dryer fires occur every year, causing over $100 million in damages. This happens because the lint trap you clean out only catches about 20-30% of the debris. The rest builds up in the vent.
To tackle that hidden fire hazard, pros use gear like:
High-powered compressed air whips that blast lint loose
Heavy-duty HEPA vacuums that contain the mess
Video inspection cameras to actually see inside the ducts
This equipment allows them to spot problems a DIY approach would completely miss, like disconnected joints or crushed sections of the vent hidden behind drywall. You can learn more about how to protect your home with professional dryer vent cleaning services to understand the full scope of what they can do.
Making that call ensures the job is done completely and correctly, keeping your home safe and your dryer running efficiently.
Common Dryer Vent Cleaning Questions
Even with a step-by-step guide, it's natural for a few questions to pop up, especially when you're tackling this for the first time. Getting these cleared up will give you the confidence that you’re doing the job safely and correctly.
How Often Should I Clean My Dryer Vent From Inside?
For most families, cleaning the dryer vent annually is a great rule of thumb for safety and efficiency. But let's be realistic, your laundry habits are the real driver here.
You should probably bump that up to every six months if you find yourself in one of these situations:
You have a big family, and the dryer feels like it’s running nonstop.
You’ve got furry friends who shed a lot (pet hair and lint are a potent combo).
Your vent system is on the longer side or has a few tight corners and bends.
Honestly, the best way to know is to just pay attention to your dryer. If you notice clothes are still damp after a full cycle or the top of the machine is getting really hot, those are your warning signs. Don't wait for the annual cleaning, it's time to clear it out now.
Can I Use a Leaf Blower to Clean My Dryer Vent?
I get why people ask this, it seems like a fast and powerful way to get the job done. But please, don't do it. Using a leaf blower is a shortcut that can create a much more dangerous problem than the one you're trying to solve.
The sheer force of a leaf blower can easily pop the ductwork apart inside your walls or ceiling. When that happens, you’re not cleaning the vent anymore; you’re just blowing highly flammable lint into hidden cavities. It creates a massive fire risk that you can't see or clean. Stick with a proper brush and vacuum, it’s designed to contain and remove the lint safely without damaging the ductwork.
What Is the Difference Between Cleaning From Inside Versus Outside?
Cleaning from the inside, like we've covered in this guide, is typically the most thorough approach for a DIY job. It gives you direct access to the flexible transition duct right behind the dryer, which is where the worst clogs and lint pileups almost always happen.
You can clean from the outside in, and it's better than nothing, but that method often struggles to break up the really stubborn blockages closer to the dryer itself. For a truly complete cleaning, the best method is to work from both ends. That way, you know for sure that the entire length of the duct is clear.
If you've run into a clog that just won't budge or you’d rather have an expert handle it, Purified Air Duct Cleaning is ready to help. Our certified technicians use professional-grade equipment to guarantee your dryer vent is completely clear, keeping your home safe and your dryer running efficiently. Visit us at https://www.purifiedairductcleaning.com to schedule your service.