

Rodents in Air Ducts: Signs, Risks and Safe Removal
You turn on the heat or air conditioning and get a musty, sharp smell from one vent. Then you hear scratching after dark, or find small dark pellets under a floor register. Your first instinct is probably to book duct cleaning and be done with it.
Don't start there. Rodents in air ducts are usually an entry route and sanitation problem first, and a cleaning problem second. If animals can still get in, cleaning gets undone. If droppings get disturbed dry, you spread the contamination you're trying to remove. The order below protects your lungs, your equipment, and your wallet.
Signs Rodents Have Reached Your Ducts
A few droppings under a register can point to nearby rodent activity, but they do not establish that an animal is living inside the duct. Look for a pattern across locations and clues.
Sign | Where it shows up | What it usually means |
|---|---|---|
Droppings | Under registers, on plenum floors, near furnace cabinet | Activity near that opening; trace back to the entry route |
Grease rub marks | Along duct seams, vent edges, wall penetrations | Animals repeatedly using the same path |
Gnaw marks | Flexible duct, cabinet corners, exposed wiring | Chewing for access or nesting; damaged duct needs repair |
Scratching or scurrying | Walls, ceilings, attic, plenum | Live animals moving inside a void |
Musty or ammonia odor | Rooms served by one vent, strongest when the blower runs | Accumulated urine or contaminated dust circulating |
Shredded insulation or paper | Furnace cabinet, crawlspace, roof unit housing | Nesting material that should be treated as contamination |
Sudden draft or weak airflow | One room or one return | Blockage, nesting or damaged duct changing pressure |
Why droppings alone don't prove the location
Droppings beneath a register show activity near the opening, not necessarily inside the duct run. Material may fall or blow in from a furnace cabinet, wall void, crawlspace, or register cavity. Each possible source calls for a different inspection and repair.
The National Park Service rodent exclusion manual identifies HVAC, plumbing, and electrical penetrations as possible access routes. Checking those routes helps locate how rodents reached the area before anyone treats the ducts.
How a proper investigation runs
Ask household members when the odor, noise, or airflow change began, and whether it coincides with the blower running. A smell that becomes stronger at startup may point toward the plenum or a supply run. Scratching at night may come from a nearby void rather than the ductwork itself.
Inspect the system in sequence:
Air handler first: Furnace cabinet, return plenum, and supply plenum
Openings next: Every register, return grille, and utility penetration
Hidden runs last: Crawlspace, attic, roof units, and evaporative coolers
Use an inspection camera where a run is accessible. Sketch where each sign appears, and photograph everything before touching it.
Two or more signs near the same register suggest a repeated route, not proof of a nest inside the duct.
A single dropping could be old. Droppings alongside a rub mark and an odor at startup make a stronger pattern. Record dates, rooms, and blower timing so a pest professional can focus monitoring on likely routes rather than placing devices blindly. The Green Advantage rodent detection guide can help identify signs elsewhere in the home.
Health and HVAC Risks You Should Not Ignore
Rodent droppings, urine, and saliva contaminate dust. When that dust gets disturbed, particles become airborne. People breathe them in, or touch contaminated material and then touch their eyes, nose, or mouth.
The infectious concern gets overstated and understated in equal measure. The CDC guidance on airborne infection control states that airborne transmission may contribute to the natural spread of hantaviruses. The hazard comes from disturbing or aerosolizing droppings, urine, or nesting material, not from every dusty duct in every home.
That distinction should change your behavior, not panic you. Don't dry sweep. Don't run a shop vacuum through a nest. Don't assume a dirty duct automatically means disease, and don't assume visible contamination is harmless because no one feels sick yet.
Who faces the highest risk
People with asthma, allergies, or weakened immune systems, and young children, react first and hardest to contaminated particles. If someone in that group sleeps in a room served by a suspect vent, treat the problem as urgent. Our overview of health problems linked to dirty air ducts explains why the return side matters so much for sensitive occupants.
Blower airflow is the delivery mechanism. Contamination in a return plenum or blower compartment doesn't stay in one room. The system picks it up and distributes it to every supply register on that zone.
What rodents do to the equipment
Nesting in the blower compartment or return restricts airflow and makes the motor work longer to move the same air. Gnawed flexible duct leaks conditioned air into an attic or crawlspace, so rooms drift warm or cold and run times climb. Shredded, urine-soaked insulation and debris migrate toward coils, where they foul surfaces and hold odor.
Homeowners often notice the energy clue first: longer cycles, one weak room, a filter that loads up fast. Those are mechanical symptoms of a biological problem.
Stop rule: If anyone has respiratory symptoms, or contamination sits in the air handler or return side, don't keep running the system until the source is handled.
Confirm Who Acts First Before Any Cleaning
Cleaning first is the most expensive mistake in this whole process. Use this order instead.
Situation | First call | Why this order |
|---|---|---|
Droppings near one register, no live animals seen | Pest control inspection | Locate the entry route before any cleaning |
Live or dead rodents in the blower, plenum or return | Pest control, then HVAC duct specialist | Remove animals first, then clean contaminated parts |
Gnawed or damaged flexible duct | HVAC contractor | Repair or replace the section, then reseal the connection |
Odor or droppings, no visible contamination yet | Pest control with monitoring | Confirm activity with traps and monitoring |
Visible contamination after removal is complete | Duct cleaning company | Clean contaminated sections, then verify with inspection |
The sequence I recommend
Removal and sealing come before cleaning. A pest inspection should cover the furnace cabinet, plenums, registers, and roof units, not just kitchen bait stations. Entry points get sealed, animals get removed, and only then does a cleaning crew assess what's left inside the system.
Cleaning has its own limits. The risks of air duct cleaning include dust and debris released into the air, allergic reactions, and mold growth, and these risks are rare when the work is done properly by a qualified company. That's another reason live contamination shouldn't be stirred up before removal.
For timing context, our cleaning service takes on average 2 to 3 hours from start to finish, depending on the size of the home, and ducts are generally recommended to be cleaned every 3 to 5 years depending on ductwork age and condition, system type, and allergies or respiratory problems in the home. A rodent event moves you off that normal schedule, but it doesn't change the order.
Questions that expose weak providers
Ask these before you sign anything, and use our list of air duct cleaning questions to ask to compare answers:
Coverage: Does the inspection cover every access point found in the investigation?
Materials: Are entry points sealed with 1/4-inch screening or an equivalent rodent-resistant termination?
Verification: How will recurrence be checked, and over what period?
If a contractor quotes a guaranteed success percentage, make them define the population, inspection period, and recurrence criteria. Public agencies don't publish a universal success rate for duct-specific removal, so a bare number means nothing.
Write down what was found. Call pest control first, an HVAC contractor where ductwork is damaged, and book cleaning last.
How to Respond Safely Before Any Cleaning
Your job before professionals arrive is containment, not deep cleanup. The CDC rodent control guidance states that people can become exposed by breathing contaminated air, or by touching contaminated materials and then touching the eyes, nose, or mouth. It recommends wetting rodent waste with disinfectant before removal and using protective measures during cleanup.
The infographic below covers the first isolation moves.
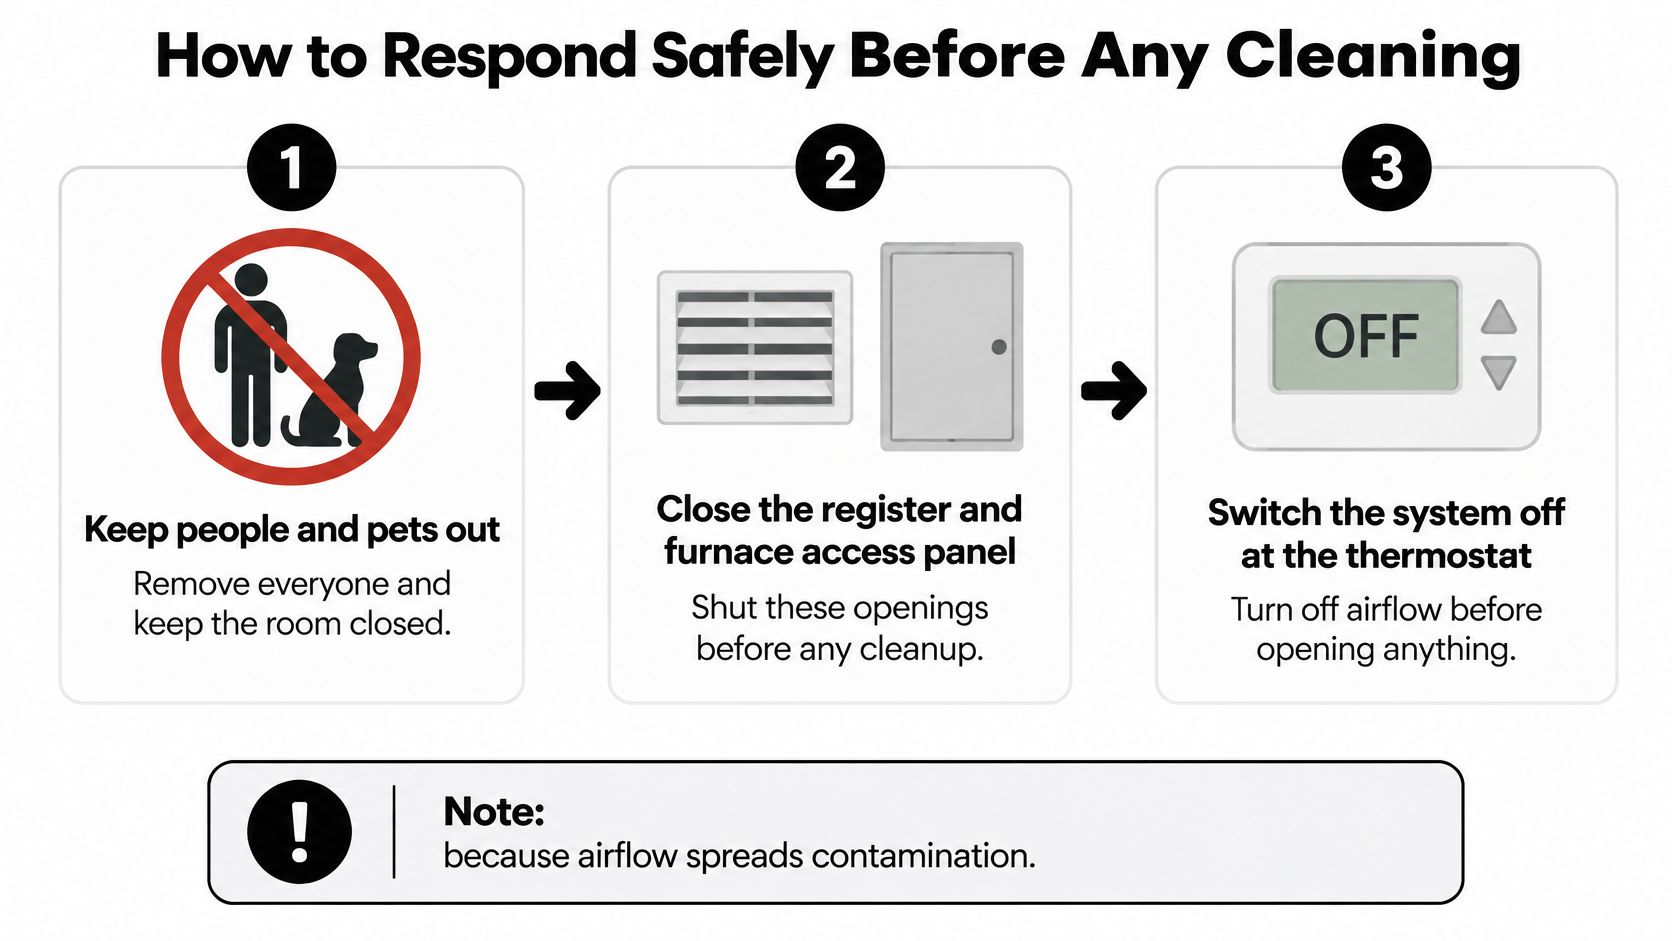
Step by step containment
Clear and shut down. Keep people and pets out of the affected room, close the register and furnace access panel, and switch the system off at the thermostat. Airflow spreads particles, so nothing gets opened while the blower can run.
Gear up before you open anything. Wear nitrile gloves, a fitted N95 or better respirator, eye protection, and disposable coveralls if you have them. Open windows in the living space to ventilate, but don't create a draft that blows across the contaminated spot.
Wet everything first. Spray droppings, urine stains, and nesting material with freshly made disinfectant solution until soaked, then wait several minutes. Wet material stays put. Dry material becomes dust.
Skip the broom and household vacuum. Never dry sweep or use an ordinary vacuum on rodent waste. Both actions aerosolize particles, which is exactly the exposure route you're trying to avoid. This is the most common slip, especially when droppings sit on a hard floor under a vent and a broom is within reach.
Lift, bag, and double bag. Pick up wet material with gloved hands or a damp paper towel, seal it in a plastic bag, then place that bag inside a second one. Go slow. Dragging a towel across dry edges defeats the soaking step, so rewet any spot that starts to dry.
Handle carcasses the same way. Use gloves, never bare hands, and bag a carcass with the same double bag method. Label it and follow your local disposal rules. Don't toss it loose into household trash where it can tear a bag.
Wipe and wash. Wipe hard surfaces around the register and accessible plenum with disinfectant, discard gloves and towels into the outer bag, then wash hands thoroughly. Clean reusable eye protection and tools before they go back in a drawer.
Where DIY cleanup stops
Surface droppings at a register boot are one thing. Nesting deep in a wall void, inside the blower, or in a duct section you can't reach is another. Digging blind tears flex duct, spreads contamination further into the run, and can leave a dead animal where you can't retrieve it.
If you can't see the full extent of the material, you can't clean it safely. Stop, close the opening, and bring in a professional.
That boundary also protects the next crew. Our guide on how to prepare for duct cleaning covers access, pets, and clearing the work area so the visit stays contained. Tell any provider exactly what you found, what you wetted, and what you left untouched. Honest notes beat a half-cleaned duct that looks fine at the register and stays contaminated at the plenum.
One more caution: don't spray disinfectant deep into a duct and call it sanitized. Liquid on dust and insulation can create new problems, and it doesn't remove nesting or droppings. Physical removal comes first. Any antimicrobial decision belongs after inspection, removal, and repair, with products used only where they're labeled for HVAC use.
Sealing Entry Points With the Right Mesh Size
Exclusion fails when openings get covered instead of sized. Start with the thresholds.
Opening | Size threshold | What can pass | Correct fix |
|---|---|---|---|
Gap around pipe or electrical penetration | 1/4 inch or larger | Mice | Seal with metal, mortar or approved sealant |
Open heating or AC vent end | 1/4 inch hardware cloth | Blocked for mice when screened | Galvanized hardware cloth that keeps required airflow |
Coarse 1/2 inch mesh | 1/2 inch | Mice can still pass | Replace with 1/4 inch corrosion-resistant screen |
Gnawed flexible duct | Any hole | Rodents already had access | Repair or replace the duct section before screening |
Return or combustion-air opening | Airflow requirement | Rodents, if left open | Keep open; use a rodent-resistant termination that keeps free area |
Roof unit or exterior intake | Any unscreened gap at flashing or seams | Rodents and debris | Inspect flashing and seams, then install a rodent-resistant termination |
The photo below shows the material choice that matters at a duct gap.
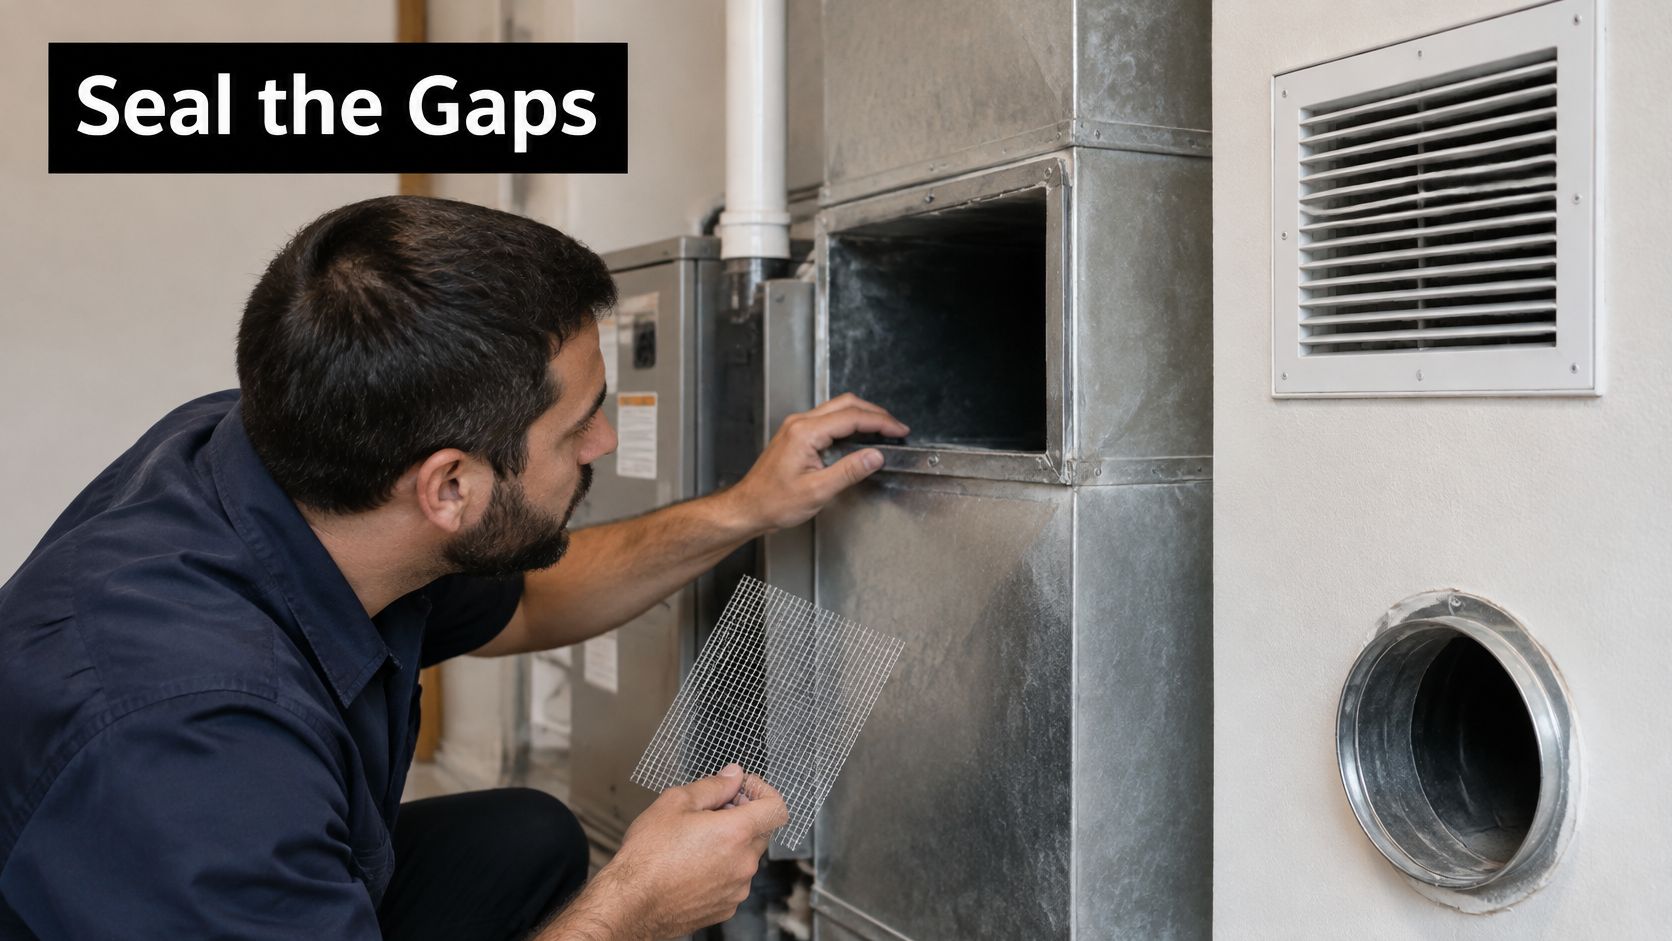
Finding every opening
Walk the system in the order air and animals travel it: exterior intakes and exhausts, roof-unit penetrations, register pathways, utility gaps, then each flexible-duct run. Measure each opening, don't eyeball it. Then inspect the flashing, seams, and fasteners around it, because a screen over a rotted curb or loose seam still leaves a side door.
The Nevada rodent proofing guidance specifies openings no larger than 1/4 inch (0.6 cm) to prevent house-mouse entry and recommends screening HVAC openings with woven or welded galvanized hardware cloth. For a room by room method to seal gaps that let rodents inside, FullScope Pest Control lays out the common household entry points beyond the ductwork itself.
Ordinary filter media and loosely packed foam don't hold. Rodents gnaw through expanding foam, and 1/2-inch mesh still admits mice. Copper mesh or metal backer with sealant works for small utility gaps, but foam alone is a temporary plug, not exclusion.
The short video below walks through checking openings before you seal them.
Sealing without creating a safety problem
Screens must preserve the manufacturer-required free area for airflow. Blocking a return or combustion-air opening can starve equipment, upset pressure, and create a fire or carbon monoxide risk. Use a rodent-resistant termination sized for the opening, then verify the system still runs within normal static pressure and temperature rise.
Our guide on how to seal air ducts covers joint sealing for efficiency, which pairs with exclusion but doesn't replace hardware cloth at open ends. Mastic seals air leaks. Metal stops teeth. You need both in the right places.
Repair or replace compromised duct first. Sealing over contamination traps odor and nesting inside the run, and sealing an active nest inside a wall or duct guarantees a worse smell within days. Trap and monitor until activity stops, then close the pathway.
Re-inspect after trapping, then again after several weeks of monitoring with no new droppings, rub marks, or sounds. Zero new signs over time is the finish line, not the day the screen went up.
Prevention Outside the Duct Work
Rodents rarely start in a duct. They start at the perimeter, move through wall cavities and ceiling spaces, and find mechanical penetrations that connect to ductwork. Exterior work cuts off that route.
The U.S. Green Building Council integrated pest management guidance recommends keeping shrubs and other plants at least 18 inches, or 450 millimeters, away from the building, with small stones or a similar substrate in that space. Bare stone gives rodents no cover against the wall, and it lets you spot burrows, droppings, and gaps at the foundation.
Vegetation touching siding, a roof edge, or a packaged unit is a bridge. Trim branches back, move woodpiles away from the structure, and don't let dense ground cover hide the base of exterior penetrations.
Building and sanitation fixes
Seal the shell: Close cracks, crevices, and holes in exterior walls, and inspect door and window seals
Remove water: Repair leaks at hose bibs, condensate lines, and plumbing penetrations
Remove food: Keep garbage in sealed containers and clean food areas daily
Remove shelter: Clear clutter in garages, basements, and crawlspaces, and keep doors closed
Indoor air leaks and pest routes often share the same gaps, so our guide on how to detect air leaks in your home doubles as a perimeter checklist. A gap that pulls attic air into a return chase can also pull in an animal.
Trapping without overusing poison
Integrated pest management runs on inspection, identification, monitoring, prevention, and evaluation, not automatic pesticide use. Place traps only where activity is documented, not throughout the building. Mechanical or glue traps are preferred in food-service and storage areas because rodenticides carry cross-contamination risk, and poisoned rodents can die inside a duct or wall void where you can't reach them.
Where bait is justified outdoors, use solid-block baits in locked dispensers. Indoors, snap traps along documented runways give you a count and a carcass you can remove. Both tell you whether exclusion worked.
Monitoring routine: Check traps, screens, and penetrations on a set schedule, monthly at first, then seasonally once signs stay at zero.
Log each check with a date and a quick photo of key openings. New gnawing on a screen edge or fresh droppings at one penetration tells you exactly where pressure is returning, while it's still a one opening fix instead of another full infestation.
Once rodents are removed and every entry point is sealed, we can inspect and clean the contaminated duct sections, blower area, and registers so the system stops recirculating what the animals left behind. If you're in the Phoenix metro and you've reached that stage, or you aren't sure how far contamination spread, visit Purified Air Duct Cleaning to request an assessment and get the cleaning sequenced correctly.