Venting Dryer Through Roof: A Complete Safety Guide
- Dec 7, 2025
- 15 min read
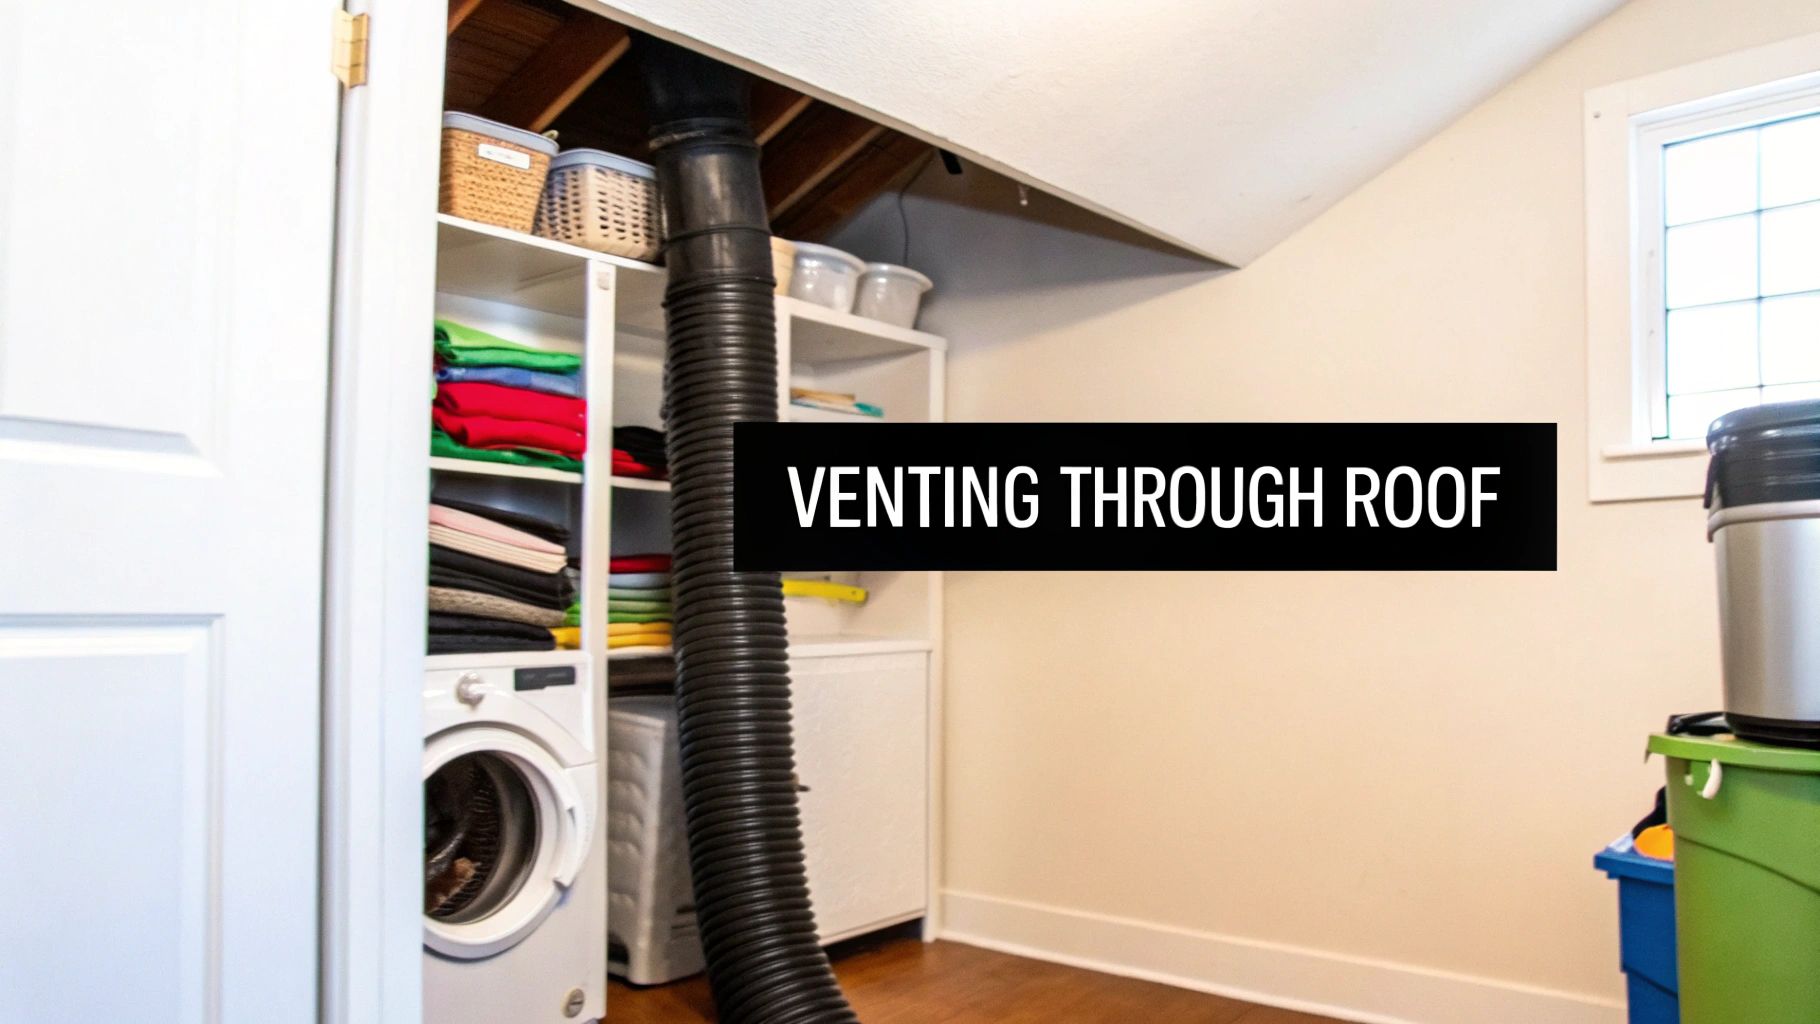
Absolutely, venting a dryer through the roof is a good idea, and often the best idea, when running a vent through an exterior wall just isn't practical. For laundry rooms tucked away in the center of a home or located on an upper floor, a straight shot up is usually the most direct path to get that hot, moist air outside.
This kind of direct route can seriously boost your dryer's performance and cut down on lint buildup compared to a long, winding horizontal vent that has to snake through your house.
Why a Roof Vent Might Be Your Best Option
When we map out a dryer exhaust system, the number one rule is to find the shortest, straightest route possible. Every elbow joint and extra foot of ductwork adds resistance, which makes your dryer work harder and creates new hiding spots for flammable lint. This is exactly why venting through the roof often becomes the smartest solution.
Imagine a laundry closet in a central hallway or on the second floor. Trying to vent it through a wall could mean a long, convoluted journey with multiple 90-degree turns, winding through floor joists and wall cavities. That kind of setup is not just inefficient; it's a major fire hazard. In contrast, a vertical run straight through the attic and roof is clean and direct.
Key Scenarios for Roof Venting
Centrally Located Laundry Rooms: If your laundry area doesn't touch an exterior wall, a vertical vent is really the only logical way to go.
Multi-Story Homes: For an upstairs laundry room, a roof vent is almost always shorter than a duct that has to travel all the way down and out through a first-floor wall.
Condos and Apartments: In many stacked living situations, roof venting isn't just an option; it's often the only way to meet building codes.
While a roof vent solves a lot of logistical headaches, it does come with its own set of challenges. The vertical run means gravity is working against the airflow, which can cause lint to settle back down more easily. Proper installation is also non-negotiable to prevent roof leaks. An improperly installed roof vent can quickly lead to water damage, mold, and even pest problems. We’ve seen homeowners make the dangerous mistake of venting directly into the attic, which is a massive no-go. You can learn more about those risks in our guide on why you should avoid venting a dryer to an attic.
Understanding the Safety Implications
No matter how your dryer is vented, regular maintenance is essential. Clothes dryers are a top cause of house fires, and a clogged exhaust system is almost always the culprit. Between 2010 and 2014, U.S. fire departments responded to an average of 15,970 home fires involving clothes dryers or washing machines each year. A shocking 92% of these fires started with the dryer, not the washer. These statistics from Spot on Inspection really highlight how crucial a clean, properly installed vent system is.
A well-designed roof vent system is a safe and effective solution. However, because it is less accessible for routine cleaning, it demands a commitment to regular, professional maintenance to prevent the dangerous buildup of lint.
Planning Your Project for Safety and Performance
Before you even think about cutting a hole in your roof, remember that a solid plan is the most important tool you'll use. A successful roof vent installation is built on thoughtful preparation, with the main goals being efficiency and safety. This initial planning phase is what separates a high-performing, safe system from one that's a constant headache.
First things first: map out the duct’s route. Your objective is simple: find the shortest, straightest path from the back of your dryer, up through the attic, and out the roof. A direct route is a game-changer for your dryer's efficiency and, more critically, it drastically cuts down the risk of lint buildup. Every bend in the ductwork slows down airflow, so your mission is to eliminate as many as possible.
Think of it this way: a straight vertical run with just one gentle turn to connect to the dryer is the gold standard. On the flip side, a route that zig-zags through the attic with multiple sharp 90-degree turns is just asking for poor performance and creating a serious fire hazard. Take a few minutes to sketch out your proposed path before you buy a single piece of material.
Navigating Building Codes and Regulations
Let's be clear: understanding local building codes isn't just a friendly suggestion; it's non-negotiable for safety and compliance. These codes are in place to regulate dryer vent installations, and they have specific rules for routing through a roof.
The International Residential Code (IRC), which most local codes are based on, states that the maximum length for a dryer exhaust duct is 25 feet. But it's not that simple. You have to subtract length for every turn: deduct 2.5 feet for each 45-degree bend and a full 5 feet for every 90-degree bend.
This rule means you need to do some careful math. A roof vent project almost always has a few turns, so calculating the effective length is essential to stay within the legal limit. Codes also mandate that the vent cap on the roof must be at least three feet away from other openings like windows or vents and must have a backdraft damper. You can find more details on these crucial safety codes over at sdinspect.com.
A critical note from the IRC: screens are explicitly forbidden on dryer vent terminations. They might seem like a smart way to keep pests out, but they are notorious for catching lint. A lint-clogged screen can cause a complete blockage, turning your dryer into a major fire risk.
Selecting the Right Materials for the Job
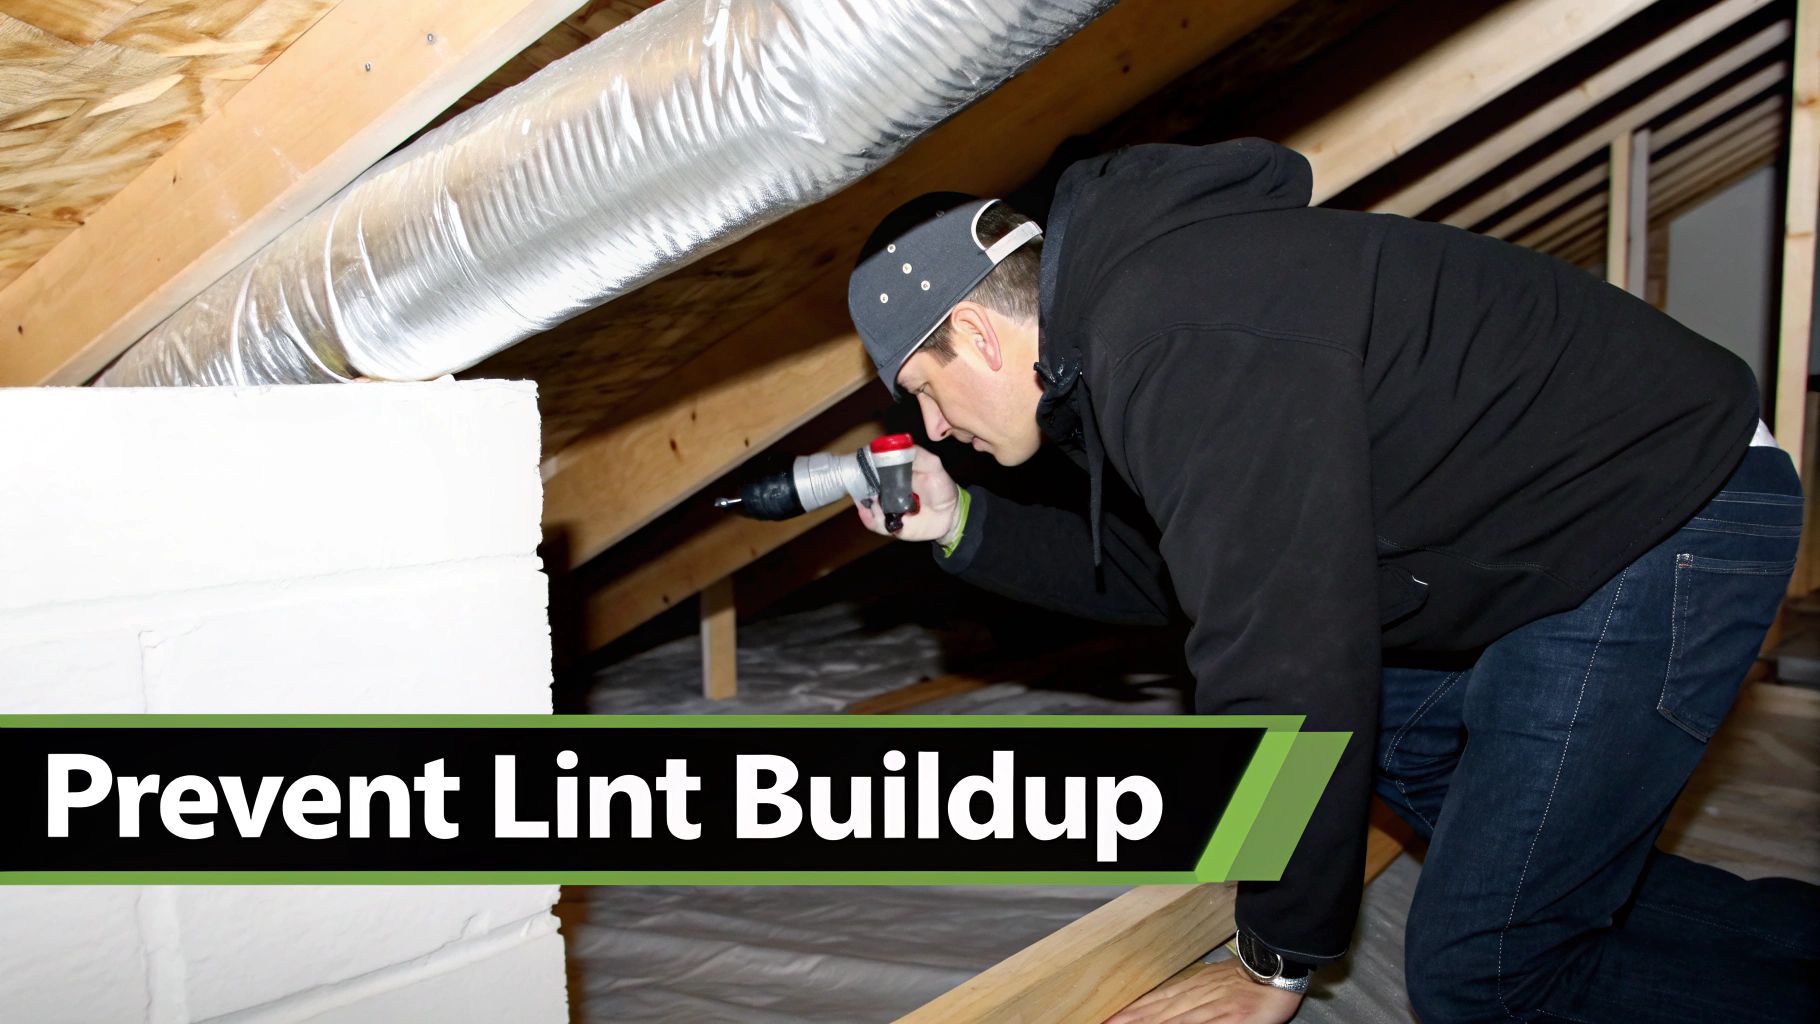
Choosing the right materials is just as vital as planning the route. When it comes to the ducting itself, there's only one right answer: rigid or semi-rigid metal ducting. You must never use those flexible vinyl or foil accordion-style ducts in hidden spaces like an attic. They're flimsy, get crushed easily, and their ribbed interior is a perfect trap for lint.
For an installation that’s both safe and built to last, stick with smooth-walled metal ducting that has a diameter of at least four inches. This ensures you get maximum airflow and gives lint very few places to build up. Connect all the duct sections with sturdy metal clamps and seal every seam with aluminum foil tape. Standard cloth duct tape is a no-go; it will dry out from the heat, crack, and eventually fail.
Picking the right roof vent cap is equally important. Many generic roof vents are designed for bathroom fans and simply won't work for a dryer.
Avoid Bath Fan Vents: Those common low-profile vents usually have small openings or built-in screens that will clog with lint almost instantly.
Choose a Dryer-Specific Vent Cap: Look for a vent cap made specifically for dryers. These will have a larger opening, a damper to prevent backdrafts, and a design that sheds lint instead of trapping it.
Consider Your Climate: If you live in an area with heavy snow, pick a vent cap with a taller profile to keep it clear of snow accumulation.
A well-chosen vent cap lets hot air and lint escape freely while keeping rain, snow, and pests out. We cover more tips on this in our guide on proper clothes dryer venting made simple. Getting the planning and materials right from the start is the foundation of a project that will keep your home safe and your dryer running efficiently for years.
How to Install a Dryer Roof Vent
Alright, you've got your plan mapped out and your materials are ready to go. Now for the hands-on part: the installation. This is where precision and safety really matter, especially once you get up on that roof. We'll walk through each stage, breaking it down into clear, manageable actions that will take you from the attic floor to a fully installed, weatherproof roof vent.
The end goal here is a system that's secure, efficient, and completely watertight. That means paying close attention to every detail, how you cut the opening, connect the ducting, and most importantly, how you install the roof vent flashing. Get this right, and your dryer will run smoothly for years without ever compromising the integrity of your roof.
This flowchart lays out the essential stages for a successful installation, from figuring out the route to gathering all your supplies.

As you can see, careful planning is the bedrock of a safe and effective roof vent installation.
Marking and Cutting the Exit Point
The first physical step is to pinpoint the exact spot where the vent will poke through the roof. This process actually starts inside your attic.
Head up into the attic and find the location directly above where your vertical duct run will be. To make sure you cut in the perfect spot from the outside, you’ll drill a small pilot hole straight up through the roof sheathing. A long, thin drill bit works best for this. This tiny hole acts as your marker, letting you find the center from the rooftop without making a big, messy hole.
Once you’re safely up on the roof, locate that pilot hole. Now it's time to mark the full-size opening. Just place your roof vent pipe over the pilot hole and trace around it with a pencil. This circle is your cutting guide.
Using a reciprocating saw or a jigsaw, carefully cut along the line you just drew, going through both the shingles and the roof sheathing. Take your time here. A clean, precise cut is essential for getting a snug fit and a good seal later.
Installing the Roof Vent Flashing
This is arguably the most critical step for keeping your roof leak-free. The flashing is a sheet of metal built into the vent that slides under the shingles, directing water away from the opening you just cut.
Start by gently prying up the shingles around the upper half of the hole. You need to create just enough space to slide the top flange of the flashing completely underneath them. The idea is to have the upper part of the flashing tucked away, hidden by the shingles above it.
In contrast, the bottom part of the flashing needs to lie on top of the shingles below the hole. This layering method, under on the top, over on the bottom, is brilliant in its simplicity. It uses gravity to ensure that any water running down the roof flows right over the flashing and continues its journey, instead of finding its way into the opening.
Pro Tip: Before you secure the flashing, apply a generous bead of high-quality roofing sealant to its underside. This creates a tough, waterproof gasket between the flashing and the roof, adding a serious extra layer of defense against leaks.
With the flashing perfectly positioned, nail it down to the roof deck with roofing nails. Make sure you place the nails where they'll be covered by the overlapping shingles. This not only hides them but also prevents creating new potential leak points.
Connecting the Ductwork and Sealing the System
Now that the roof vent is securely in place, it’s time to head back into the attic and connect the ductwork. Guide the rigid metal duct pipe up through the hole you cut and attach it to the collar on the underside of the roof vent cap.
Secure this connection with a metal clamp, making sure it's good and tight. Every single joint in your duct system, from where it leaves the dryer to where it meets the roof vent, has to be sealed completely. Use aluminum foil tape to wrap every seam and connection. Do not use standard cloth duct tape; it will dry out, crack, and fail under the heat and moisture.
Check for Stability: Make sure the entire duct run is stable. Use metal hanging straps to secure the duct to your attic rafters, which will keep it from sagging or coming apart over the years.
Maintain the Slope: If you have any horizontal sections, ensure they have a slight upward slope toward the roof. This helps any condensation drain out instead of pooling inside the duct.
Final Inspection: Before you call it a day, give every connection one last check. A loose joint is a big problem, leaking lint and hot, moist air into your attic, which can lead to mold or even become a fire hazard.
Proper installation isn't just about following a checklist; it's about understanding why you're doing each step. It’s often helpful to borrow principles from other home systems. For example, you can learn a lot from understanding rough-in plumbing to avoid common installation mistakes. This kind of thinking helps you see how all the pieces work together to form a safe, integrated system. And if you want to brush up on the basics, our DIY guide for installing a dryer vent offers more foundational tips for anyone new to this type of project.
Managing Lint Buildup and Moisture Risks
Getting your roof vent installed is a huge win, but don't close up the toolbox just yet. The real work begins now with ongoing maintenance. A vertical dryer vent comes with its own unique set of challenges you'll need to stay on top of, namely lint accumulation and moisture.
Gravity is working against you here. While your dryer’s blower is strong, it can't always push every last bit of lint up and out. Some of it is bound to settle back down, which means buildup happens much faster than in a simple horizontal run. This turns regular cleaning from a good idea into an absolute must for safety.
On top of that, any part of the duct running through a cold attic is a prime spot for condensation. When that hot, moist air from your dryer hits the chilly metal duct in winter, you get water. And that can lead to a whole host of problems.
Preventing Condensation and Mold
The best, and really, the only, way to fight condensation is insulation. You absolutely have to wrap the entire length of the metal duct in your attic with foil-backed duct insulation.
This simple sleeve keeps the duct’s surface temperature up, stopping the humid air inside from turning into water droplets. Skip this step, and you’re basically asking for moisture to pool inside the duct, leading to rust, water damage, and even mold growth. If you're already seeing signs of trouble, our guide on addressing dryer vent moisture build-up has more in-depth solutions.
Properly insulating the duct in your attic doesn't just stop condensation. It also makes your dryer run better. By keeping the exhaust air warm, it flows faster, which helps carry lint all the way out of the system.
The Importance of Regular Cleaning
Let's be clear: a vertical vent needs more attention than one going straight out the wall. Since lint can collect so easily, a consistent cleaning schedule is your best defense against poor performance and fire risks.
Even a flawless installation will accumulate lint over time. A dryer vented through the roof needs professional cleaning at least once a year to prevent dangerous blockages. The whole system, from the dryer to the roof cap, depends on powerful airflow, typically around 100-200 cubic feet per minute (CFM) for residential dryers. Any obstruction tanks that efficiency and creates a hazard.
To keep your system running safely, you need a routine.
Annual Professional Cleaning: Once a year, no exceptions. Have a pro clean the entire duct line from the back of your dryer all the way to the roof cap.
Bi-Annual Inspections: Twice a year, take a look at the roof vent cap outside. Make sure the damper flap isn't stuck or caked with lint.
Monthly Lint Trap Cleaning: This one’s a no-brainer, but it has to be said: clean your dryer’s internal lint screen after every single load.
For more information, it’s always a good idea to brush up on dryer vent cleaning and safety tips.
When to Consider a Dryer Duct Booster Fan
Sometimes, even with perfect planning, the duct run is just too long or has too many turns for your dryer's motor to handle. If your total duct length (after adding 5 feet for every 90-degree elbow) creeps past the manufacturer's limit, often around 35 feet, you might need a booster fan.
These are inline fans installed right in the ductwork. They have a sensor that kicks them on automatically when the dryer is running, giving the airflow the extra push it needs to get lint and moist air out.
A booster fan is a smart move if:
Your total effective duct length is over 35 feet.
You notice clothes are still damp after a normal cycle.
The top of your dryer feels unusually hot while running.
A booster fan helps maintain the right airflow, drastically cutting down on lint buildup and reducing fire risk. It's a proactive fix for a challenging vent route.
Knowing When to Call a Professional Installer
Taking on a project like venting a dryer through your roof can feel like a major DIY win. But let's be honest, this is a bit more involved than just hooking up a pipe. You're dealing with roof work, navigating potential building codes, and the absolute necessity of creating a permanent, watertight seal.
Knowing when to step back and call in a pro isn't admitting defeat; it's a smart move that protects your home and guarantees the job is done right from the start.
Some situations are just clear-cut. Not all roofs are the same, and what seems like a simple job on a low-pitch, single-story house can quickly become a dangerous tightrope act on another.
Red Flags That Signal You Need a Pro
Certain scenarios just raise the stakes, making professional help a very wise investment. If you run into any of these roadblocks, it’s probably time to put down the tools and pick up the phone.
A Steep or Complex Roof: If your roof has a serious pitch or is covered in delicate materials like slate or tile, the risk of a fall, or of damaging your roof, goes way up. Pros have the safety gear and experience to handle these tricky situations without incident.
An Extremely Long or Complicated Duct Run: Trying to snake a duct through a crowded attic filled with trusses, wiring, and plumbing is a puzzle. An expert knows how to calculate the effective duct length, factoring in every single bend to make sure your dryer performs efficiently and meets code.
Uncertainty About Building Codes: Local building codes aren't suggestions; they're non-negotiable rules. A professional installer lives and breathes these regulations. They'll ensure your project is fully compliant so you don't run into trouble during a future home inspection.
A professional installation gives you more than just a finished project; it gives you peace of mind. There's real value in knowing an experienced tech has properly sealed your roof against leaks and made sure your vent system is safe from fire hazards.
The Clear Benefits of Professional Installation
Hiring a professional is about more than just dodging the manual labor. It’s an investment in quality, safety, and the long-term health of your home and dryer. They bring an expertise and access to materials that the average DIYer just can’t match.
A huge advantage is guaranteed code compliance. Installers are up-to-date on the specific requirements for duct materials, where the vent can terminate, and the proper sealing methods.
They also use commercial-grade materials, like specialized roof vent caps (the DryerJack is a great example), which are leagues better than the flimsy bath fan vents you find at big-box stores. These purpose-built components are designed to shed lint without clogging up, which is a common failure point in DIY jobs.
Ultimately, a pro ensures the system is installed and optimized for safety. Their work is a direct defense against dangerous lint buildup, a leading cause of house fires. To get a better handle on this risk, you can learn more about how professional dryer vent cleaning services prevent fires. The combination of the right materials, expert technique, and a focus on safety standards makes hiring a pro the surest way to a secure and efficient dryer vent system.
Common Questions About Roof Dryer Vents
Even the most straightforward plan can hit a snag, and when it comes to a project like venting a dryer through your roof, it's natural to have questions. Homeowners often worry about everything from potential leaks to what the long-term upkeep looks like. We’ve heard them all, so we've gathered the most common ones to give you direct, practical answers and help you tackle the job with confidence.
This is all about clearing up any confusion before you start. Getting these key points sorted out now will help you make the right calls for a safe, efficient, and long-lasting installation.
Is a Roof Vent or a Wall Vent Better for a Dryer?
Honestly, the best choice comes down to your home's layout. If your laundry room is on an exterior wall, a wall vent is almost always the way to go. It offers a short, straight shot directly outside, the simplest and most efficient route.
But what if your laundry room is upstairs or stuck in the middle of the house? That’s when a roof vent becomes the better option. It provides a much more direct, vertical path for the air to escape, avoiding the need for long, winding horizontal ducts that are a nightmare for lint buildup.
The golden rule is to find the shortest, straightest path possible. A well-planned roof vent is always a better choice than a long, convoluted wall vent with multiple elbows and turns. Better airflow means a safer, more efficient dryer.
Can I Use Flexible Ducting for My Attic Roof Vent?
Absolutely not. Let me be clear: you should never, ever use flexible vinyl or foil ducts in hidden spaces like an attic, crawlspace, or inside a wall. These materials are a massive fire hazard. They’re flammable, they crush easily which restricts airflow, and their ribbed interior is the perfect trap for lint.
Building codes are crystal clear on this point. You must use rigid or semi-rigid metal ducting for the entire run. This ensures maximum safety and proper airflow. Also, make sure every joint is secured with metal clamps and sealed up tight with aluminum foil tape; never use standard cloth duct tape, which will dry out and fail.
How Often Should I Clean a Roof Dryer Vent?
Because a roof vent is a vertical run, it's naturally more susceptible to lint buildup than a horizontal one. Gravity works against you here, allowing lint to settle back down into the ductwork, which can create blockages over time.
For this reason, you need to inspect and clean the entire duct at least once a year.
For high-usage households: If you’re doing laundry for a big family or your duct run is on the longer side, cleaning it every six months is a much safer bet.
Keep an eye out for warning signs: Notice your clothes are taking forever to dry? Does the top of the dryer feel excessively hot? These are classic signs of a clog. Don't ignore them, it's time for a cleaning.
Will a Dryer Roof Vent Cause My Roof to Leak?
When installed correctly, a roof vent will not cause a leak. The secret to a completely watertight seal is the flashing. This is the metal piece that integrates the vent cap with your shingles, and getting it right is non-negotiable.
The flashing has to be layered properly with the roofing materials. It must slide under the shingles on the uphill side and lay over the shingles on the downhill side. Using a high-quality roofing sealant adds another critical layer of protection. If you have any doubt at all about your ability to create a permanent, watertight seal, this is the one step where calling in a professional is the smartest move you can make.
A properly installed and maintained roof vent is a safe, effective solution for many homes. If you have any doubts about your installation or need a professional cleaning, the certified technicians at Purified Air Duct Cleaning are here to help. We ensure your system is safe, efficient, and code-compliant. Contact us for a free quote at https://www.purifiedairductcleaning.com.