Venting Dryer Through Wall: A Clear Guide to venting dryer through wall
- Jan 13
- 12 min read
When you're figuring out how to vent a clothes dryer, pushing it straight through an exterior wall is hands-down the most direct and effective route. The idea is simple: cut a hole, run a rigid metal duct through it, and cap it with a weatherproof vent hood on the outside. This method is far superior to venting into a crawlspace or attic, options that can open the door to serious fire risks and moisture damage.
Why Proper Dryer Venting Is a Home Safety Essential
It’s easy to look at a dryer vent installation as just another weekend chore, but it’s so much more than that. Getting this right is a fundamental safety measure that protects your home and family from some pretty serious, and entirely preventable, dangers.
An improperly vented dryer is a major fire hazard. Think about it: hot, moist air is pushing highly flammable lint out of the machine. If that vent run is too long, poorly installed, or full of sharp bends, the lint gets trapped. It doesn't take much for that buildup to ignite.
The Hidden Dangers of Poor Installation
Beyond the very real risk of fire, a bad vent job can quietly cause a whole host of other problems. All that moisture from your wet clothes has to go somewhere, and if it doesn't have a clear shot outside, it'll find a place to settle inside your walls.
This trapped moisture can lead to a domino effect of issues:
Mold and Mildew Growth: Dampness inside your walls or attic is the perfect breeding ground for mold. This not only compromises your home’s structure but can also create serious respiratory health issues for your family.
Structural Damage: Over time, constant moisture will rot wood framing and weaken drywall. I've seen it happen. What starts as a small damp spot can lead to thousands in repairs.
Carbon Monoxide Exposure: This is a big one for gas dryers. If the vent is blocked or leaking, deadly, odorless carbon monoxide can seep back into your home. You can't see it or smell it, which makes it incredibly dangerous.
The numbers don't lie. According to the National Fire Protection Association (NFPA), fire departments in the U.S. responded to an average of 14,630 home fires involving clothes dryers every single year between 2014 and 2018. The leading cause? You guessed it: lint buildup.
Taking the time to properly install your dryer vent is a direct investment in your home's safety. It’s not just about appliance efficiency; it’s about preventing a catastrophic event.
A clean, professional installation also saves you headaches down the road. Improper venting is one of those common home inspection problems that can throw a wrench in a real estate deal. Ultimately, knowing the risks is the first step, and you can learn even more by reviewing our guide on how to prevent dryer fires for simple, effective tips: https://www.purifiedairductcleaning.com/post/how-to-prevent-dryer-fires-simple-tips-to-keep-your-home-safe
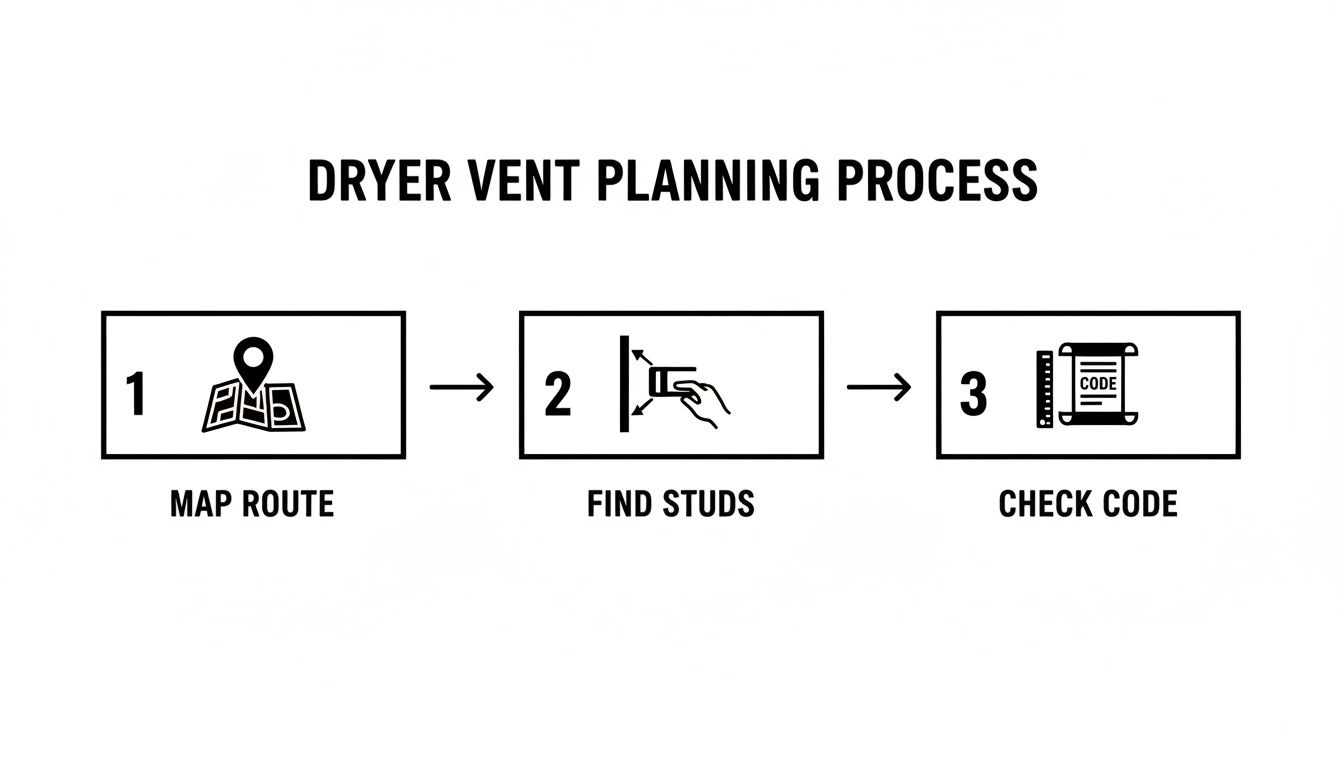
Planning Your Vent Route for Peak Safety and Efficiency
Before you even think about picking up a drill, your most important tool is a solid plan. Seriously, mapping out the vent path is the single most critical step to make sure your dryer runs like a champ and doesn't become a fire hazard. The golden rule for venting through a wall is simple: keep the route as short and straight as humanly possible.
A direct path gives lint less distance to travel, which drastically cuts down on clogs and fire risks. Every single bend or elbow you add to the duct is like a speed bump for airflow, creating the perfect little spot for lint to build up. Your goal is to find an exit point on an exterior wall that gives you a straight shot from the back of the dryer to the great outdoors.
Locating the Ideal Exit Point
First things first, you need to play detective behind your dryer. Grab a stud finder and scan the wall to see what's hiding behind the drywall. You're looking for a clear, unobstructed bay between two wall studs.
Hitting something unexpected can turn this straightforward job into a weekend-long nightmare. You need to be on the lookout for:
Electrical Wiring: This is a big one. Running into live wires is incredibly dangerous.
Plumbing Pipes: The last thing you want is to drill into a water or drain line and cause a flood.
HVAC Ductwork: Sometimes, other ducts are already running through the same wall cavity.
Once you’ve found a clear path, mark the center point where you plan to drill. A little bit of prep work now will save you a world of frustration later.
A classic rookie mistake is just assuming the wall is empty. I can't tell you how many times I've heard stories of homeowners who start drilling, only to hit a main plumbing stack. Then they're stuck patching a hole and starting all over again. Always, always use a stud finder to confirm your path is clear before you make a single cut.
Following Building Codes for a Compliant Installation
Beyond just finding a clear path, your plan absolutely has to follow local building codes. These rules are in place for your safety, and they aren't just suggestions. For instance, most codes state the maximum developed length of a dryer exhaust duct shouldn't exceed 35 feet from the dryer to the outside vent hood. That total length gets shorter with every bend, for example a single 90-degree elbow can count as 5 feet of duct.
On top of that, the exterior vent hood needs to terminate at least 3 feet away from any doors, windows, or AC units to stop exhaust from getting sucked right back into your house. While venting through a wall is usually the best approach, it's not your only choice. It's helpful to understand all the options, as we cover in our complete safety guide on venting a dryer through the roof.
Installing the Dryer Vent Through an Exterior Wall
With a solid plan in hand, you're ready to get your hands dirty. This is where we make the actual opening for venting your dryer through the wall. I know, drilling a hole in your house sounds intimidating, but with the right approach and a little patience, it's totally manageable.
Precision is the name of the game here. You'll start from the inside, marking the center point in that clear bay you found earlier. Grab a long drill bit and send a small pilot hole straight through to the outside. This tiny hole is your secret weapon, as it guarantees the big hole you cut on the exterior lines up perfectly with the one inside. Trust me, this simple trick prevents a world of frustration.
The planning you've done up to this point, mapping the route, finding the studs, and checking codes, is what makes this part go smoothly.
This just goes to show that a successful installation is all in the prep work.
Creating the Vent Opening
Once that pilot hole is through, you’ll work from both sides of the wall. Inside, attach a hole saw to your drill, typically 4.25 inches for a standard 4-inch duct, and use the pilot hole as your guide to cut through the drywall. Let the tool do the work; forcing it will just make a mess.
Now, head outside. Using that same pilot hole, repeat the process. Cutting through exterior siding and sheathing takes more oomph, so apply steady, firm pressure. It can feel a bit nerve-wracking, but this two-sided method is the key to a clean, accurate hole.
Assembling the Ductwork and Vent Hood
It’s time to put the duct system together, and this is where your choice of materials is non-negotiable. You absolutely must use rigid or semi-rigid metal ducting. Those flexible foil or plastic ducts are not only against most building codes, but they're also a massive fire hazard because they trap lint and can easily ignite.
Here’s the general flow for assembly:
Fit the Vent Hood: From the outside, slide the vent hood's pipe into the opening. Screw it securely to the exterior wall, making sure it sits flush and level.
Connect the Ducting: Back inside, push a section of rigid metal duct through the wall until it connects snugly with the pipe on the vent hood.
Seal All Connections: Every single joint and seam needs to be sealed with aluminum foil tape. Do not use standard duct tape. This creates an airtight seal that keeps hot, moist air from leaking into your wall cavity.
A rookie mistake I see all the time is using screws to connect duct sections. The screw tips poke into the duct and create little hooks that are perfect for catching lint. Over time, that buildup can become a serious fire risk. Always use aluminum foil tape for smooth, safe connections.
Ensuring a Safe and Secure Connection
The last piece of the puzzle is connecting the wall duct to the back of your dryer. Use another piece of rigid duct and metal elbows as needed. Just remember, every 90-degree elbow adds about 5 feet of resistance to your vent's total length, so try to use as few as possible.
If the project starts to feel overwhelming, or if you run into something unexpected like concrete or thick masonry, it’s always smart to hit pause. In tricky situations, consulting with a construction professional can save you a lot of trouble and ensure the job is done right.
For a more detailed walkthrough, you can also check out our ultimate DIY safety guide on how to install dryer vents. It has extra tips to help you finish the project with confidence. Getting this right is a one-time job that pays off in safety and efficiency for years to come.
Sealing and Finishing for a Professional Result
Simply getting the duct through the wall isn't crossing the finish line. The real mark of a quality job is in the final details; this is what separates a sloppy, amateur effort from a secure, professional installation that will protect your home from weather and energy loss.
A proper seal is more than just cosmetic; it's a critical barrier against the outside world. An unsealed vent is basically an open door for rain, drafts, and pests to sneak into your walls. Taking a few extra minutes here will absolutely pay off for years to come.
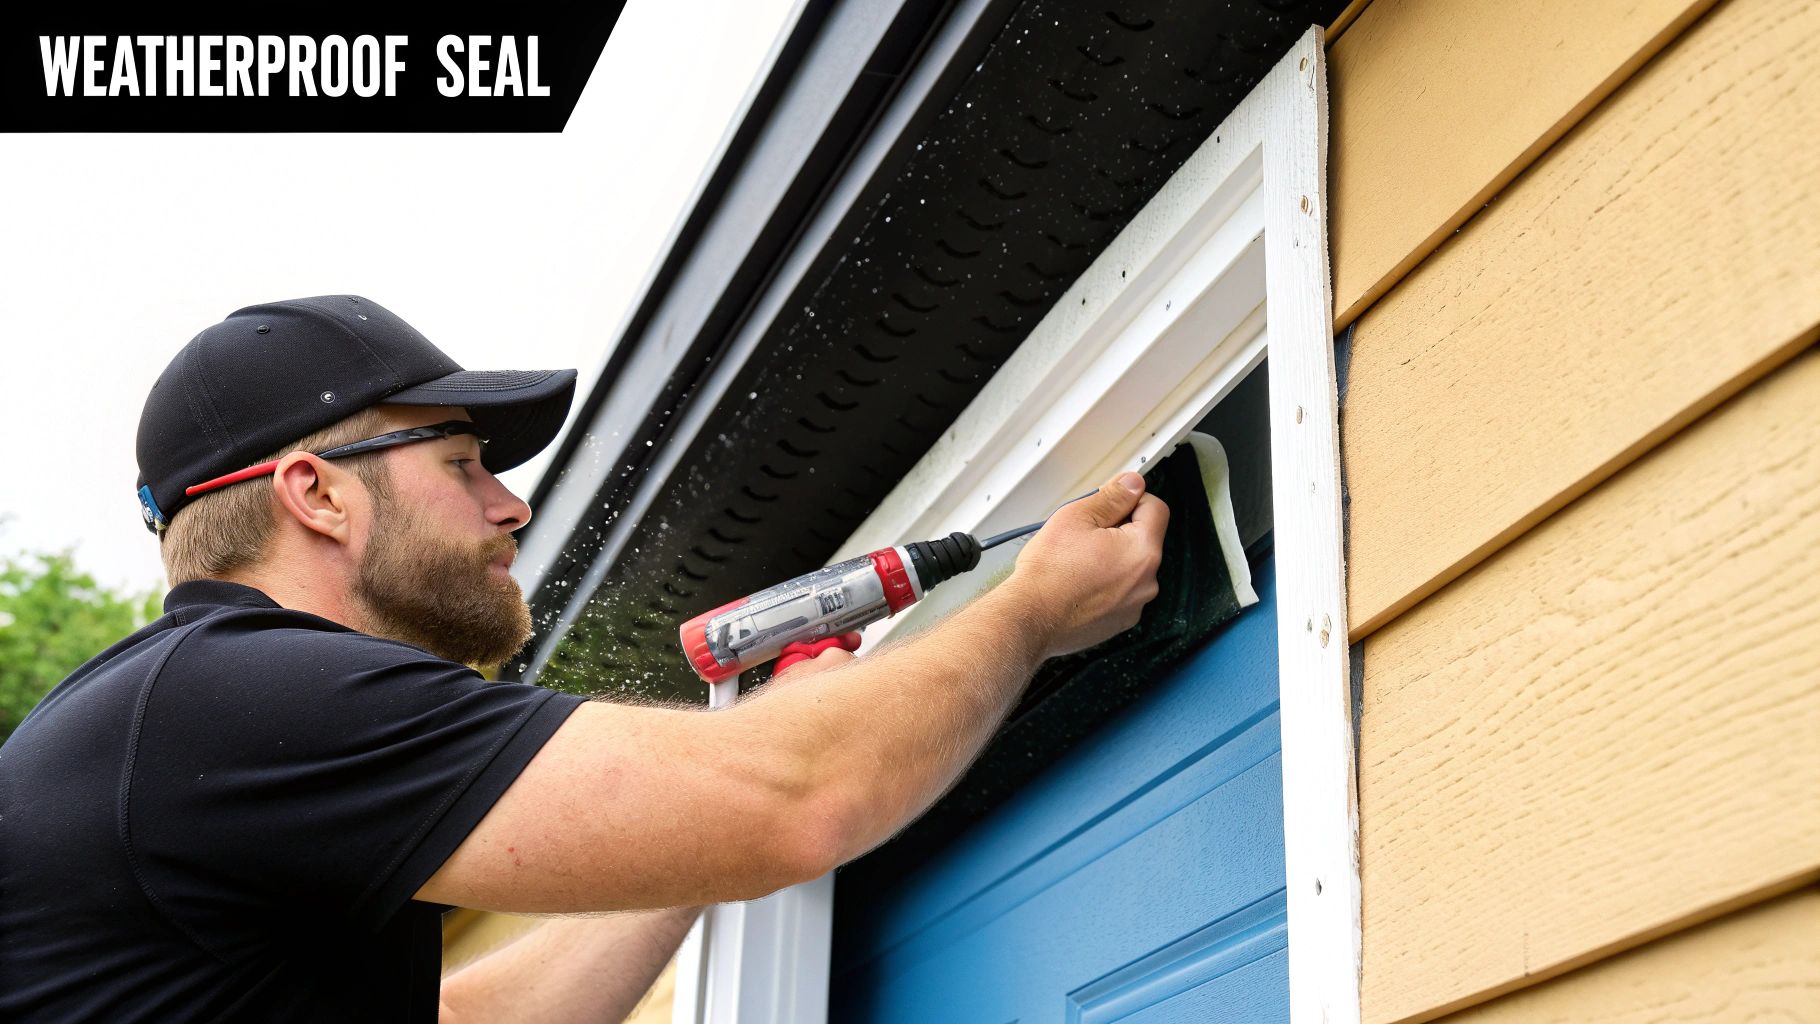
Creating a Weatherproof Exterior Seal
Your first line of defense is on the outside of your house. Once you have the vent hood screwed firmly to the siding, you need to create a durable, weatherproof seal around the entire thing.
Grab a high-quality, exterior-grade caulk rated for outdoor use. Make sure it’s designed to stick to your specific siding material, whether that’s vinyl, wood, brick, or fiber cement. You’ll apply a continuous bead of caulk where the flange of the vent hood meets the wall. This simple step is what stops water from seeping behind the vent and into your wall cavity, which can lead to rot and mold.
For a clean look, smooth the caulk bead with a damp finger or a small caulking tool. The goal is a seamless transition that completely blocks any path for moisture or bugs.
Don't skip the exterior caulk. I've seen homeowners ignore this step, only to discover water damage and drafty rooms months later. It's a five-minute task that prevents a thousand-dollar problem.
Insulating and Finishing the Interior
Now, head back inside. You'll probably see a small gap between the metal duct and the hole you cut in the drywall. If you leave this gap as-is, you’re creating a major source of energy loss. Cold air will pour in during the winter, and hot, humid air will find its way in during the summer.
To fix this, get a can of low-expansion spray foam insulation, the kind made for filling gaps around windows and doors. Carefully spray it into the space around the duct, and the foam will expand to create a perfect airtight seal. This prevents drafts and helps maintain your home's energy efficiency. This is a core part of what effective duct sealing is all about, and you can learn more about how to understand how it can save you money on your utility bills.
Once the foam has cured (check the can for times), you can trim any excess so it’s flush with the wall. To really give it a polished, professional look that hides the opening, install a trim plate or wall escutcheon. These plates are made to fit snugly around the duct and cover any ragged drywall edges, giving your venting dryer through wall project a clean, finished appearance.
Avoiding Common Pitfalls and Keeping Your Vent Clear for the Long Haul
Getting your new dryer vent installed is a fantastic feeling, but don't pack up the tools just yet. A top-notch installation can quickly turn into a hazard if you fall for a few common mistakes or let maintenance slide. Frankly, knowing what not to do is just as critical as getting the installation right in the first place.
Many DIY projects are doomed from the start by simple, preventable errors. These slip-ups don't just hurt your dryer's efficiency and drive up your energy bills; they create genuinely dangerous situations. A poorly installed or neglected vent is a significant fire risk waiting to happen.
Costly Mistakes to Sidestep During Installation
The single biggest mistake I see is people using the wrong materials. Those flexible vinyl or foil accordion-style ducts you see at every big-box store? They're a massive fire hazard. Their ridged interior is a lint magnet, and the thin material gets crushed easily, which creates an instant blockage. When you're venting through a wall, always, always use smooth, rigid metal ducting.
Another common problem is making the vent path too long or full of twists and turns. As a rule of thumb, try to keep the total duct length under 35 feet. But here's the kicker: every 90-degree elbow you add is like adding 5 feet of extra pipe because of how much it restricts airflow. A long, winding vent makes it incredibly difficult for your dryer to push out all the lint, causing it to build up fast.
Finally, be strategic about where the exterior vent hood goes. If you place it too low to the ground, tuck it under a deck, or let bushes grow over it, you're choking off the airflow. All that lint has nowhere to go and just builds up at the exit, completely defeating the purpose of the vent.
A Simple Maintenance Routine for Safety and Peace of Mind
With your vent installed the right way, a little bit of upkeep is all it takes to keep it working safely and efficiently. You don't need to be a pro for this part; you just need to be consistent.
Here’s a practical schedule that works:
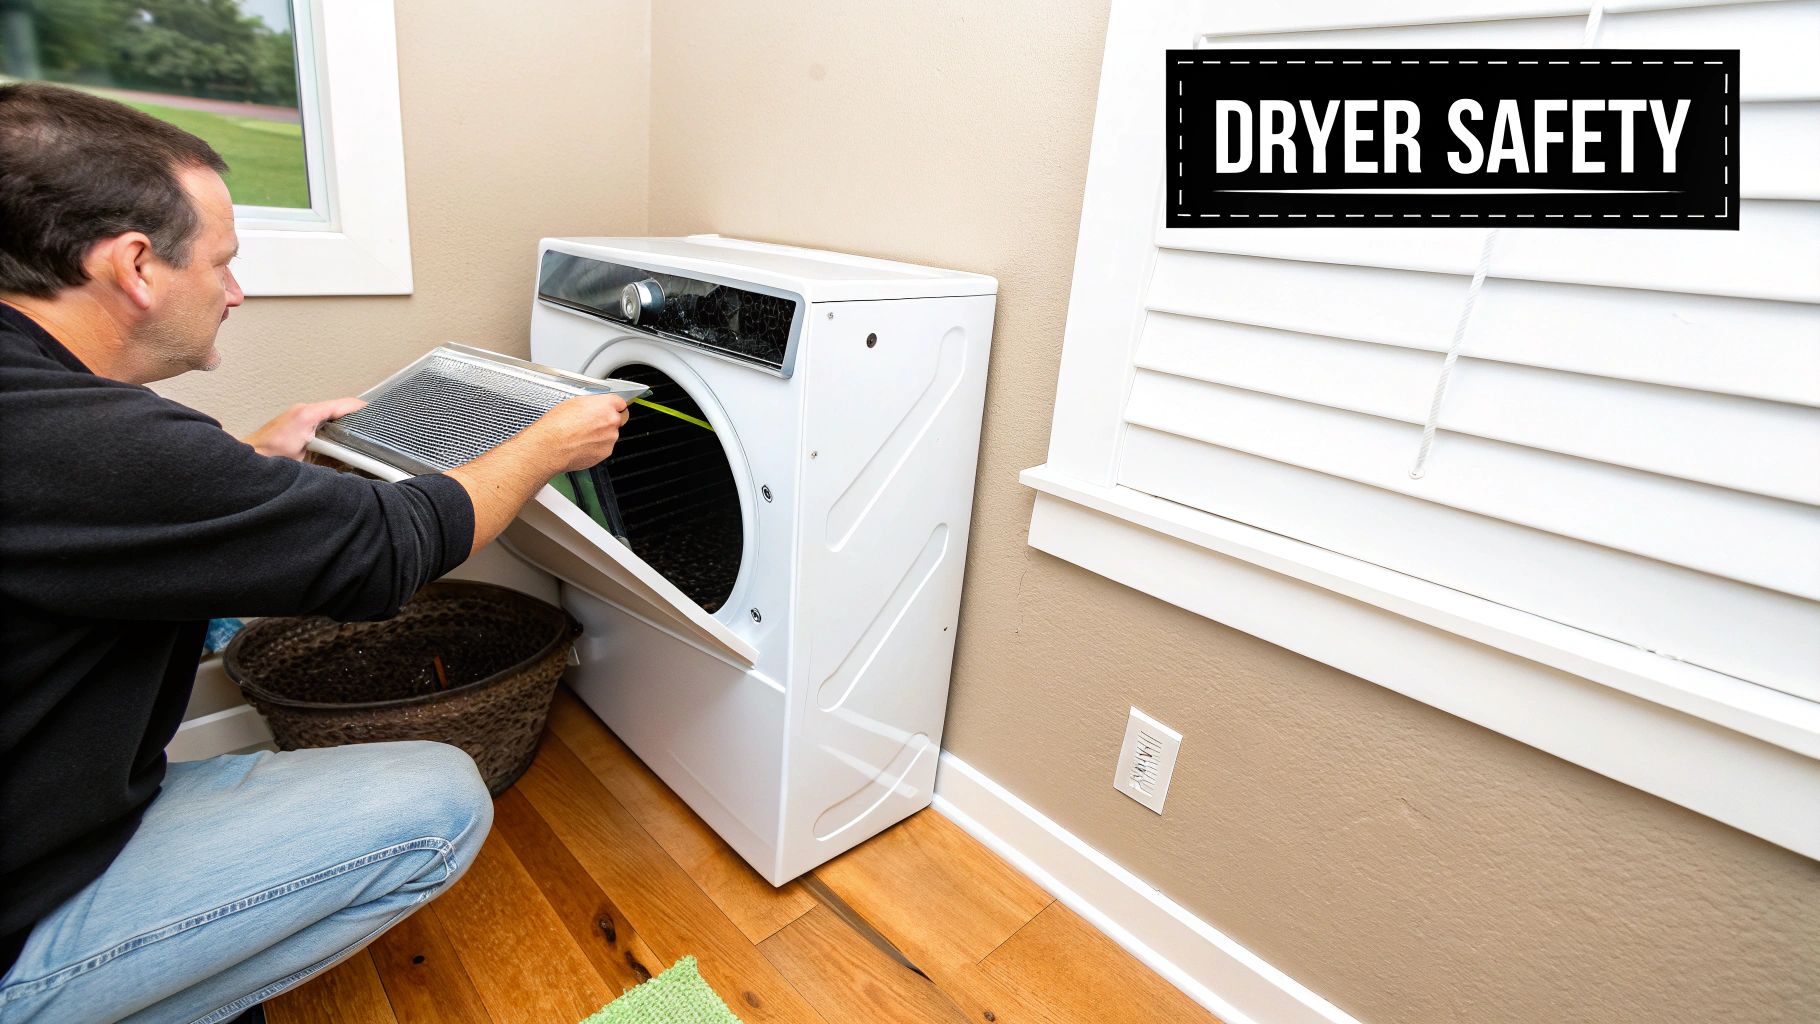
After Every Load: This one's easy. Clean your dryer's lint screen. A full screen is the first domino to fall in a clogged vent system.
Every Few Months: Pull the dryer out from the wall, disconnect the duct, and use a vacuum to clear out any lint buildup right at the connection point. While you're at it, pop outside and make sure the exterior vent flap opens and closes freely without being stuck by debris or a bird's nest.
Once a Year: This is the big one. At least annually, the entire duct needs a thorough cleaning from the back of your dryer all the way to the outside wall. You can buy a special brush kit and do it yourself or call in a professional service.
Neglecting that annual clean-out is like never changing the oil in your car. It might seem okay for a while, but you're setting yourself up for a catastrophic failure. Dryer lint is incredibly flammable, and a yearly cleaning is the single most effective thing you can do to prevent a devastating house fire.
Pay attention to your dryer's performance. If clothes suddenly take forever to dry, feel unusually hot at the end of a cycle, or you smell something burning, those are serious red flags. Stop using it and clean the vent immediately. For a complete breakdown of best practices, check out The Essential Guide to Dryer Vent Maintenance to keep your system running safely.
Common Questions About Dryer Venting
Even with a step-by-step guide, it's natural to have a few questions pop up when you're in the middle of a project like this. Let's tackle some of the most common ones we hear from homeowners.
Can I Just Vent My Dryer Inside?
Absolutely not. We see this question a lot, and the answer is always a hard no. Those "indoor vent kits" you see at the store are a terrible idea. They don't trap all the lint, which is a major fire hazard, and they pump gallons of moisture into your home's air. This is a recipe for mold, mildew, and even structural rot down the road.
Is It Okay to Use Flexible Vinyl or Foil Ducting?
Another definite no. You should never, ever use that flimsy, white plastic or slinky-style foil ducting for a dryer. Most building codes have outlawed them for a reason: the accordion-like ridges are perfect traps for lint. The material also crushes easily, which creates an instant blockage. Always stick with smooth-walled rigid or semi-rigid metal ducting for a safe installation that meets code.
Your choice of ducting material isn't just a recommendation; it's one of the most critical safety decisions you'll make. Using the wrong type of duct is a leading cause of dryer fires.
How Often Should I Clean My Dryer Vent?
You should schedule a full, professional cleaning of the entire vent line, from the back of the dryer to the outside wall cap, at least once per year.
On your own, you should be cleaning the lint screen inside the dryer after every single load. It’s also a good habit to peek at the exterior vent opening every few months to make sure it isn't blocked by leaves, snow, or a bird's nest. If you ever notice your clothes are taking longer than usual to dry, that's a huge red flag that your vent needs to be cleaned immediately.
What About Venting Through the Roof?
While it’s technically possible to vent a dryer through the roof, we generally advise against it. A vertical run is much harder for the dryer's blower to push lint up and out, making clogs far more likely. Cleaning a roof vent is also a much bigger, more dangerous job, so it often gets neglected, which only increases the long-term fire risk compared to a simple, straight shot through a wall.
A properly installed and maintained dryer vent is something you can't afford to overlook for your home's safety and your dryer's efficiency. If you're feeling unsure about any step or want the peace of mind that comes with a professional inspection and cleaning, the certified technicians at Purified Air Duct Cleaning are here to help. Make sure your system is safe and running right by visiting us at https://www.purifiedairductcleaning.com to schedule your service.